TL;DR
To set up DMARC in Google Workspace, confirm SPF and DKIM are already authenticating your domain, then publish a DMARC TXT record at _dmarc.yourdomain.com in your DNS host. Start with the policy, v=DMARC1; p=none; rua=mailto:you@yourdomain.com, watch the reports, and then tighten to quarantine and reject.
- DMARC lives in your DNS host, not the Google Admin console. You set up SPF and DKIM inside Google, then add DMARC at your registrar.
- Turn on SPF and DKIM first and let them authenticate for 48 hours before you publish DMARC.
- Since February 2024, Google and Yahoo require a DMARC policy for any domain sending more than 5,000 messages a day to Gmail.
- Always begin at p=none, read the reports and move to quarantine and then reject as your traffic proves clean.
If your emails are landing in spam, seeing low engagement, or struggling to reach the inbox, email authentication may be one of the first areas to investigate. Mailbox providers like Gmail and Yahoo increasingly rely on authentication signals to determine whether a message is legitimate, making proper domain authentication essential for both security and deliverability.
DMARC is one of the most important email authentication protocols for protecting your domain from spoofing and impersonation attacks. Working alongside SPF and DKIM, it helps mailbox providers verify that emails sent from your domain are authentic while giving you greater visibility into who is sending on your behalf.
Whether you’re sending business emails, marketing campaigns, or cold outreach through Google Workspace, a properly configured DMARC record can help strengthen sender trust and support better inbox placement.
In this guide, you’ll learn how to set up DMARC in Google Workspace step by step, verify your configuration, and follow best practices for email security and deliverability.
Table of Contents
What Is DMARC And How Does It Work?
DMARC stands for Domain-based Message Authentication, Reporting, and Conformance. It is an email authentication standard, defined in RFC 7489, that tells receiving servers what to do with messages that claim to come from your domain but fail your other authentication checks. It also sends you reports on who is sending mail using your domain, both legitimate and not.
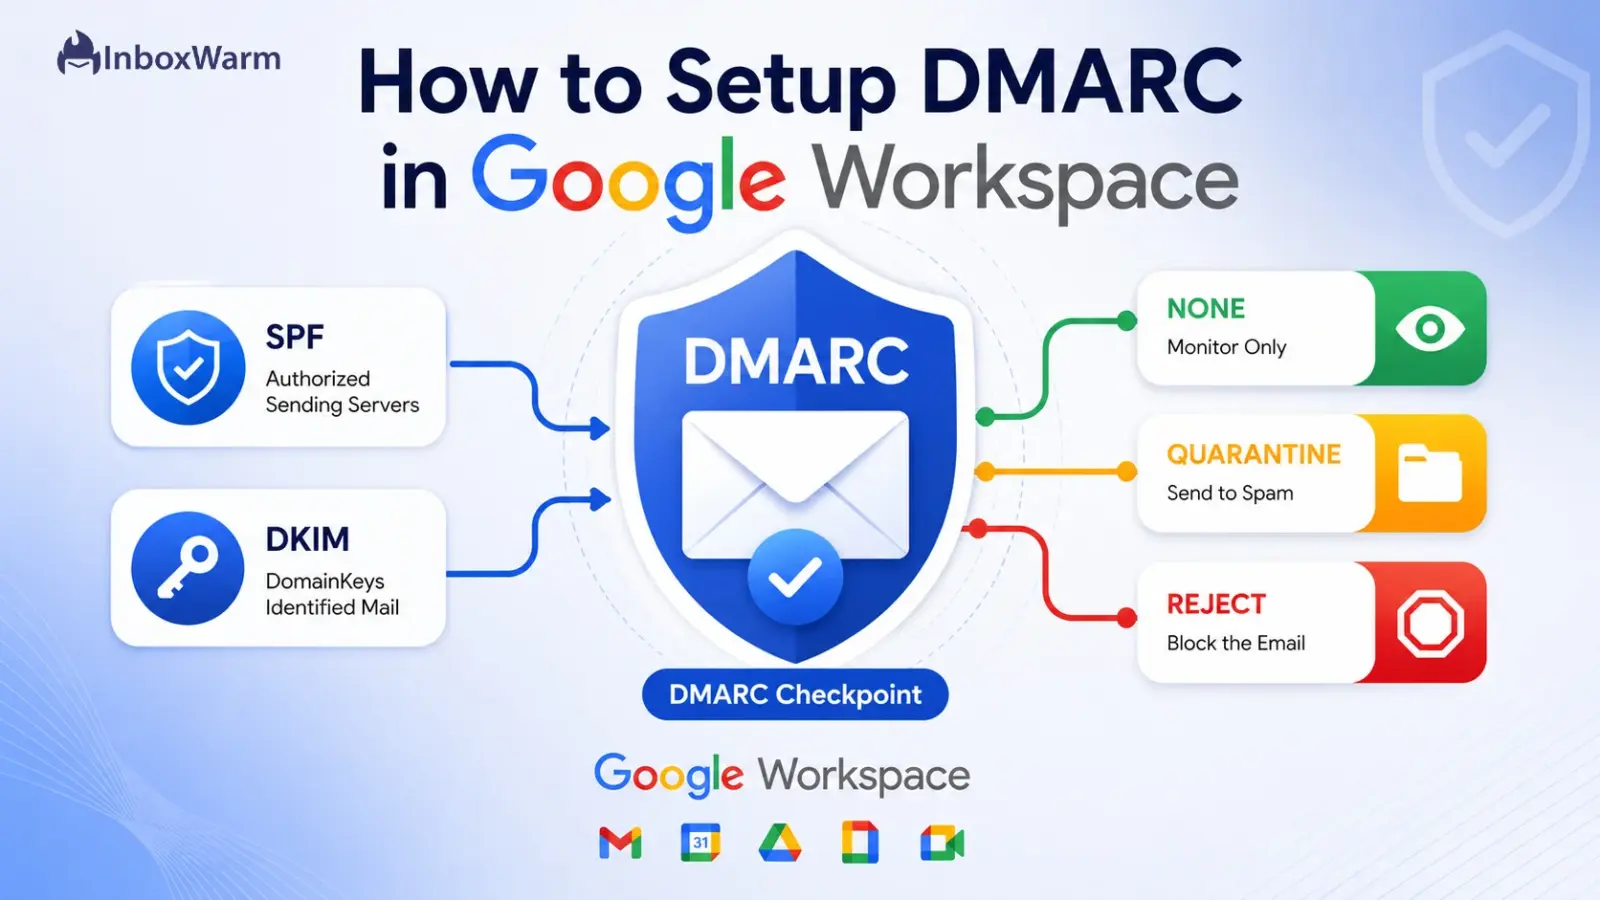
DMARC does not work alone. It sits on top of two older standards, SPF and DKIM, and adds three things they lack: a published policy (what action to take on failures), alignment (making sure the authenticated domain matches the visible “From” address), and reporting (visibility into every source sending as you).
How DMARC Works
When Gmail receives a message that claims to be from your domain, it runs a sequence of checks before deciding what to do with it:
- It looks up your SPF and DKIM results for the message.
- It then checks alignment, confirming the authenticated domain matches the domain in the visible From header.
- To pass DMARC, the message must pass at least one of two paths: SPF authentication with SPF alignment or DKIM authentication with DKIM alignment.
- If the message passes either path, it clears DMARC and is delivered normally.
- If it fails both paths, the receiving server reads your DMARC record and applies the policy you published: none, quarantine, or reject.
How SPF, DKIM, And DMARC Work Together
Each protocol answers a different question. Understanding the division of labor makes the setup steps that follow much clearer.
| Protocol | What It Does | Where You Configure It |
|---|---|---|
| SPF | Lists the servers allowed to send mail for your domain (RFC 7208). | A TXT record in your DNS host. |
| DKIM | Adds a cryptographic signature that proves the message was not altered (RFC 6376). | Generated in the Google Admin console, published in DNS. |
| DMARC | Sets the policy for failures and requests reports (RFC 7489). | A TXT record in your DNS host. |
Each protocol is published as an open standard: SPF in RFC 7208, DKIM in RFC 6376, and DMARC in RFC 7489. If any term here is unfamiliar, the InboxWarm email deliverability glossary defines each authentication concept in plain language.
Why Should You Set Up DMARC In Google Workspace?
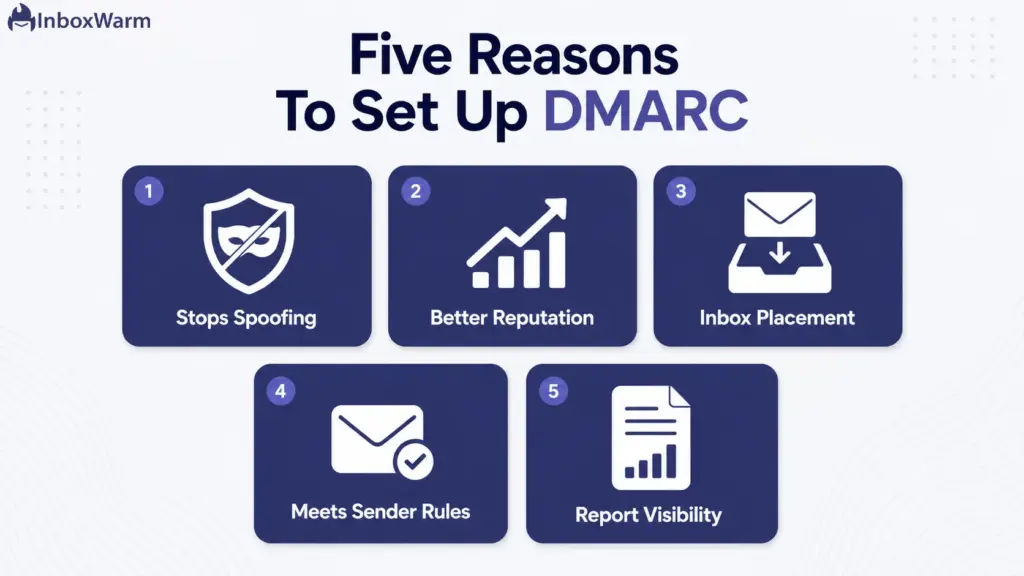
DMARC protects your domain from impersonation, improves how mailbox providers treat your mail, and keeps you compliant with the sender requirements that now gate the inbox.
Here is what each benefit means in practice.
Prevent Email Spoofing And Phishing
Spoofing is when someone forges your domain in the From address to make a fraudulent email look legitimate. A reject policy tells receiving servers to throw those forged messages away before they reach anyone. This protects your customers, your partners, and the reputation of your domain.
Improve Your Sender Reputation
Mailbox providers track how trustworthy a sending domain is over time. A domain with enforced authentication signals that you control your mail stream and are not a source of abuse. That trust compounds, and a stronger sender reputation means more of your legitimate mail reaches the inbox.
Boost Deliverability And Inbox Placement
Authentication is one of the first things Gmail evaluates before deciding whether a message lands in the inbox or the spam folder. DMARC, paired with consistent sending and a warmed-up domain, supports better inbox placement.
If you are sending from a new or cold Google Workspace domain, pairing DMARC with Gmail warm-up helps you build the sending history that placement depends on.
Meet Google And Yahoo Sender Requirements
Since February 1, 2024, senders of more than 5,000 messages a day to Gmail must authenticate with SPF, DKIM, and DMARC, offer one-click unsubscribe, and keep their spam complaint rate below 0.3%. Google recommends staying under 0.1%. These are no longer best practices. They are enforced requirements set out in Google’s Email sender guidelines, and DMARC is part of the baseline.
Gain Visibility Through DMARC Reports
DMARC aggregate reports show you every IP address and service sending mail under your domain. This is often the first time an admin discovers a forgotten marketing tool, a misconfigured app, or an outright impersonation attempt. You cannot fix what you cannot see, and reports are how you see it.
Bulk sender note: Google states its defenses already block nearly 15 billion unwanted messages a day. Enforcement of the sender rules tightened through late 2025, so treat DMARC as mandatory if you send at any real volume.
What Do You Need Before Setting Up DMARC?
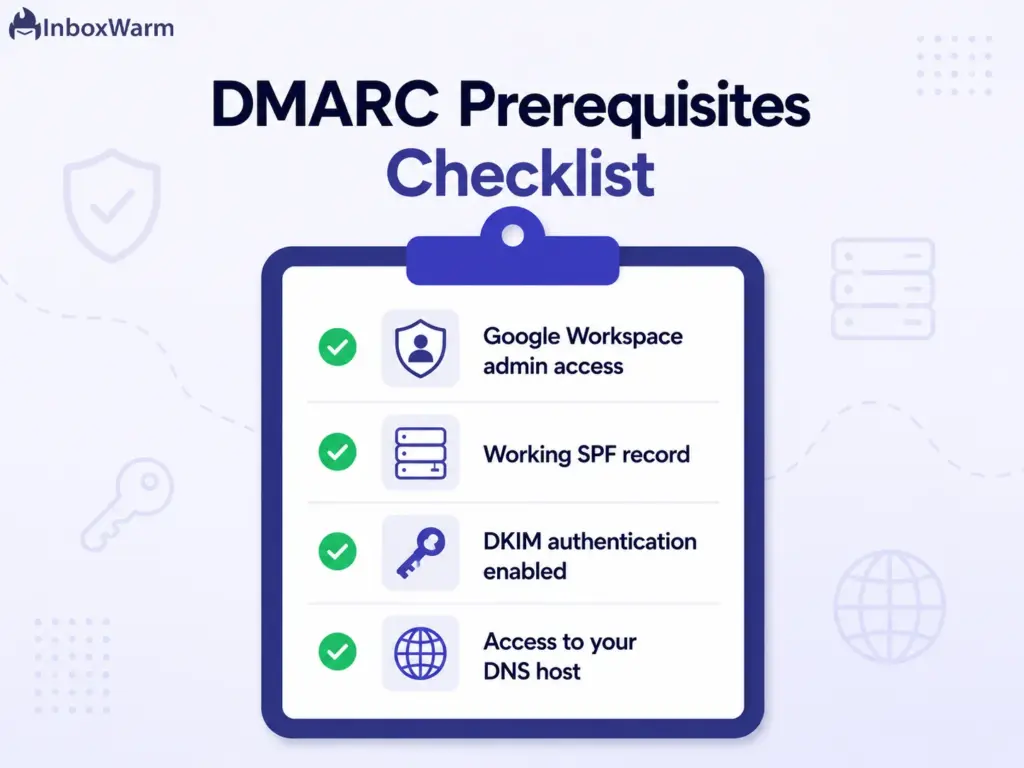
DMARC only works once SPF and DKIM are in place and authenticating. Confirm these four prerequisites before you publish anything, because a DMARC record on top of broken authentication will quietly send your own legitimate mail to spam.
Google Workspace Admin Access
You need a Google Workspace account with administrator privileges to reach the Admin console at admin.google.com. DKIM is generated there. A super admin role avoids permission roadblocks during setup.
A Working SPF Record
Your domain needs an SPF record that authorizes Google to send on its behalf. For Google Workspace, that means including Google’s mail servers in your SPF TXT record. SPF should already be authenticating before you add DMARC.
DKIM Authentication Enabled
DKIM signing must be generated in the Admin console and published in your DNS. Google does not enable DKIM by default, so even established domains often need this step. DKIM is the more reliable of the two alignment paths, so do not skip it.
Access To Your DNS Host
DMARC is published as a TXT record at your domain registrar or DNS host, such as GoDaddy, Cloudflare, or Namecheap. You need login access to the DNS management area for your domain. If you are unsure who hosts your DNS, your registrar is the place to start.
How Do You Set Up DMARC In Google Workspace Step-by-Step?
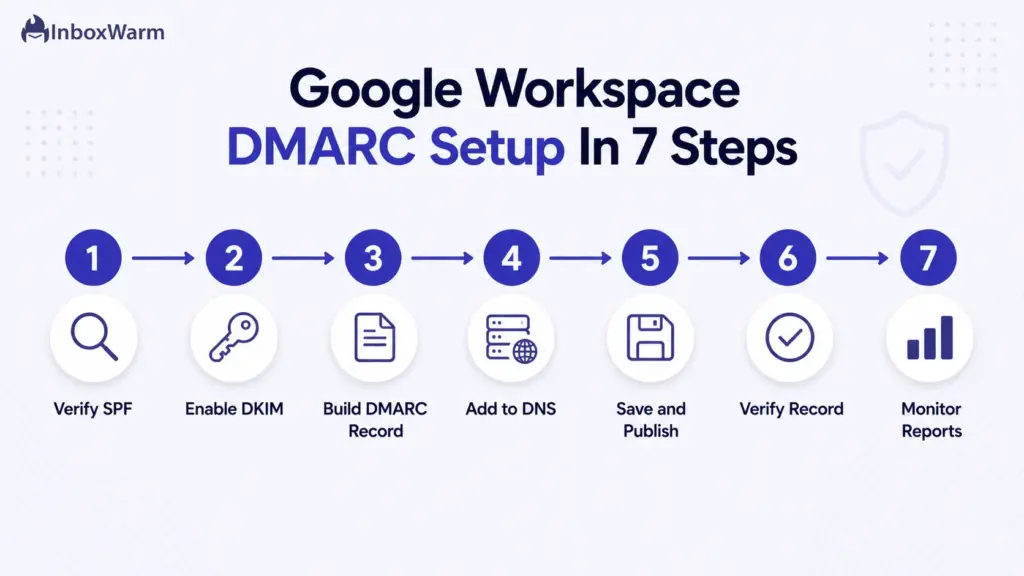
There are seven steps: verify SPF, enable DKIM, build your DMARC record, add it to your DNS, save and publish, verify the record, and monitor reports. You do not configure DMARC inside Google. Google’s role is SPF and DKIM. DMARC itself is published at your DNS host.
Step 1: Verify Your SPF Record
Confirm that SPF authorizes Google to send for your domain before touching DMARC. Open the DNS settings at your host and look for a TXT record at your root domain that begins with v=spf1. It should include Google’s sending servers.
Google Workspace SPF record
v=spf1 include:_spf.google.com ~all
The include:_spf.google.com mechanism authorizes Google’s mail servers and consumes 4 of the 10 DNS lookups SPF allows, so keep your record lean. Use a free SPF checker to confirm the record resolves and passes before moving on. You should have only one SPF record per domain.
Step 2: Enable DKIM Authentication In Google Workspace
Generate and turn on DKIM signing inside the Admin console, then publish the key in your DNS. In the Google Admin console, go to Apps, then Google Workspace, then Gmail, then Authenticate Email. Select your domain and click Generate New Record.
- Choose a 2048-bit key length when your DNS host supports it. It is more secure than 1024-bit.
- Leave the selector prefix as “google” unless that selector is already in use.
- Click Generate. Google produces a TXT record value that starts with v=DKIM1; k=rsa; p=…
- Add that value to your DNS as a TXT record at google._domainkey.yourdomain.com.
- Wait for the record to propagate, then return to Authenticate Email and click Start Authentication.
Propagation usually takes under an hour but can run up to 48 hours. When Google confirms the record, the status changes to Authenticating email with DKIM. Confirm it independently with a DKIM checker. A common error is copying the key with a trailing space or line break, which silently breaks authentication. Google’s Set up DKIM guide documents the same flow if you need a reference.
Step 3: Create Your DMARC Record
Build the line of text that defines your policy and where reports are sent. A DMARC record is a set of tag-value pairs separated by semicolons. The v and p tags must come first. Every other tag is optional and can appear in any order. Start with a monitoring policy so you observe without affecting delivery.
Starter DMARC record
v=DMARC1; p=none; rua=mailto:dmarc-reports@yourdomain.com; pct=100; adkim=s; aspf=s
Before you finalize the record, set up a dedicated mailbox or group to receive reports. The rua address can collect a high volume of mail, so a shared mailbox keeps your personal inbox clear. Google recommends using a dedicated mailbox, a group, or a third-party report service rather than your own address.
If you would rather not hand-write the syntax, the DMARC record generator builds a valid record from your domain and chosen policy. The full tag reference appears in the record examples section below.
Step 4: Add The DMARC TXT Record To Your DNS
Publish the record at your DNS host, because nothing about DMARC is configured inside Google. As Google’s own Set up DMARC documentation confirms, you add the record at your registrar, not in the admin console. Sign in to the registrar or DNS host where your domain lives, find the DNS or TXT records page, and add a new TXT record with these values.
| Field | Value To Enter |
|---|---|
| Type | TXT |
| Host / Name | _dmarc.yourdomain.com (replace with your domain) |
| Value | v=DMARC1; p=none; rua=mailto:dmarc-reports@yourdomain.com; pct=100; adkim=s; aspf=s |
| TTL | Leave the default, or 3600 seconds (1 hour) |
Some hosts append your domain name automatically, so you may only need to enter _dmarc in the host field.
After saving, double-check that the published record reads _dmarc.yourdomain.com and not something doubled like _dmarc.yourdomain.com.yourdomain.com.
Step 5: Publish And Save Your Changes
Save the TXT record and allow time for DNS to update across the internet. Most DNS changes propagate within an hour, though full global propagation can take up to 48 hours. If you manage more than one sending domain, repeat the process for each one, since every domain needs its own DMARC record and can carry its own policy.
Step 6: Verify Your DMARC Record
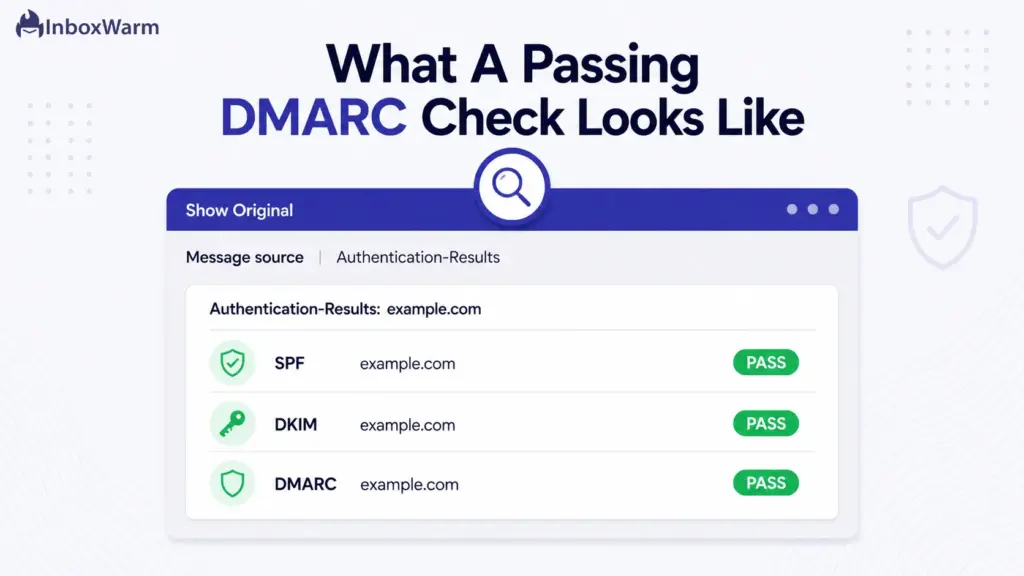
Confirm the record is live and syntactically correct before you trust it. Run your domain through a DMARC checker or any DMARC lookup tool. A correct result shows your published policy (p=none to start), the RUA address, and a valid v=DMARC1 tag with no syntax errors. You can also send a test message to a Gmail address, open the message, and check the original headers for dmarc=pass.
Step 7: Monitor DMARC Reports
Read the aggregate reports that arrive at your RUA address and use them to find every legitimate source before you tighten the policy. Reports are XML files that list the sending IPs, the volume from each, and whether they passed SPF, DKIM, and alignment. Large senders can receive hundreds or thousands of reports a day, which is why a parsing service or dashboard is worth using. Only after every legitimate source passes should you move from “none” to “quarantine” and later to “reject.”
What Are Some DMARC Record Examples For Google Workspace?
The right record depends on where you are in the rollout. Below are working examples for each policy level, followed by the record most businesses should publish first. Replace yourdomain.com with your real domain in every example.
DMARC Monitoring Policy (p=none)
This is the safe starting point. It takes no action on failing mail and simply collects reports, so it cannot harm delivery while you learn who sends as you.
DMARC Quarantine Policy (p=quarantine)
Once your legitimate sources pass cleanly, quarantine sends failing mail to the spam folder instead of the inbox. It is the middle rung between monitoring and full rejection.
DMARC Reject Policy (p=reject)
Reject is the strongest policy. Receiving servers throw away mail that fails authentication, which gives you maximum protection against spoofing. Only move here after quarantine has run without false positives.
Recommended DMARC Record For Most Businesses
Start every domain here. This record monitors without risk, sends reports to a dedicated mailbox, and applies to 100% of your mail. Tighten the policy in stages once the reports confirm your sources are clean.
Here is what each tag in those records controls.
| Tag | Required | What It Does |
|---|---|---|
| v | Yes | DMARC version. It must be DMARC1 and must be listed first. |
| p | Yes | Policy for failing mail: none, quarantine, or reject. Listed second. |
| rua | Recommended | Email address for aggregate reports. Must use the mailto: prefix. |
| pct | Optional | Percent of failing mail the policy applies to, from 1 to 100. Defaults to 100. |
| sp | Optional | Separate policy for subdomains. Inherits p if omitted. |
| adkim | Optional | DKIM alignment: s for strict, r for relaxed (default). |
| aspf | Optional | SPF alignment: s for strict, r for relaxed (default). |
| ruf | Not supported | Forensic report address. Gmail does not support this tag. |
Relaxed alignment (the default) is enough for most domains. Use strict alignment only when mail is sent from subdomains outside your control, since strict settings can cause legitimate subdomain mail to be rejected.
How Do You Verify Your DMARC Setup?
Verification confirms the record is published, valid, and actually authenticating your mail. Run all four checks rather than trusting a single green light.
Check Your DNS Record
Query the TXT record at _dmarc.yourdomain.com directly. On the command line you can run a DNS lookup or use any online TXT record viewer. You should see exactly one record beginning with v=DMARC1. More than one DMARC record at that host is invalid and will be ignored by receivers.
Use A DMARC Lookup Tool
A DMARC checker parses your record and flags syntax problems a raw lookup will not catch, such as a missing prefix or a malformed RUA address. It confirms the policy level you actually published.
Test SPF And DKIM Alignment
DMARC only passes when SPF or DKIM also aligns with your From domain. Send a message to a Gmail account, open it, choose “Show original,” and look for spf=pass, dkim=pass, “dmarc=pass.” If DMARC fails while SPF or DKIM passes, alignment is the likely culprit.
Review DMARC Reports
The reports at your RUA address are the real proof. They show whether mail from every source is passing in the field, not just in a test. Give the reports a week or two at p=none before drawing conclusions, since they reveal sending patterns a single test cannot.
What Are The Most Common DMARC Setup Mistakes?
Most DMARC problems trace back to a handful of avoidable errors. Watch for these before and after you publish.
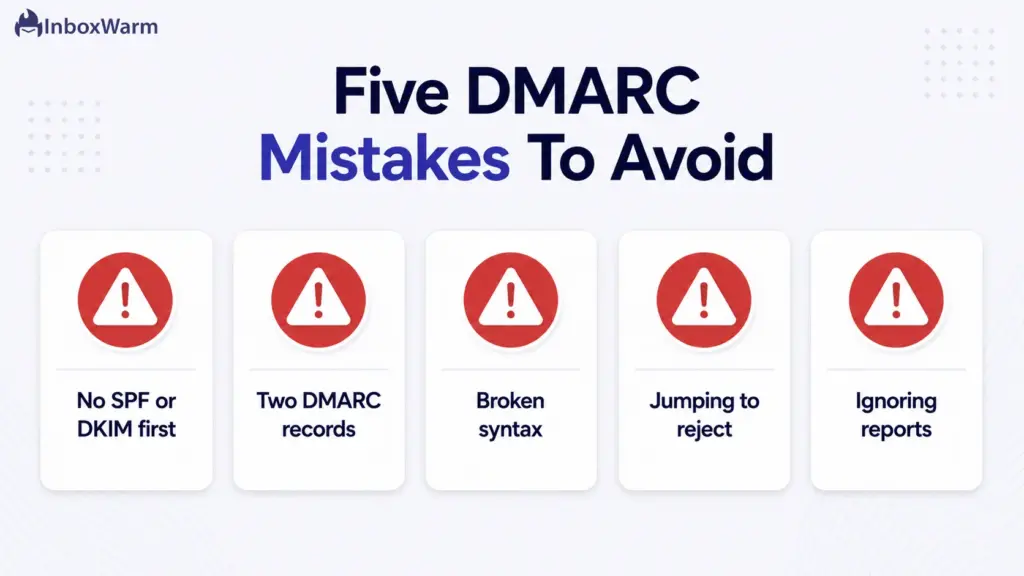
- Publishing DMARC without SPF or DKIM. DMARC has nothing to enforce against, and a strict policy can send your own mail to spam. Set up both first, and let them run for 48 hours.
- Using multiple DMARC records. Only one TXT record is allowed at _dmarc. Two or more are invalid, and receivers ignore the policy entirely.
- Incorrect DMARC syntax. A missing semicolon, a URL address without the mailto: prefix, or v and p out of order will break the record. Validate before you trust it.
- Moving to a reject policy too soon. Jumping straight to p=reject before reports are clean can block legitimate mail from tools you forgot about. Roll out in stages.
- Ignoring DMARC reports. A record set to none that no one reads gives you compliance on paper and zero protection in practice. The reports are the point.
What Are The Best Practices For DMARC And Deliverability?
A safe DMARC rollout is gradual and report-driven. Follow this sequence to reach enforcement without breaking delivery.
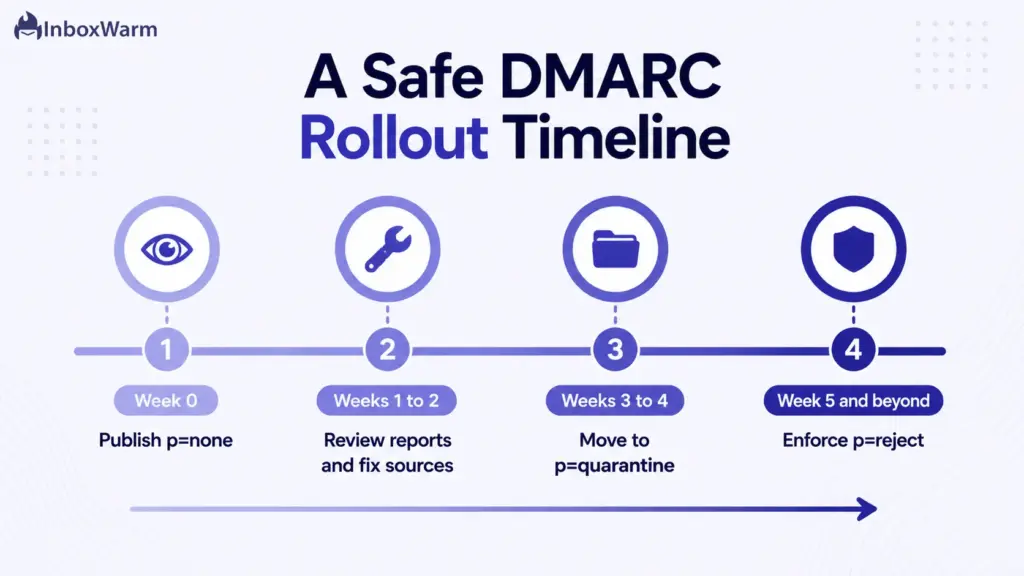
Start With A Monitoring Policy (p = none)
Publish p=none first so you collect reports without affecting any mail. This phase is about discovery, not enforcement. Stay here until you can account for every sending source.
Ensure SPF And DKIM Are Properly Aligned
Confirm that the domain in your From header aligns with the domain authenticated by SPF or DKIM. Alignment, not just authentication, is what DMARC checks. Fix any third-party sender that fails alignment before you tighten the policy.
Review DMARC Reports Regularly
Make report review a routine, not a one-time task. New tools, vendors, and campaigns appear over time, and each one shows up in your reports. A parsing dashboard turns raw XML into a clear list of who is passing and who is not.
Gradually Move From None To Quarantine
Once legitimate sources pass consistently, move to p=quarantine. Failing mail now goes to spam rather than the inbox, which contains spoofing while you confirm nothing legitimate is caught. You can also ramp the pct tag upward in stages.
Implement a Reject Policy For Maximum Protection
When quarantine has run without false positives, move to p=reject. This is the policy that fully blocks impersonation, and it is the goal of any serious DMARC deployment. It is also the level that gives mailbox providers the strongest trust signal.
Monitor Email Deliverability Performance
Authentication is necessary but not sufficient for inbox placement. Keep watching your deliverability, complaint rate, and sending consistency after DMARC is live. For new or low-volume Google Workspace domains, Gmail warm-up builds the reputation that lets authenticated mail actually land in the inbox.
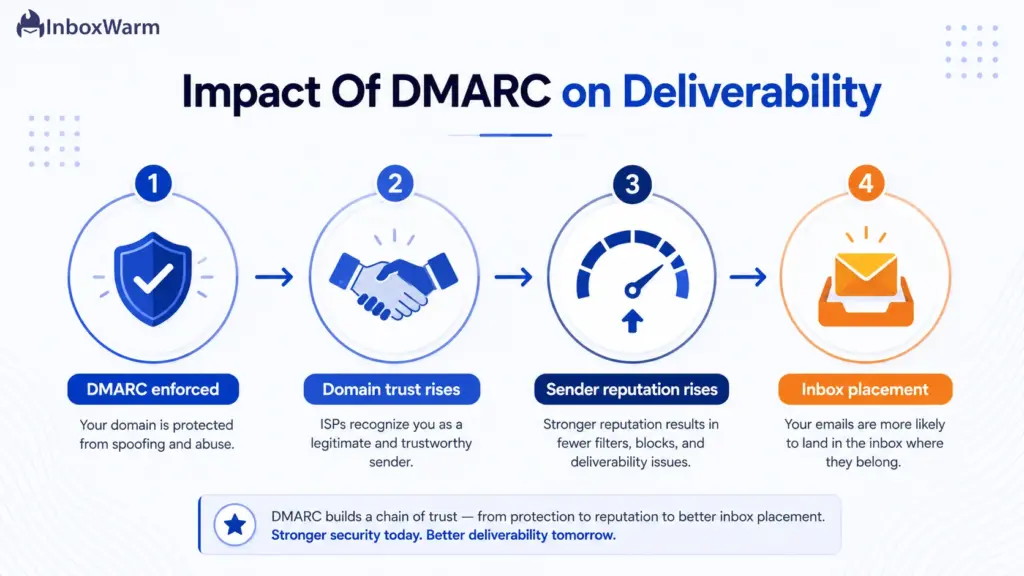
How Does DMARC Impact Email Deliverability?
DMARC influences email deliverability indirectly but powerfully by shaping how mailbox providers trust and treat your domain.
Here is how the pieces connect.
- Strengthens domain trust. An enforced policy signals to receivers that you control your mail stream and stand behind every message sent as you.
- Improves sender reputation. Consistent authentication is one of the inputs that providers weigh when scoring your domain over time.
- Reduces spoofing risk. Blocking forged mail keeps abuse off your domain, which protects the reputation your real mail depends on.
- Supports better inbox placement. Passing DMARC removes an authentication red flag, giving your legitimate mail a clearer path to the inbox.
- Meets authentication compliance. DMARC keeps you aligned with Google and Yahoo sender requirements, which is now a precondition for reaching Gmail at volume.
Final Thoughts
Setting up DMARC in Google Workspace comes down to a clear sequence: get SPF and DKIM authenticating inside Google, publish a DMARC TXT record at your DNS host, and start in monitor mode so you can watch before you enforce. The protocol itself is a single line of text, but the value comes from the rollout, reading the reports, fixing what fails, and tightening the policy in stages until you reach reject.
That patience pays off twice. A reject policy shuts the door on anyone impersonating your domain, and the authentication trail it leaves behind is exactly what Gmail and Yahoo now require from any serious sender. Skipping the monitoring phase is the one shortcut that consistently backfires, so resist the urge to jump straight to enforcement.
DMARC is the authentication foundation, not the whole picture. Once your Google Workspace domain is authenticated and your reports are clean, the next lever for deliverability is reputation, built through consistent sending and proper warm-up.
Authenticate first, then warm up, and your mail has its best chance of reaching the inbox.
DMARC proves your emails are legitimate. InboxWarm helps mailbox providers trust them.
Improve sender reputation, strengthen inbox placement, and build a healthy sending history for your Google Workspace domain with InboxWarm.ai.
Frequently Asked Questions
Does Google Workspace Require DMARC?
Google requires DMARC for any domain sending more than 5,000 messages a day to Gmail accounts, a rule in force since February 2024 and actively enforced since November 2025. Smaller senders are not strictly required to publish DMARC, but Google strongly recommends it. Given that enforcement now includes message rejections, setting up DMARC is the safe choice for any business sender.
Can I Set Up DMARC Without SPF And DKIM?
No. DMARC has nothing to enforce against unless SPF or DKIM is authenticating your mail first. Publishing a DMARC policy on an unauthenticated domain can send your own legitimate messages to spam or get them rejected. Always configure SPF and DKIM and let them run for 48 hours before adding DMARC.
What DMARC Policy Should I Start With?
Start with p=none, the monitoring policy. It takes no action on failing mail and simply sends you reports, so it cannot harm delivery while you discover every source sending to your domain. Once the reports confirm your legitimate sources pass, move to quarantine and then to reject in stages.
How Long Does It Take For A DMARC Record To Become Active?
A DMARC record usually propagates within an hour, but full global DNS propagation can take up to 48 hours. The record is active as soon as receiving servers can read it. Aggregate reports, however, take longer to arrive, often a day or more, since they are generated by receivers on their own schedule.
How Can I Verify That My DMARC Record Is Working?
Run your domain through a DMARC checker to confirm the record is published and valid, then send a test message to a Gmail address and check the original headers for dmarc=pass. For real-world proof, review the aggregate reports at your RUA address over a week or two. Together these confirm the record is both syntactically correct and authenticating live mail.
Does DMARC Improve Email Deliverability?
Indirectly, yes. DMARC does not place mail in the inbox on its own, but passing it removes an authentication red flag and strengthens the domain trust that mailbox providers weigh. Combined with consistent sending and proper warm-up, it supports better inbox placement. It also keeps you compliant with Google and Yahoo sender requirements, which is now a precondition for reaching Gmail at scale.