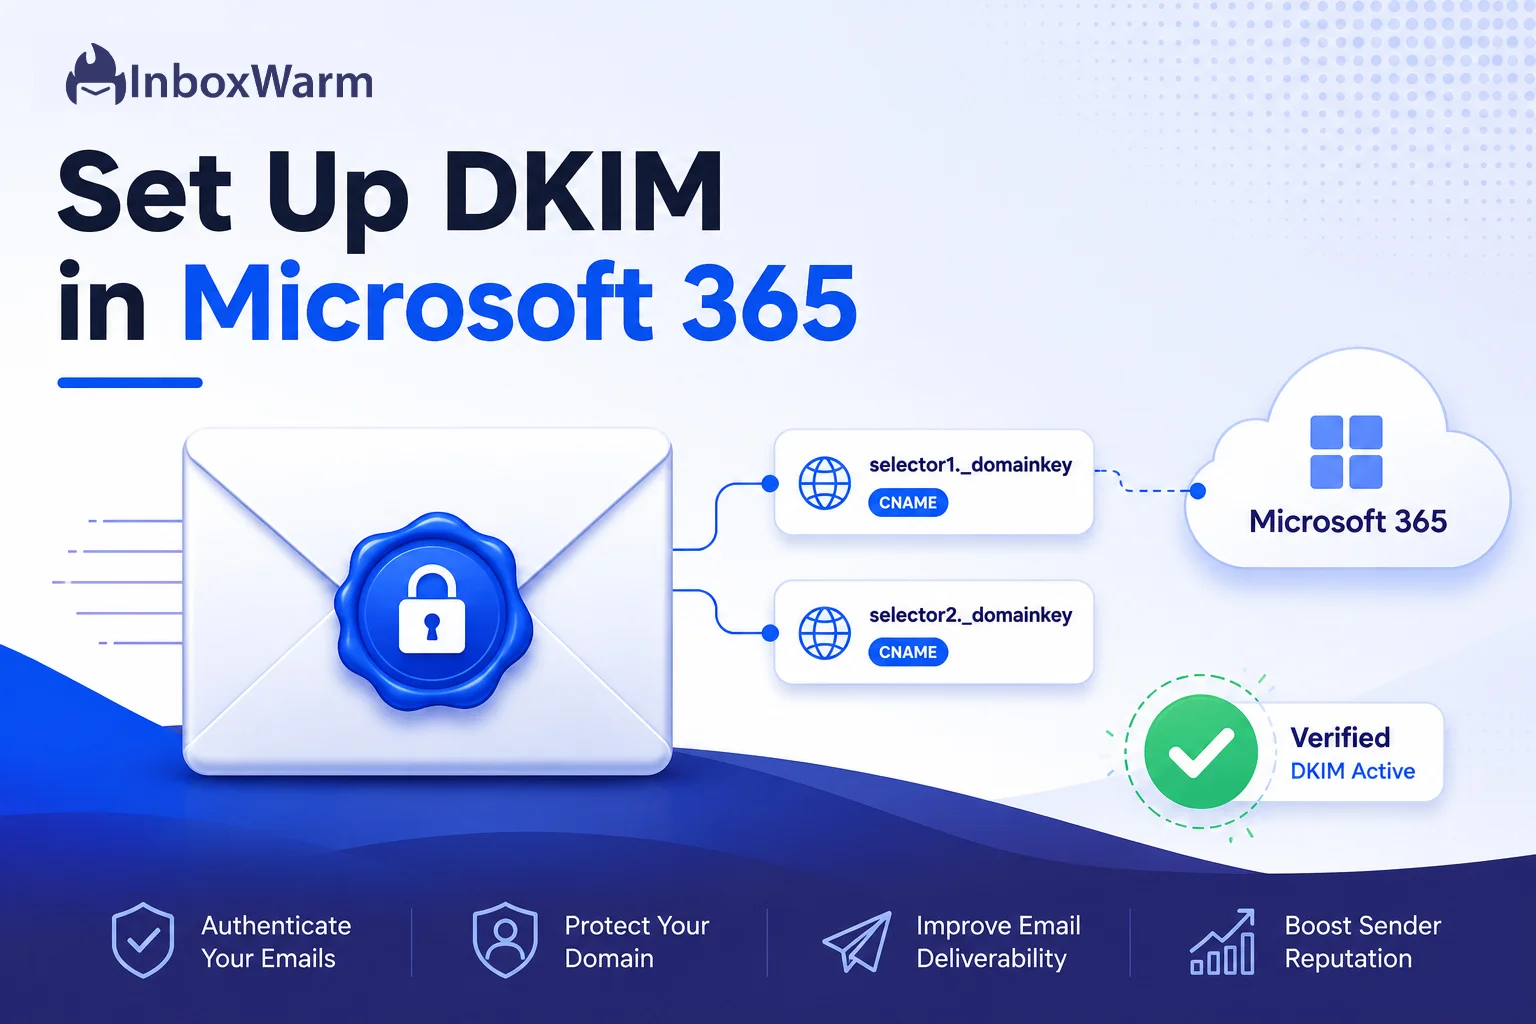
Quick Answer
To set up DKIM in Microsoft 365, sign in to the Microsoft Defender portal (security.microsoft.com), navigate to Email & Collaboration → Policies & Rules → Threat Policies → DKIM, and select your custom domain. Microsoft 365 will generate two DKIM CNAME records.
Add these records to your DNS provider, wait for DNS propagation, then return to Microsoft 365 and enable DKIM signing for the domain. Once activated, DKIM helps authenticate your emails, protect against spoofing, and improve email deliverability.
Every email you send from Microsoft 365 passes through multiple systems before reaching an inbox. Along the way, receiving servers at Gmail, Yahoo, and Outlook must determine whether the message is genuinely from your domain or from someone attempting to spoof it. DKIM (DomainKeys Identified Mail) solves this problem by adding a cryptographic signature that proves your emails are authentic and haven’t been altered in transit.
Here’s what many Microsoft 365 admins overlook: while Microsoft’s default onmicrosoft.com domains are signed automatically, custom domains are not. If you use a custom domain for business email, you must configure DKIM yourself. Otherwise, your messages may be more vulnerable to spoofing, suffer from lower sender trust, and face deliverability issues.
With Google and Yahoo now enforcing stricter sender authentication requirements, DKIM is no longer optional for organizations that rely on email.
In this guide, you’ll learn how to set up DKIM in Microsoft 365, publish the required CNAME records, verify that signing is working correctly, troubleshoot common issues, and strengthen your email authentication strategy with SPF and DMARC.
Table of Contents
What Is DKIM and Why Does Microsoft 365 Need It?
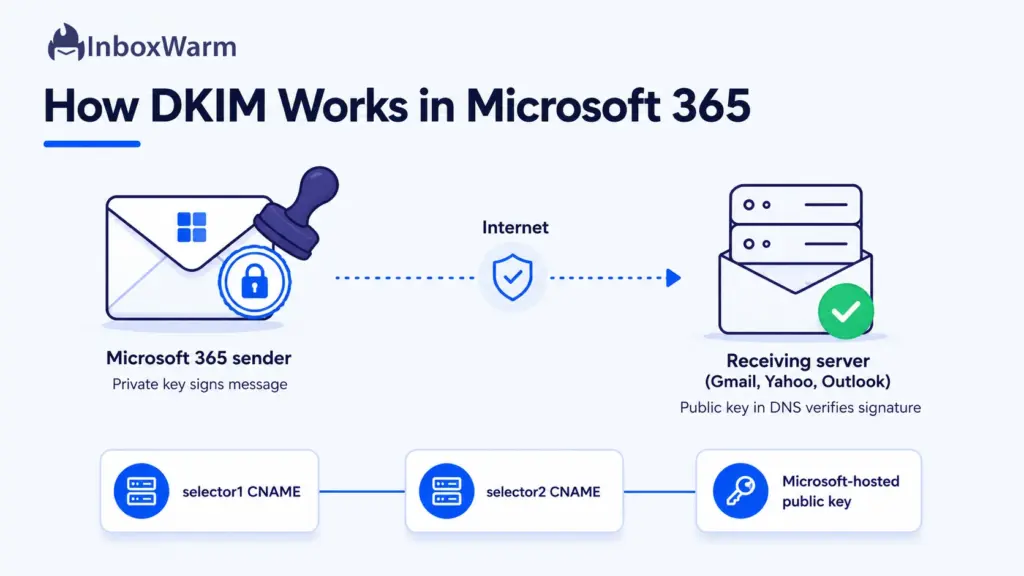
DKIM (DomainKeys Identified Mail) is an email authentication method that adds a cryptographic signature to your outbound messages so receiving servers can verify the mail genuinely came from your domain and was not tampered with in transit. Defined in RFC 6376, it works with a key pair: a private key signs the message, and a matching public key published in your DNS lets recipients check that signature.
In Microsoft 365, the source server signs important header fields and the message body with the private key, then stores that signature in the DKIM-Signature header. The signing domain is identified by the d= value in that header. The destination server reads it, looks up your public key in DNS, and validates the signature. If anything in the signed content changed, validation fails.
Microsoft handles DKIM differently from most email providers. Instead of asking you to paste a public key into a TXT record, Microsoft 365 publishes the public keys for you and has you point two CNAME records at them. That is why the Microsoft 365 DKIM setup looks different from a typical ESP and why the records you create are CNAMEs rather than TXT records.
So why the manual work?
Because Microsoft only signs your custom-domain mail once you tell it to. Outbound messages from the default onmicrosoft.com domain are signed automatically, but for any custom domain such as yourcompany.com, no DKIM signing happens until you configure it. Authenticated, well-signed mail is also a core input to sender reputation, which is why deliverability and authentication go hand in hand.
What Do You Need Before You Set Up DKIM in Microsoft 365?
Before you configure DKIM for Microsoft 365, confirm four things: a verified custom domain in your tenant, the right admin role, access to your DNS provider, and SPF already in place. Getting these lined up first prevents most of the errors people hit halfway through setup.
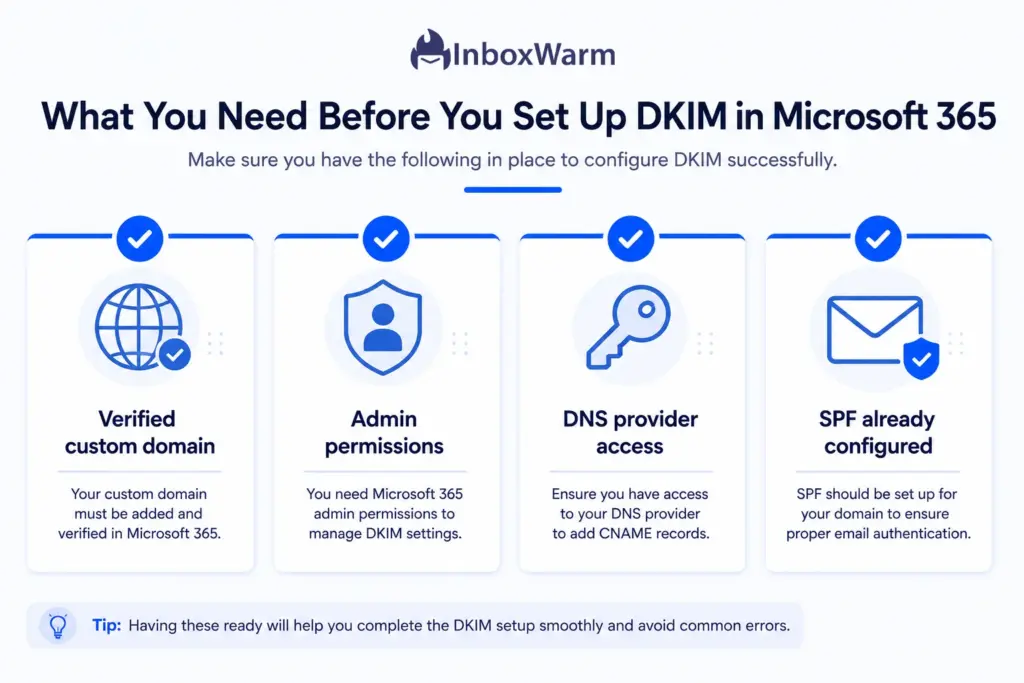
A Verified Custom Domain
Your domain must be added and verified in Microsoft 365. DKIM is generated there. A super admin role avoids permission roadblocks during setup.
A Working SPF Record
Your domain needs an SPF record that authorizes Google to send on its behalf. For Google Workspace, that means including Google’s mail servers in your SPF TXT record. SPF should already be authenticating before you add DMARC.
DKIM Authentication Enabled
DKIM signing must be generated in the Admin console and published in your DNS. Google does not enable DKIM by default, so even established domains often need this step. DKIM is the more reliable of the two alignment paths, so do not skip it.
Access To Your DNS Host
DMARC is published as a TXT record at your domain registrar or DNS host, such as GoDaddy, Cloudflare, or Namecheap. You need login access to the DNS management area for your domain. If you are unsure who hosts your DNS, your registrar is the place to start.
If SPF is still on your list, our walkthrough on how to set up an SPF record covers the syntax and common mistakes. You can also generate a clean record with the SPF record tool before you touch DKIM.
How Do You Set Up DKIM in Microsoft 365? (Step by Step)
To set up DKIM in Microsoft 365, you generate the CNAME values in the Microsoft Defender portal, publish those two CNAME records in your DNS, wait for them to propagate, then return to the portal and enable signing. The whole process is mostly careful copy and paste. Typos in the CNAME values are the single most common reason setup fails, so slow down on the DNS step.
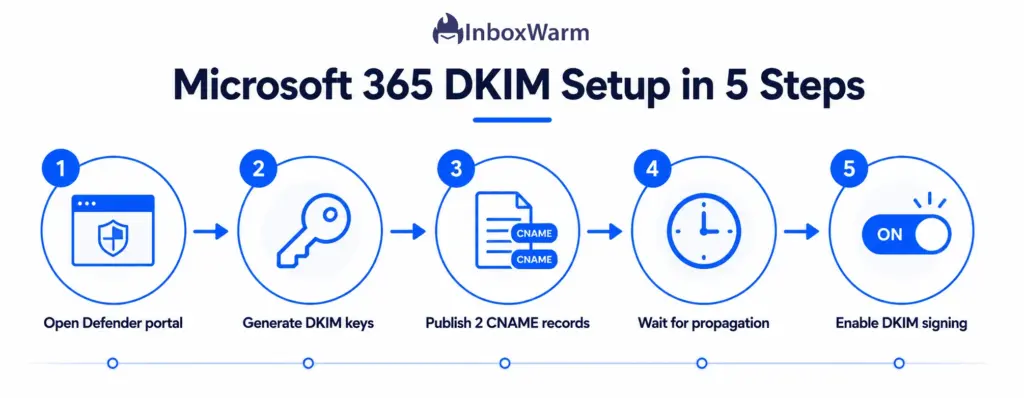
Step 1: Open the DKIM Settings in the Defender Portal
Sign in to the Microsoft Defender portal at security.microsoft.com with an admin account. In the left navigation, go to Email & collaboration, then Policies & rules, then Threat policies, and then select DKIM under the rules.
You can also jump straight there with the shortcut security.microsoft.com/dkimv2. Microsoft has reorganized this portal more than once, so if the path looks different, the dkimv2 shortcut is the reliable way in.
Step 2: Generate Your DKIM Keys and Retrieve the CNAME Values
On the DKIM page you will see a list of your domains. Select your custom domain (click the domain name, not just the checkbox). If keys have not been created yet, choose Create DKIM keys. Microsoft 365 generates two 2048-bit RSA key pairs and gives you two CNAME records to publish. Keep this flyout open and copy both the host name and the target value for each record.
The records follow this pattern. The values below are illustrative only. Always copy the exact host and target shown in your portal, because your tenant name and domain are baked into them.
| Record | Host name | Points to (target) |
|---|---|---|
| CNAME 1 | selector1._domainkey | selector1-yourdomain-com._domainkey.tenant.onmicrosoft.com |
| CNAME 2 | selector2._domainkey | selector2-yourdomain-com._domainkey.tenant.onmicrosoft.com |
Two selectors are intentional. Only one is active at a time; the second exists so Microsoft can rotate your DKIM key automatically without an interruption in signing.
Step 3: Publish the Two CNAME Records in Your DNS
Log in to your DNS provider in a separate tab and add both records exactly as Microsoft shows them. Set the type to CNAME, paste the host into the name field, and paste the target into the value or points-to field. A few provider-specific notes that prevent failed lookups:
- Cloudflare: set both CNAME records to DNS only (grey cloud). Leaving the orange proxy on will break DKIM resolution.
- Trailing dots and dashes: copy carefully. The dashes, periods, and underscores in the target are easy to mistype, and one wrong character means the record will not validate.
- TTL: a low TTL (for example, 300 to 3600 seconds) speeds up testing. You can raise it later once DKIM is confirmed.
Step 4: Wait for DNS Propagation
DNS changes are not instant. Most CNAME records resolve within an hour, but global propagation can take up to 48 hours. Enabling DKIM before the records are visible to Microsoft is the most common self-inflicted error, so give it time. If you are impatient, you can flush your local DNS cache, but Microsoft still has to detect the records at your registrar before it will let you switch signing on.
Step 5: Enable DKIM Signing in the Defender Portal
Return to the DKIM flyout you left open. Toggle Sign messages for this domain with DKIM signatures to enabled. If Microsoft detects both CNAME records, the toggle flips on and your custom domain now signs outbound mail. If it cannot find the records, you will get an error that lists the exact values it expects, which is your cue to recheck the DNS entries for typos and wait a little longer before retrying.
How Do You Set Up DKIM in Microsoft 365 Using PowerShell?
If you manage multiple domains or want to script the work, use Exchange Online PowerShell instead of the portal. Connect first, create the signing config, publish the CNAME records in DNS, and then enable signing once they propagate. The portal is faster for a single domain; PowerShell wins at scale.
Connect to Exchange Online, then run the commands you need:
- Get-DkimSigningConfig lists every domain and its current DKIM status across the tenant.
- New-DkimSigningConfig -DomainName yourdomain.com -Enabled $false initializes DKIM and generates the keys for a domain that is not yet listed.
- Get-DkimSigningConfig -Identity yourdomain.com | Format-List Selector1CNAME, Selector2CNAME retrieves the exact CNAME targets to publish.
- Set-DkimSigningConfig -Identity yourdomain.com -Enabled $true turns on signing after your CNAME records have propagated.
The sequence matters: initialize and read the selectors, publish the CNAME records in DNS, wait for propagation, then set Enabled to $true. Run the command too early, and it errors out the same way the portal toggle does.
How Do You Verify DKIM Is Working in Microsoft 365?
To verify DKIM is signing your Microsoft 365 mail, send a test message from your custom domain to a Gmail address, open it, click the three-dot menu, and choose Show Original. In the authentication results, look for dkim=pass with your domain in the signature. A pass confirms signing is live and aligned to your sending domain.
Three checks, from quickest to most thorough:
- Inspect a real header. Send to Gmail, open Show Original, and confirm dkim=pass plus a DKIM-Signature header that shows d=yourdomain.com. This is the definitive test because it reflects what real recipients see.
- Confirm the DNS records resolve. Run nslookup -type=cname selector1._domainkey.yourdomain.com (and selector2). If they resolve to the Microsoft target, your DNS side is correct.
- Use a checker. Paste your domain into a tool for a quick read on selector and key status.
For a fast read on whether your selectors are published correctly, run your domain through the DKIM checker. If signing still shows as inactive after the records resolve, the problem is almost always propagation timing or a mismatched From domain rather than the signature itself.
How Do You Fix Common Microsoft 365 DKIM Errors?
Most Microsoft 365 DKIM errors trace back to four causes: the CNAME records have not propagated, a value was mistyped, only one selector was published, or the From domain does not match the signing domain.
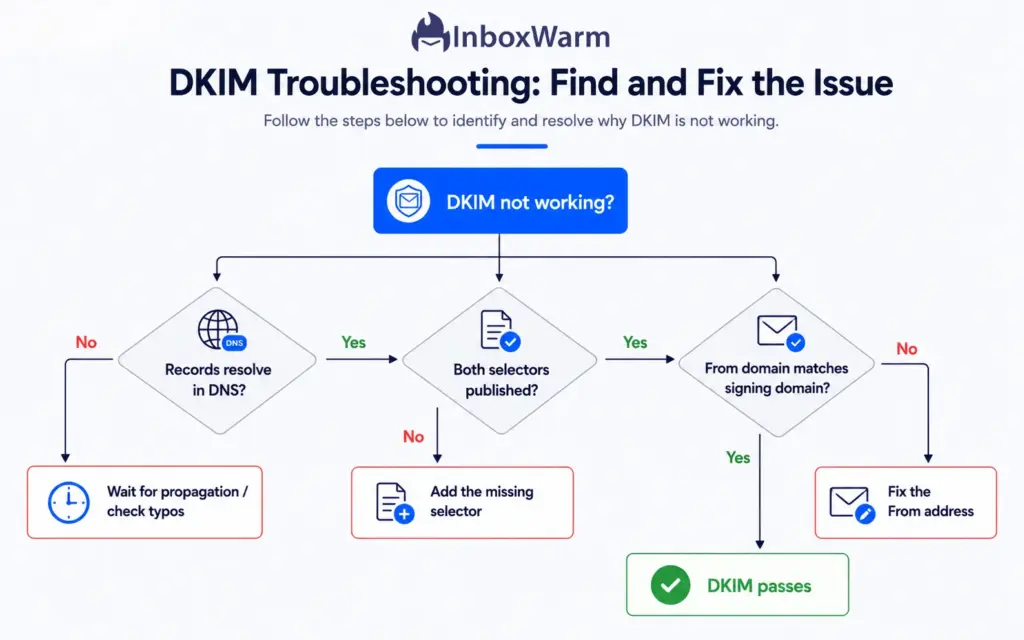
Work through them in that order and the fix is usually quick.
| Symptom | Likely cause | Fix |
|---|---|---|
| CNAME record does not exist | DNS not propagated, or typo in host/target | Wait up to 48 hours, recheck every character, then retry the toggle |
| Mail signed by onmicrosoft.com, not your domain | Custom-domain signing never enabled | Return to the DKIM page and toggle signing on for the custom domain |
| dkim=fail or no signature in header | Only one selector published, or wrong From domain | Publish both selectors and confirm the From domain matches the signed domain |
| Records look right but still fail | Cloudflare proxy on, or stale DNS cache | Set CNAMEs to DNS only, flush cache, confirm they resolve publicly |
If DMARC reports show authentication failures even after DKIM passes on its own, the issue is usually alignment rather than DKIM itself. Our guide on why DMARC fails breaks down the difference between a DKIM pass and a DKIM-aligned pass, which is what DMARC actually requires.
How Do SPF, DKIM, and DMARC Work Together in Microsoft 365?
SPF, DKIM, and DMARC are three layers of one system. SPF authorizes which servers can send for your domain, DKIM signs the message so it cannot be altered undetected, and DMARC tells receivers what to do when a message fails and ties the checks back to your visible From address. DKIM on its own helps, but DMARC is what turns authentication into enforcement.
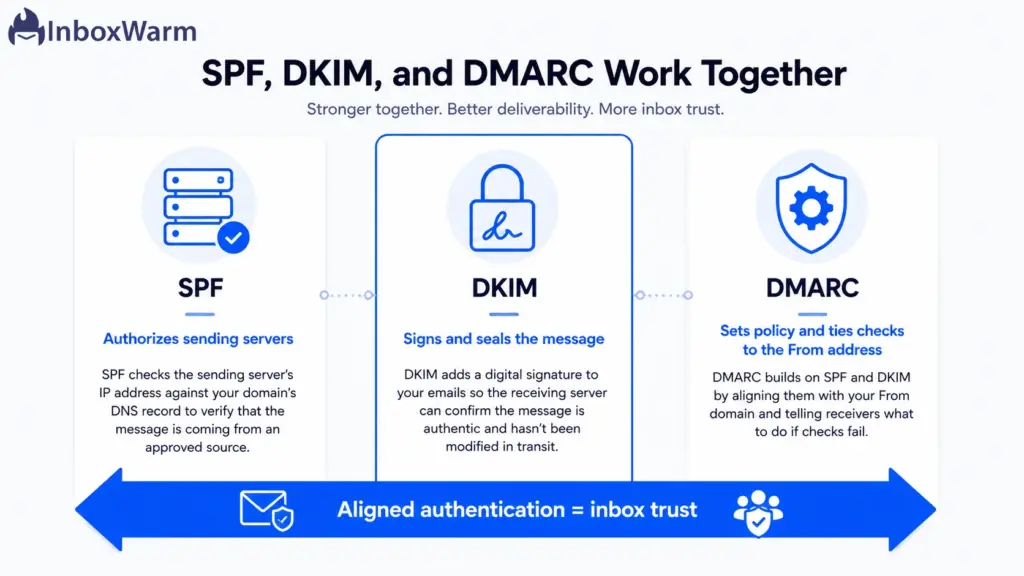
The link between them is alignment. DMARC passes when either SPF or DKIM passes and the passing check is aligned, meaning the authenticated domain matches your From domain. DKIM alignment survives email forwarding where SPF often breaks, which is exactly why custom-domain DKIM matters so much for Microsoft 365 senders.
Since 2024, Google and Yahoo require bulk senders (those sending roughly 5,000 or more messages a day to Gmail) to authenticate with SPF, DKIM, and DMARC, and to publish at least a monitoring DMARC policy. For most senders, that makes all three non-negotiable rather than nice to have.
If you have not finished the set, generate a policy with the DMARC record tool and start at p=none to monitor before you move to quarantine or reject. Strong authentication protects your email deliverability, but it does not build reputation on its own. That is where email warm-up comes in: consistent, engaged sending that teaches mailbox providers to trust your domain.
Conclusion
Setting up DKIM in Microsoft 365 comes down to a short, repeatable loop: generate the keys in the Defender portal, publish the two CNAME selectors in your DNS, wait for propagation, and flip signing on. The only place it usually goes wrong is the DNS step, so copy the values exactly and give them time to resolve before you enable the toggle. Once it is on, Microsoft signs every message from your custom domain and rotates the keys for you.
Treat DKIM as one piece of a larger picture rather than a finish line. With SPF authorizing your senders and DMARC enforcing alignment, your domain becomes far harder to spoof and far easier for Gmail, Yahoo, and Outlook to trust. That trust is what keeps your mail out of spam, and it is the foundation every cold or bulk sending program should be built on.
Authentication earns you the right to be delivered; reputation earns you the inbox.
Frequently Asked Questions
Why does Microsoft 365 use CNAME records instead of TXT records for DKIM?
Most providers ask you to publish the public key directly in a TXT record. Microsoft 365 hosts the public keys itself and has you point two CNAME records at them. This lets Microsoft rotate your DKIM keys automatically without you editing DNS again, which is why you publish selector1 and selector2 CNAMEs rather than a single TXT record.
How long does Microsoft 365 DKIM take to start working?
After you publish the CNAME records, most resolve within an hour, though global DNS propagation can take up to 48 hours. You cannot enable signing until Microsoft detects both records, so if the toggle errors out, wait longer and recheck for typos. Once enabled, signing applies to new outbound mail right away.
Do I need both selector1 and selector2 CNAME records?
Yes. Microsoft 365 uses two selectors so it can rotate signing keys without interrupting your mail. Only one selector is active at a time, but both records must be published or DKIM will fail to enable. Publishing just one is a common reason setup does not validate.
Can I set up DKIM for Microsoft 365 with PowerShell instead of the portal?
Yes. Use Exchange Online PowerShell with New-DkimSigningConfig to initialize keys, retrieve the selector CNAME targets, publish them in DNS, then run Set-DkimSigningConfig with -Enabled $true after propagation. PowerShell is the better choice when you manage many domains or want to script the process; the portal is simpler for a single domain.
Is DKIM enough on its own for Microsoft 365 email security?
No. DKIM should always run alongside SPF and DMARC. SPF authorizes your sending servers, DKIM signs the message, and DMARC ties both checks to your From address and tells receivers how to handle failures. Google and Yahoo now require all three for bulk senders, so configuring DKIM alone leaves gaps in both protection and deliverability.
How do I confirm DKIM is actually signing my outbound mail?
Send a test email from your custom domain to a Gmail account, open it, and choose Show Original. Look for dkim=pass and a DKIM-Signature header listing d=yourdomain.com. You can also run nslookup on your selector records or use a DKIM checker to confirm the public keys resolve correctly.
Does Microsoft 365 enable DKIM automatically?
Microsoft 365 automatically signs mail from your default onmicrosoft.com domain, but not from your custom domain. To sign mail from yourcompany.com, you must publish two CNAME records and enable DKIM signing for that domain in the Defender portal. Each custom subdomain you send from needs its own DKIM configuration as well.
Why does Microsoft 365 use CNAME records instead of TXT records for DKIM?
Most providers ask you to publish the public key directly in a TXT record. Microsoft 365 hosts the public keys itself and has you point two CNAME records at them. This lets Microsoft rotate your DKIM keys automatically without you editing DNS again, which is why you publish selector1 and selector2 CNAMEs rather than a single TXT record.
How long does Microsoft 365 DKIM take to start working?
After you publish the CNAME records, most resolve within an hour, though global DNS propagation can take up to 48 hours. You cannot enable signing until Microsoft detects both records, so if the toggle errors out, wait longer and recheck for typos. Once enabled, signing applies to new outbound mail right away.
Do I need both selector1 and selector2 CNAME records?
Yes. Microsoft 365 uses two selectors so it can rotate signing keys without interrupting your mail. Only one selector is active at a time, but both records must be published or DKIM will fail to enable. Publishing just one is a common reason setup does not validate.
Can I set up DKIM for Microsoft 365 with PowerShell instead of the portal?
Yes. Use Exchange Online PowerShell with New-DkimSigningConfig to initialize keys, retrieve the selector CNAME targets, publish them in DNS, then run Set-DkimSigningConfig with -Enabled $true after propagation. PowerShell is the better choice when you manage many domains or want to script the process; the portal is simpler for a single domain.
Is DKIM enough on its own for Microsoft 365 email security?
No. DKIM should always run alongside SPF and DMARC. SPF authorizes your sending servers, DKIM signs the message, and DMARC ties both checks to your From address and tells receivers how to handle failures. Google and Yahoo now require all three for bulk senders, so configuring DKIM alone leaves gaps in both protection and deliverability.
How do I confirm DKIM is actually signing my outbound mail?
Send a test email from your custom domain to a Gmail account, open it, and choose Show Original. Look for dkim=pass and a DKIM-Signature header listing d=yourdomain.com. You can also run nslookup on your selector records or use a DKIM checker to confirm the public keys resolve correctly.
Your Emails Are Authenticated. Are They Inbox-Ready?
DKIM, SPF, and DMARC prove your emails are legitimate. InboxWarm.ai helps build the sender reputation needed to reach the inbox consistently.