TL;DR
- Google Workspace MX records tell the internet which servers should receive email for your domain.
- You need five MX records: ASPMX.L.GOOGLE.COM (priority 1) plus four ALT backups at priorities 5 and 10.
- New Google Workspace accounts (post-April 2023) use a single smtp.google.com MX record instead.
- Misconfigured or missing MX records cause hard bounces, spam filtering, and silent delivery failures.
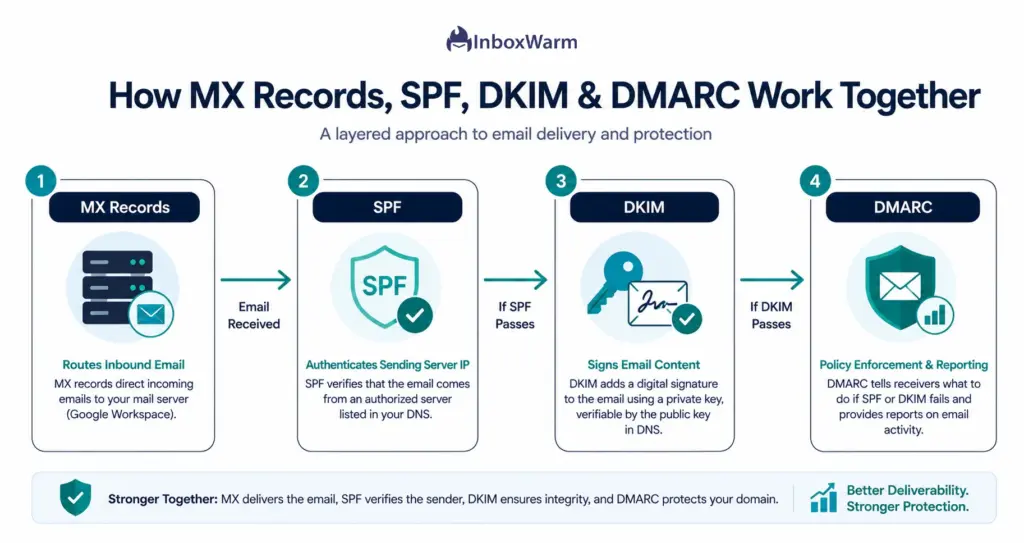
- Always pair your MX records with SPF, DKIM, and DMARC to protect inbox placement.
- Use MXToolbox or Google Admin Toolbox to verify propagation after any DNS change.
- DNS changes take up to 72 hours to propagate globally; plan migrations accordingly.
Google Workspace MX records are the DNS entries that route all incoming email for your domain to Gmail’s servers. Without them, email sent to your domain address simply cannot reach you. Setting them up correctly is the single most foundational step in any Google Workspace email deployment, and getting them wrong silently kills deliverability before a single campaign ever launches.
The stakes are real. Nearly 1 in 6 marketing emails never reach the inbox, and email deliverability issues directly affect revenue or customer retention for 64.6% of businesses. When MX records are missing, misconfigured, or left with conflicting legacy entries, emails bounce, replies vanish, and your sender reputation erodes, often before you realize there is a problem.
This guide covers everything: the exact MX record values Google requires, step-by-step setup instructions for major domain registrars, a breakdown of the priority system, the most common misconfigurations and how to fix them, and how proper MX configuration connects to SPF, DKIM, and DMARC for maximum inbox placement. Whether you are setting up Google Workspace for the first time or diagnosing a delivery problem, this is the only reference you need.
Table of Contents
What Are Google Workspace MX Records and Why Do They Matter?
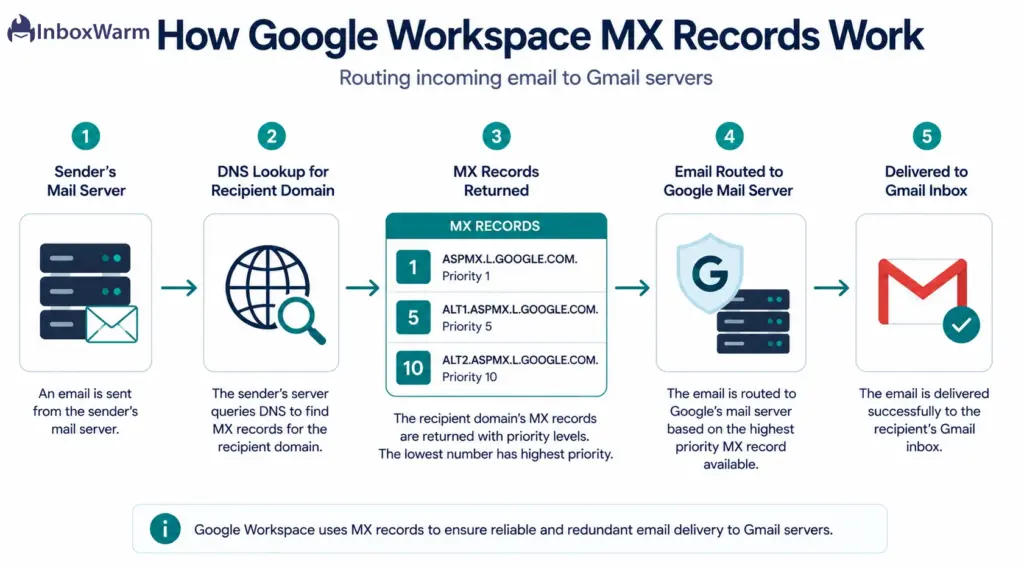
An MX record, or Mail Exchanger record, is a DNS entry that tells the internet which mail server is authorized to receive email on behalf of your domain. When someone sends a message to you@yourcompany.com, the sender’s mail server does a DNS lookup for your domain’s MX records to find out exactly where to deliver that email.
Think of it as your domain’s postal address in the global email routing system: without it, mail has nowhere to go.
Each MX record contains two core fields: a mail server hostname (the address of the server that should receive the mail) and a priority number (which determines the order in which servers are tried). Lower priority numbers mean higher preference.
So a server at priority 1 is always tried before a server at priority 5 or 10. This creates a tiered fallback system that keeps your email flowing even when a server is temporarily unreachable.
For Google Workspace users, the MX record configuration is what activates Gmail for your custom domain. Before you update these records, email sent to your domain cannot be delivered to Gmail’s servers. The Google Admin console will flag your setup as incomplete, and any email someone attempts to send to your domain address will either bounce or go undelivered.
Why Misconfigured MX Records Damage Deliverability?
Misconfigured MX records do not just block incoming email; they create a chain reaction that damages your entire sending infrastructure. When bounce notifications (Non-Delivery Reports) cannot be returned to the sender because MX records are broken, the sender’s bounce rate spikes. A bounce rate above 2% is a warning sign for most ISPs. Above 5%, you risk blacklisting.
Mailbox providers like Gmail and Outlook also use MX record reliability as a trust signal. Domains with missing or misconfigured MX records are treated as less legitimate, which can push your outbound emails into spam even when your SPF and DKIM are correct. The infrastructure-level and reputation-level signals are intertwined.
What Are the Official Google Workspace MX Record Values?
Google publishes five official MX records for redundancy and load balancing. These are the values specified in the Google Workspace Admin documentation. Enter these at your domain registrar, not in the Google Admin console.
| Mail Server (Value) | Priority | TTL |
|---|---|---|
| ASPMX.L.GOOGLE.COM | 1 | 3600 |
| ALT1.ASPMX.L.GOOGLE.COM | 5 | 3600 |
| ALT2.ASPMX.L.GOOGLE.COM | 5 | 3600 |
| ALT3.ASPMX.L.GOOGLE.COM | 10 | 3600 |
| ALT4.ASPMX.L.GOOGLE.COM | 10 | 3600 |
1. Understanding the Priority System
The priority numbers create three tiers of redundancy. ASPMX.L.GOOGLE.COM at priority 1 is the primary server. All email delivery attempts go here first. ALT1 and ALT2 at priority 5 are secondary backups. They receive email only when the priority 1 server is unreachable. ALT3 and ALT4 at priority 10 are third-tier backups, used only when both priority 1 and priority 5 servers are unavailable simultaneously.
This three-tier redundancy structure means multiple Google servers would need to fail at the same time for your email delivery to be affected. In practice, Google’s mail infrastructure rarely goes down, but the backup structure protects against rare maintenance windows and regional outages.
2. New vs Legacy MX Record Values
Starting in April 2023, new Google Workspace accounts use a single simplified MX record: smtp.google.com with priority 1. Google’s official documentation confirms that if you signed up before 2023, your account likely uses the five ASPMX records shown above. If your email is currently working, there is no need to change anything. Both configurations are fully supported and route email to Google’s servers.
Important:
Do not change your MX records if Gmail is already working. Unnecessary changes during active operation can cause temporary delivery interruptions while DNS propagates. Only update your MX records if you are doing a fresh setup, migrating from another provider, or troubleshooting a delivery issue.
How Do You Set Up Google Workspace MX Records Step by Step?
The exact interface varies by registrar, but the process is the same everywhere.
Here is the universal step-by-step flow:

Step 1: Sign In to Your Domain Registrar
Log in to the platform where your domain is registered. This is typically GoDaddy, Namecheap, Google Domains (now Squarespace Domains), Cloudflare, Bluehost, or another registrar. Do not confuse this with your Google Admin console: MX records are set at your registrar, not inside Google.
Step 2: Navigate to DNS Settings
Look for a section labeled DNS Records, DNS Management, Domain Management, or Name Server Management. This varies by registrar but the DNS settings will always contain your existing record types (A, CNAME, TXT, MX).
Step 3: Delete Existing MX Records
Before adding Google’s MX records, remove all existing MX records. Leaving old records from a previous email provider (like Microsoft 365 or a cPanel server) will cause delivery conflicts. Conflicting MX records create situations where some email gets routed to Google’s servers and some goes elsewhere, resulting in fragmented, unreliable delivery.
Step 4: Add the Five Google MX Records
Create five new MX records using the values from the table above. For each record:
- Set the Host or Name field to @ (meaning your root domain). Some registrars want it blank; others use the full domain name. Check your registrar’s documentation if unsure.
- Set the Value or Points To field to the mail server hostname exactly as shown.
- Set the Priority to the number specified for each record.
- Set TTL to 3600 (one hour) during initial setup. You can increase this to 86400 (24 hours) once everything is verified and stable.
- Add or remove the trailing dot after the hostname based on what your registrar requires. Some providers (using BIND-style notation) require it; most modern web interfaces do not.
Step 5: Save and Wait for Propagation
Save your changes. DNS propagation can take up to 72 hours for changes to be recognized globally, though most changes take effect within a few hours. During propagation, different mail servers around the world may have inconsistent views of your records, so some emails may still route to the old configuration temporarily.
Step 6: Verify in the Google Admin Console
After propagation, go to your Google Admin console, navigate to Menu > Account > Domains > Manage Domains, and confirm your domain shows as Verified. If it does not show as verified, emails may be rejected even if your MX records look correct.
How Do You Set Up MX Records on Specific Registrars?
While the five MX record values are always the same, the interface for entering them differs by registrar.
Here is how to navigate the most common platforms:
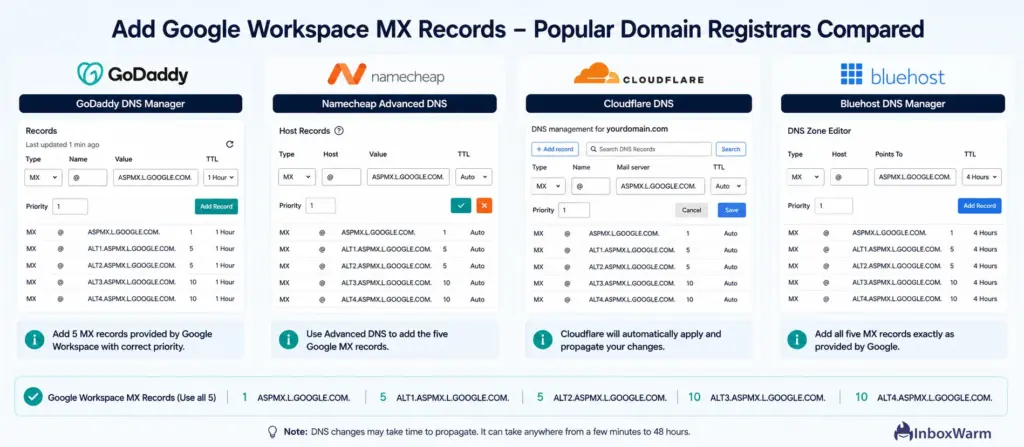
1. GoDaddy
- Log in and click Domains, then select your domain.
- Click DNS to open DNS Management.
- Scroll to the MX section and delete any existing records.
- Click Add, select MX as the record type, enter @ in the Host field, paste the mail server address in the Points To field, set the priority, and click Save.
- Repeat for all five records.
2. Namecheap
- Log in, go to Domain List, and click Manage next to your domain.
- Select the Advanced DNS tab.
- Scroll to the Mail Settings section and switch to Custom MX.
- Delete existing records and add the five Google MX records with their respective priorities.
3. Cloudflare
- Log in to Cloudflare and select your domain.
- Go to the DNS section.
- Leave the Name field blank or enter @ depending on what Cloudflare shows.
- Add each MX record with the correct mail server and priority values.
- Note: Cloudflare automatically adds trailing dots, so do not add them manually.
4. Bluehost
In Bluehost, navigate to Domains > DNS Management and scroll to the MX Records section. Delete old records before adding new ones, especially if you are migrating from another provider. Add each Google MX record with the host set to @ and save.
How Do You Verify That Your Google Workspace MX Records Are Working?
Once you have saved your MX records and waited for initial propagation (usually 1 to 4 hours), use these tools to confirm everything is correct:
1. MXToolbox MX Lookup
MXToolbox is the fastest way to check. Enter your domain name and it returns every active MX record along with their priorities and response times. Every entry should match Google’s five server names exactly. If you see entries from a previous provider, those records are still live and need to be deleted at your registrar.
2. Google Admin Toolbox
Google provides its own Admin Toolbox Dig tool. Enter your domain name (without www) in the Name field and select MX as the record type. The output shows the MX records currently published for your domain and whether they match the expected Google values.
3. Command Line Verification
If you prefer the terminal, run this command (replace yourdomain.com with your actual domain):
nslookup -type=MX yourdomain.com
The output should list all five Google MX servers with their priority numbers. If it returns nothing or shows different server addresses, your records have not fully propagated or were entered incorrectly.
Verification Tip:
Run the MXToolbox lookup from a different network or use a VPN if you want to confirm propagation beyond your local DNS cache. Results can vary by location during the 24 to 72 hour propagation window.
What Are the Most Common Google Workspace MX Record Mistakes?
Most MX setup failures come from a handful of predictable errors.
Knowing them in advance saves hours of troubleshooting:
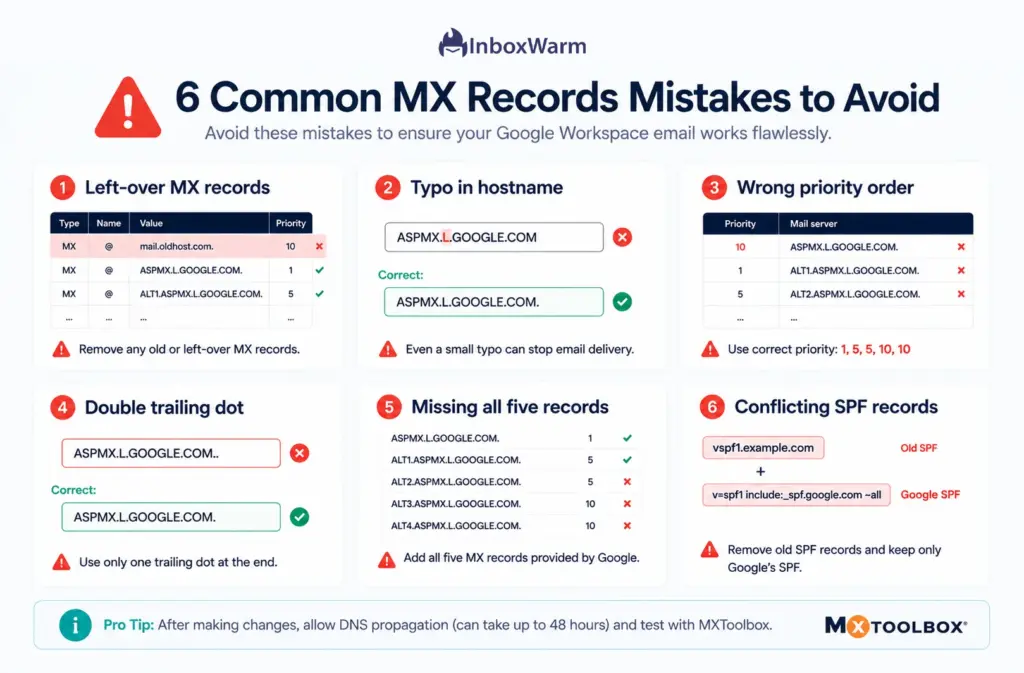
1. Leaving Old MX Records In Place
This is the most common mistake. When migrating from another email provider, any remaining MX records from the old system will compete with Google’s records. Some email will route to Google, some will route to the old provider. The result: missed emails, failed logins, and confused senders who get no bounce notification.
2. Typos in Hostnames
A single wrong character breaks delivery entirely. Common examples include typing ASPMX.L.GOOGLE.COM as ASPMX.LGOOGLE.COM (missing a period), or ALT1.ASPMX as ALT.ASPMX. The hostname must be entered character-for-character as specified.
3. Swapping Priority Values
Putting ALT servers at priority 1 and the primary server at priority 10 will not completely break email delivery, but it routes all incoming mail to backup servers first. This can introduce delays and makes troubleshooting harder. Always match Google’s recommended priorities exactly.
4. Double Trailing Dot
Some registrars automatically append a trailing dot to hostnames (ASPMX.L.GOOGLE.COM.). If you manually add a dot and the registrar also adds one, you end up with a double-dot record (ASPMX.L.GOOGLE.COM.), which is invalid DNS. Check your registrar’s documentation to know whether to include or omit the trailing dot.
5. Adding Only the Primary MX Record
Some guides suggest that a single MX record pointing to ASPMX.L.GOOGLE.COM is sufficient. Technically, email will route, but you create a single point of failure. During Google’s rare maintenance windows, email will queue at the sender’s server and retry. All five records are recommended for full redundancy.
6. Multiple SPF Records Conflicting With MX Setup
This is not an MX issue directly, but it frequently happens during the same DNS session. If you add Google’s SPF record (v=spf1 include:_spf.google.com ~all) without removing your old provider’s SPF record, you end up with two TXT SPF records. SPF only allows one per domain. The duplicate breaks SPF authentication and can cause your outbound email to fail DMARC checks.
How Do You Troubleshoot Google Workspace Email Delivery Problems After Setting Up MX Records?
If email is still not working after setting up MX records, work through this diagnostic checklist in order:
- Confirm propagation using MXToolbox or Google Admin Toolbox Dig. If records have not propagated, wait and check again in a few hours.
- Verify your domain is confirmed as Verified in the Google Admin console under Account > Domains > Manage Domains.
- Check for leftover MX records from previous email providers and delete them.
- Test actual email delivery by sending a message to your domain address from an external account (Gmail, Outlook, Yahoo) and checking whether it arrives in Gmail.
- Send a test email from your Google Workspace account to a Gmail address and check the headers for authentication results (SPF, DKIM, DMARC pass or fail).
- Check if your domain is on any spam blacklists using the MXToolbox Blacklist Check.
- Contact your domain registrar’s support team if records appear correct but email still is not routing: some registrars have caching issues or require manual DNS refresh.
How DNS Propagation Delay Affects Troubleshooting?
DNS propagation is not instant. Different mail servers around the world retain your old MX record data until their TTL expires. During this window (which can be up to 72 hours if your previous TTL was set to 86400), some senders will route email to your old mail server while others route to Google. This can create confusing situations where some emails arrive and others do not.
To minimize propagation delay on future changes: lower your TTL to 300 seconds (5 minutes) at least 24 hours before making any MX record change. Once the change is confirmed working, raise the TTL back to 3600 or 86400.
How Do MX Records Connect to SPF, DKIM, and DMARC for Inbox Placement?
MX records handle incoming email routing. But for your outbound email to pass authentication checks and land in the inbox, you also need SPF, DKIM, and DMARC records. Since 2024, Google and Yahoo require all bulk senders to have SPF, DKIM, and DMARC in place. Microsoft followed with similar requirements for senders of 5,000+ emails per day starting in May 2025.
1. SPF Record for Google Workspace
Add this TXT record to your domain’s DNS to authorize Google’s mail servers to send email on behalf of your domain:
v=spf1 include:_spf.google.com ~all
Set the Host field to @ and the Type to TXT. Important: your domain must have only one SPF record. If you have existing SPF entries from other services, merge them into a single record. Reference: Google SPF setup documentation.
2. DKIM Setup for Google Workspace
DKIM (DomainKeys Identified Mail) adds a cryptographic signature to outbound emails. In Google Admin console, go to Apps > Google Workspace > Gmail > Authenticate Email to generate your DKIM key. Then add the provided TXT record to your DNS. Full DKIM setup instructions are available in Google’s documentation.
3. DMARC Policy
DMARC ties SPF and DKIM together and tells receiving servers what to do when authentication fails. Start with a monitoring-only policy:
v=DMARC1; p=none; rua=mailto:dmarc@yourdomain.com
Once you have analyzed the DMARC reports and confirmed your email streams are authenticated correctly, move to p=quarantine and eventually p=reject for maximum protection.
Why Does Email Warm-Up Matter Even After Correctly Setting Up MX Records?
Correctly configured MX records prove to the internet that your domain can receive email. But they say nothing about whether your domain should be trusted to send at volume. That is where email warm-up becomes essential.
When you activate a new Google Workspace domain or recover one after a deliverability incident, the domain’s sender reputation starts at zero. Gmail, Outlook, and other providers evaluate your sending behavior: volume, engagement, spam complaint rates, and authentication alignment.
Sending high volumes without a warm-up period triggers spam filters, regardless of how clean your MX records are. Gmail inbox placement varies from 54% to 88% depending on sender practices. The difference between those numbers is largely warm-up and reputation management.
InboxWarm.ai automates this process by gradually increasing your sending volume through AI-generated positive engagement signals. It builds a verified sender reputation across all major mailbox providers before you send a single cold campaign.
Think of it as the reputation layer that makes your correctly configured MX records actually pay off: a clean DNS setup opens the door; a warmed domain ensures you walk through it.
Your MX records are set. Is your sender reputation ready?
How Do You Manage MX Records Across Multiple Domains at Scale?
Cold email agencies and SDR teams often manage 10 to 50+ sending domains simultaneously. Manually verifying MX records, SPF, DKIM, and DMARC across that many domains is time-consuming and error-prone.
Here is how to manage at scale:
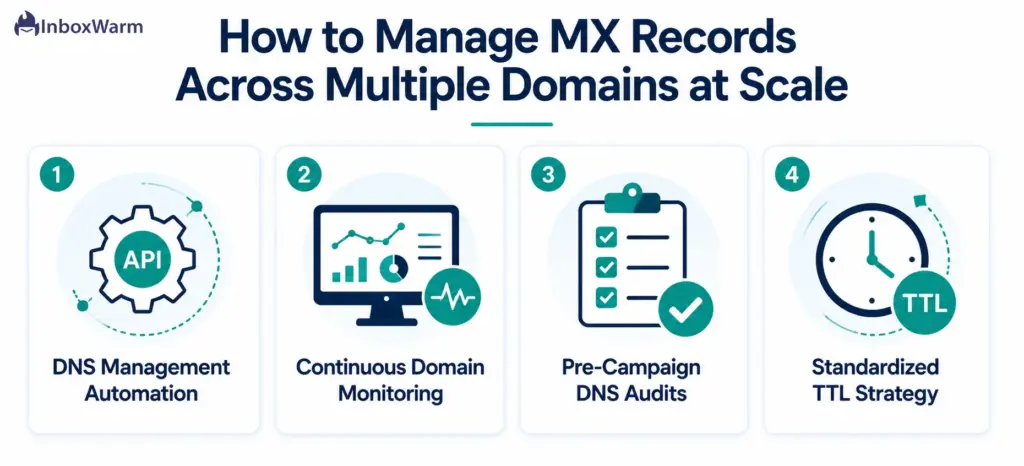
1. Use a DNS Management Automation Layer
If your team sets up a new domain every week, standardize the DNS setup into a checklist or automate it through your registrar’s API. Cloudflare, for example, offers a DNS API that allows you to create MX records programmatically, eliminating manual entry errors across domains.
2. Monitor All Domains Continuously
DNS records can change unexpectedly due to registrar migrations, accidental edits, or expiring domains. Set up continuous MX record monitoring using a tool that alerts you when any record goes missing or changes. MXToolbox offers monitoring services. Some deliverability platforms monitor DNS health as part of their dashboard.
3. Audit Before Every Campaign
Before launching any outbound campaign from a domain, run a quick MX lookup and SPF/DKIM/DMARC check. If you are managing multiple client domains, build this verification into your campaign launch checklist. A misconfigured record discovered before a campaign is a 5-minute fix. Discovered mid-campaign, it means bounces, reputation damage, and potentially weeks of recovery.
4. Standardize TTL Values
Across all managed domains, set a consistent TTL strategy. Use 3600 seconds (one hour) for domains that may need frequent DNS changes, and 86400 seconds (24 hours) for stable production domains. This reduces propagation delays when changes need to be made and ensures consistency across your DNS portfolio.
What Happens to MX Records When You Migrate Away From Google Workspace?
If you ever migrate from Google Workspace to Microsoft 365, Zoho Mail, or a self-hosted server, your MX record update process runs in reverse.
Before switching, plan the following:
- Lower your existing Google MX records’ TTL to 300 seconds at least 24 hours before the cutover. This ensures the switch propagates quickly.
- Set up and verify mailboxes on the new platform before pointing MX records at it. If the new server is not ready to receive mail when records switch, email will bounce.
- Update SPF to include the new provider’s sending IPs or include tag. Remove Google’s SPF include to avoid SPF failures.
- Generate new DKIM keys on the new platform and update your DNS TXT records accordingly.
- Keep Google Workspace active and monitor the old mailboxes for 72 hours post-cutover to catch any delayed deliveries that route to Google during propagation.
The most common MX migration failure is updating DNS before the new server is ready. Email sent during the gap either bounces or gets delayed by retries. Plan the new server setup as Step 1, and the MX record update as the final step only after the new environment is fully tested.
Frequently Asked Questions
2. Do I Need All Five Google MX Records or Just the Primary One?
You technically need at least the primary record (ASPMX.L.GOOGLE.COM at priority 1) for email to route to Gmail. However, all five records are strongly recommended. They provide three tiers of redundancy, ensuring email delivery continues even during rare server unavailability events. Using only the primary creates a single point of failure.
3. Can I Use CNAME Records Instead of MX Records for Email?
No. RFC 1035 prohibits MX records from pointing to CNAME aliases. MX records must point directly to A or AAAA records. Google's mail server hostnames (like ASPMX.L.GOOGLE.COM) are already properly configured with A records, so no workaround is needed. Simply enter the hostnames as specified.
4. What Is the Difference Between G Suite MX Records and Google Workspace MX Records?
G Suite was rebranded as Google Workspace in October 2020. The underlying MX record values are the same: the five ASPMX servers are still in use for accounts created before April 2023. For accounts created after April 2023, the simplified smtp.google.com single MX record is used. Both sets of values are fully supported and route email to Google's mail servers.
5. Why Are My Google Workspace Emails Going to Spam Even With Correct MX Records?
MX records govern incoming routing but have no direct influence on whether your outbound emails land in the inbox. Outbound deliverability depends on SPF, DKIM, and DMARC authentication, your domain's sender reputation, email content quality, list hygiene, and sending volume patterns. If your domain is new or has not been warmed up, even authenticated emails can hit spam filters. Run a domain health check and ensure all three authentication protocols are correctly configured.
6. Do MX Records Affect Email Sending or Only Receiving?
MX records are specifically a receiving mechanism: they tell the internet where to deliver email sent to your domain. They do not affect your ability to send email outbound. Outbound email routing is determined by your email client, SMTP server, and authentication records (SPF and DKIM). However, correctly configured MX records are still important for outbound deliverability indirectly, because bounce notifications from failed outbound emails must be delivered back to your domain, which requires working inbound MX records.
7. How Do I Know Which Registrar Manages My Domain's DNS?
Use a WHOIS lookup tool like who.is or ICANN Lookup to find your domain's registrar. The registrar listed in WHOIS results is where you need to log in to update your MX records. Note that if you are using Cloudflare, AWS Route 53, or another third-party DNS provider, your DNS records may be managed there even if your domain is registered elsewhere.
8. What Should I Do If My Google Admin Console Shows 'MX Records Not Set Up'?
This message means the Google Admin console cannot detect Google's MX records for your domain. First, verify that you entered the records at the correct registrar. Then use MXToolbox to confirm what is currently published for your domain. If the records appear correct in MXToolbox but the Admin console still shows the error, DNS propagation may not be complete: wait a few more hours and check again. If the issue persists, contact your registrar's support team to confirm the records were saved correctly.
Bottom Line
Google Workspace MX records are not optional infrastructure: they are the DNS foundation that makes your entire email operation possible. Without them, your domain cannot receive email. With them misconfigured, you create bounces, routing conflicts, and deliverability problems that compound over time and damage your sender reputation in ways that take weeks to repair.
The setup process is straightforward once you know exactly what values to enter and where to enter them. Add the five ASPMX records with the correct priorities, delete all old conflicting records, verify propagation with MXToolbox or Google’s Admin Toolbox, and confirm your domain shows as verified in the Google Admin console. Pair that with a properly configured SPF, DKIM, and DMARC setup, and you have a technically clean foundation.
But a clean foundation is the floor, not the ceiling. Sender reputation, engagement signals, and inbox placement are built on top of correct DNS through consistent warm-up and careful sending practices.
Even with perfectly configured MX records, poor Email Deliverability can prevent your messages from reaching the inbox. If you are launching a new Google Workspace domain or recovering from a deliverability incident, pairing your MX setup with a structured warm-up process ensures your correctly configured domain actually earns the inbox placement it deserves.
Ready to maximize your inbox placement?
★ Try InboxWarm.ai free: build sender reputation from day one →