TL;DR
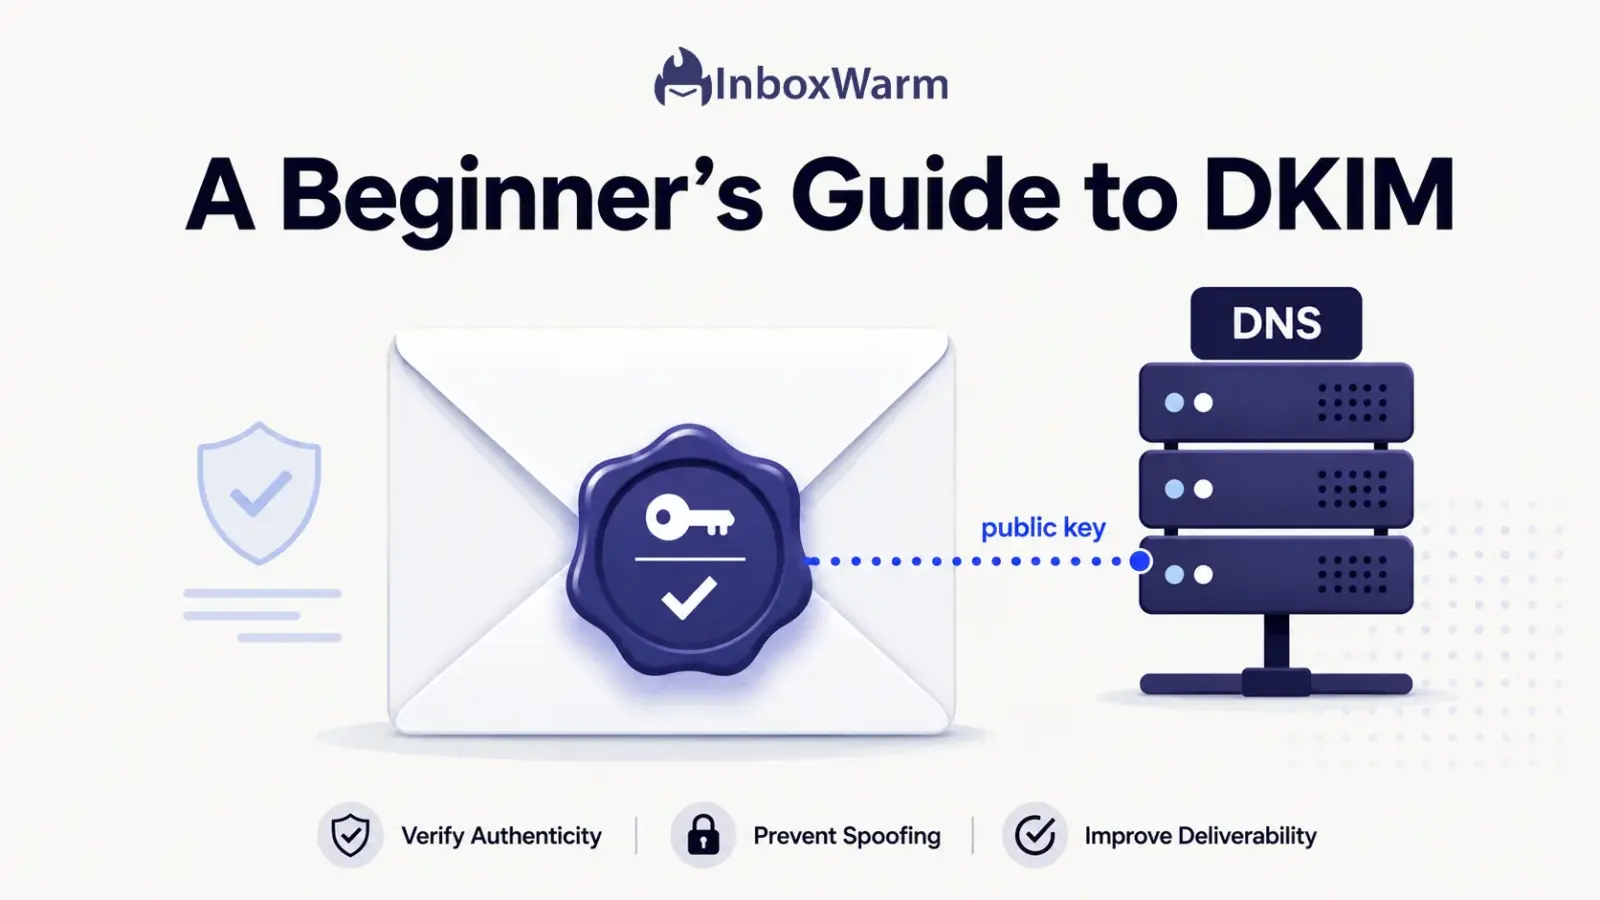
DKIM (DomainKeys Identified Mail) is an email authentication method that adds a tamper-proof digital signature to every message you send. Receiving servers use your public key, published in DNS, to confirm the email really came from your domain and was not altered in transit.
- DKIM uses a private key to sign outbound mail and a matching public key in your DNS to verify it.
- It is one of the three core email authentication standards, alongside SPF and DMARC.
- Google, Yahoo, and Microsoft now require DKIM for bulk senders (those sending 5,000 or more messages a day).
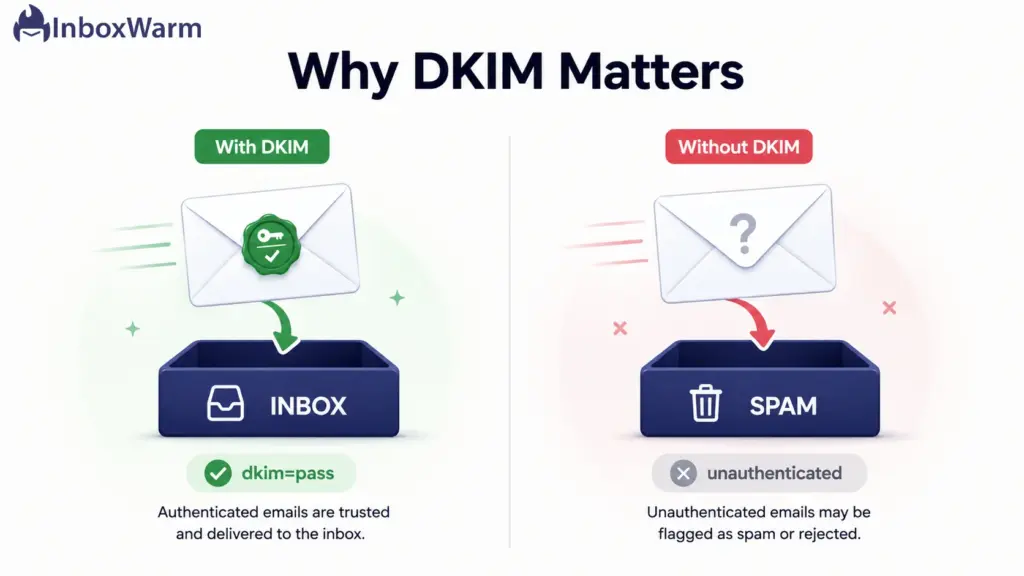
- A valid DKIM signature protects message integrity, fights spoofing, and supports your sender reputation.
You hit send on an important email and have no real idea whether it reached the inbox, slid into spam, or got rejected outright. For anyone running cold outreach or sending at scale, that uncertainty is expensive. Mailbox providers like Gmail and Outlook do not simply take your word that a message is legitimate. They look for proof, and DKIM is one of the main ways you give it to them.
Without authentication, your domain is easy to impersonate and easy to ignore. A scammer can forge your “From” address, and a spam filter has no reliable way to tell a real message from a fake one. The result is predictable: more of your mail lands in spam, your sender reputation slips, and (since February 2024) you may not even meet the minimum bar required to deliver to the major inboxes at all.
In this guide, you’ll learn what DKIM is and why it matters, how it works, and how to read both a DKIM signature and a DKIM record.
We’ll cover how DKIM fights spoofing and supports deliverability; compare DKIM vs. SPF vs. DMARC; walk through setup step by step; and show you how to check it, fix common errors, and follow best practices, including what DKIM means for cold email and marketing campaigns.
Throughout, you can lean on the free DKIM checker to confirm your own setup as you go.
Table of Contents
What Is DKIM and Why Does It Matter?
DKIM, short for DomainKeys Identified Mail, is an email authentication standard that attaches a cryptographic signature to your outgoing messages. It matters because that signature gives mailbox providers proof your mail is genuine, which is now a baseline requirement for reaching the inbox rather than a nice-to-have.
DKIM was first published as RFC 4871 in 2007 and is now defined in RFC 6376. The “DomainKeys” in the name refers to the public and private key pair at the heart of the system. The signature itself is invisible to the reader; it rides inside the message headers as a field called the DKIM-Signature header.
Why does it matter so much?
A receiving server cannot trust the From field on its own, because anyone can type any address there. DKIM ties each message to a domain whose reputation can be tracked, so mail you sign is treated as a known quantity and mail you don’t is treated as a stranger. Strangers get filtered.
A few terms you’ll see throughout this guide:
- Private key: a secret key stored on your sending server that signs every outgoing message. You never share it.
- Public key: the matching key you publish openly in DNS so receivers can verify your signatures.
- Selector: a short label that tells receivers which public key to look up, which leaves room for multiple keys on one domain.
- DKIM-Signature header: the hidden header added to each email that carries the signature and the details needed to verify it.
How Does DKIM Work?
DKIM works by signing each outgoing email with a private key that only you control, then letting receivers verify that signature with a public key you publish in DNS. If the signature checks out and the message hash matches, the email passes DKIM. If anything was altered, verification fails.
There are two stages: signing, which happens on your side, and verification, which happens on the receiver’s side.
Here is the full path a signed message travels, in five steps.
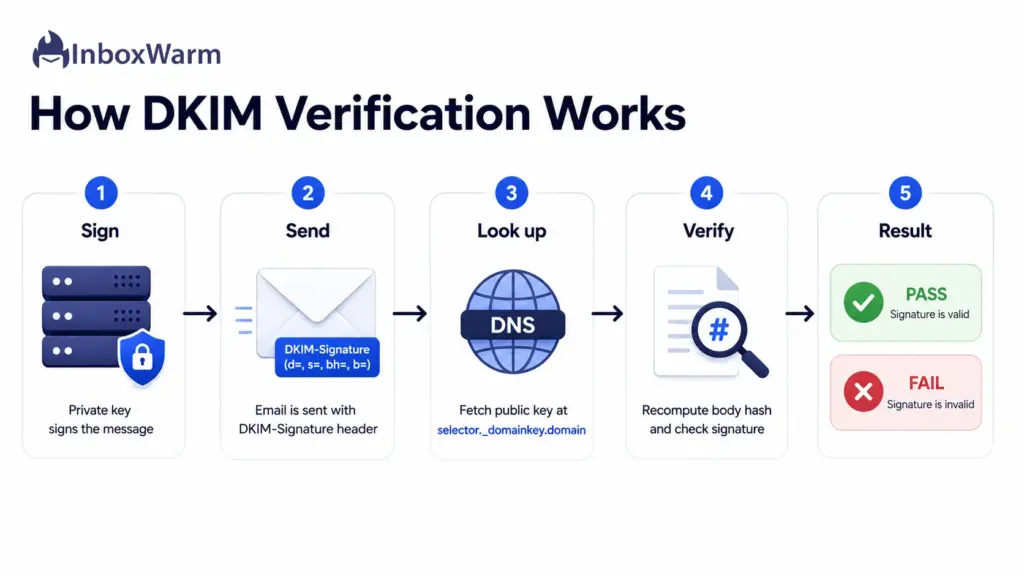
Step 1: The Sending Server Creates a Signature
When you send an email, your mail server hashes selected parts of the message, including key headers like From, Subject, and Date, plus the body. It then encrypts that hash with your private key. The result becomes the signature value (the b= tag) inside a new DKIM-Signature header added to the message.
Step 2: The Signature Travels With the Email
The DKIM-Signature header rides along inside the message itself. It carries everything a receiver needs to verify it: the signing domain (d=), the selector (s=), the algorithm (a=, usually rsa-sha256), the list of signed headers (h=), and the body hash (bh=).
Step 3: The Receiving Server Looks Up Your Public Key
The receiver reads the d= and s= values, then queries DNS for a TXT record at selector._domainkey.yourdomain.com. That record holds your public key. Some providers, including Microsoft 365, point that name to their own key servers with a CNAME, but the receiver still ends up with the public key.
Step 4: The Receiver Recomputes and Compares
Using the same algorithm, the receiver normalizes the message, recomputes the body hash, and decrypts the signature with your public key. If the recomputed hash matches the signed hash, the signature is valid. This normalizing step, called canonicalization (simple or relaxed), absorbs harmless changes like extra whitespace so legitimate mail isn’t broken by minor edits along the way.
Step 5: DKIM Passes or Fails
If everything matches, the email passes DKIM, and the receiver knows the message really came from your domain, untouched. If the key is missing, the signature is forged, or the body was modified, DKIM fails, and the message is far more likely to be filtered or rejected.
Understanding DKIM Signatures and How They Authenticate Messages
A DKIM signature is the DKIM-Signature header your server adds to each email. It authenticates the message by carrying two cryptographic fingerprints, one of the chosen headers and one of the body, that a receiver recomputes and checks against your public key.
Here is what a DKIM- Signature header looks like, simplified:
DKIM-Signature: v=1; a=rsa-sha256; d=example.com; s=selector1;
h=from:subject:date; bh=2jUSOH9...; b=AbCdEf123...
Each tag tells the receiver something specific:
| Tag | What it tells the receiver |
|---|---|
| v | The DKIM version, always 1. |
| a | The algorithm used to sign, usually rsa-sha256. |
| d | The signing domain that takes responsibility for the message. |
| s | The selector, which points to the right public key in DNS. |
| h | The list of header fields that were signed, such as From and Subject. |
| bh | The body hash, a fingerprint of the message body. |
| b | The signature itself, the encrypted hash of the headers and body hash. |

The two fingerprints are what make the signature tamper-evident. The body hash (bh=) proves the body was not changed, and the signature (b=) proves the signed headers were not changed and that the message was signed by someone holding the private key.
If a single character in a signed field is altered in transit, the recomputed hash no longer matches, and DKIM fails. That is the whole point: authentication is not a label you can copy; it is a calculation that only succeeds when the message is genuine and intact.
What Is a DKIM Record and Where Is It Stored?
A DKIM record is a specially formatted DNS TXT record that publishes your public key so receiving servers can verify your signatures. It is stored in your domain’s DNS zone, at a subdomain built from your selector, the literal _domainkey, and your domain, for example, selector1._domainkey.yourdomain.com.
A real record looks like this:
selector1._domainkey.example.com IN TXT “v=DKIM1; k=rsa; p=MIGfMA0GCSqGSIb3DQEBAQUAA4GNADCBiQ…”
The value is a set of tag=value pairs.
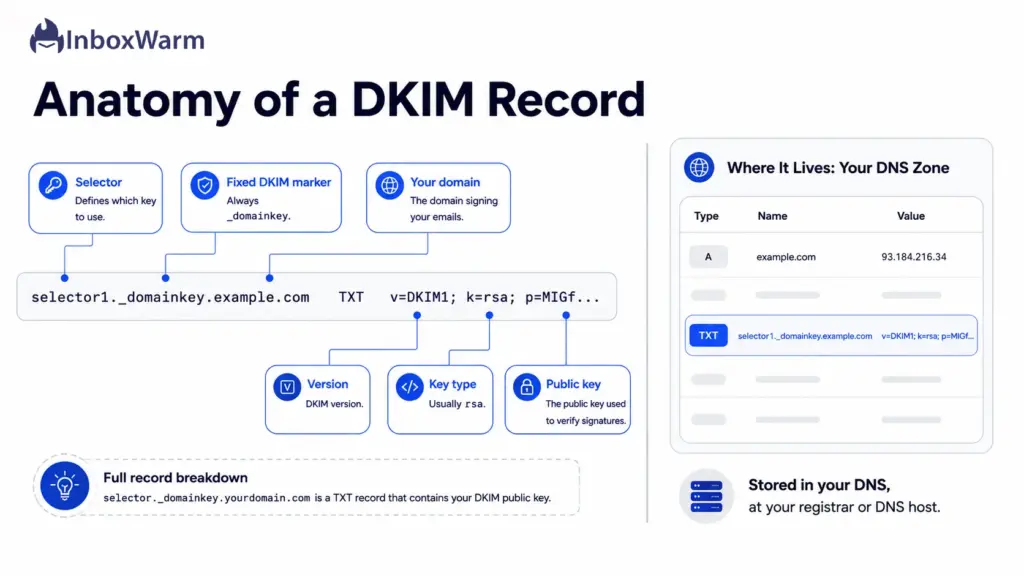
The most common ones:
| Tag | What it means |
|---|---|
| v | Version. Always DKIM1. |
| k | Key type. Almost always rsa. |
| p | The public key itself, a long base64 string. This is the part receivers use to verify your signatures. |
| t | Optional flags. For example, t=y marks the key as testing mode while you confirm everything works. |
You add and store this record wherever your domain’s DNS is hosted, usually your registrar or DNS provider. The selector is a label chosen by your email provider (Google Workspace uses “google,” for instance) so a single domain can hold several keys and rotate them without breaking signing.
As a rule, use a 2048-bit key. Some receivers reject anything shorter than 1024 bits, and modern guidance favors 2048 bits for stronger protection. A 2048-bit key often exceeds the 255-character limit for a single DNS string, so it gets split across multiple quoted strings, which DNS reassembles automatically.
Once it is published, confirm the record resolves correctly with a DKIM checker before you rely on it.
How Does DKIM Prevent Email Spoofing?
DKIM prevents email spoofing by making messages tamper-evident. Because only you hold the private key, an attacker cannot forge a valid signature for your domain, and any change to a signed message breaks the body hash and fails verification.
Email spoofing is the practice of forging a message’s sender details so it appears to come from someone it does not. DKIM does not hide the From address, but it lets a receiver detect when a message claiming to be from your domain was not actually signed by you. An impostor can type your domain into the “From” field, but without your private key, they cannot produce a signature that verifies against your public key.
There is a limit worth understanding. On its own, DKIM checks the signing domain (the d= tag), not the visible From address a person reads, and it does not tell the receiver what to do when a check fails.
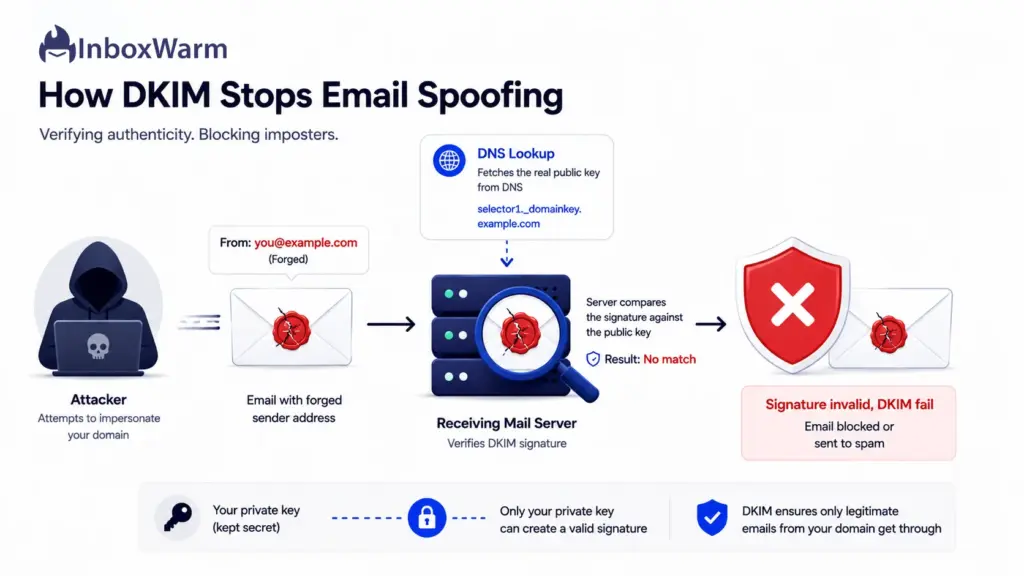
That gap is closed by DMARC, which ties DKIM and SPF results to the From domain and instructs receivers to quarantine or reject messages that fail. DKIM provides the proof. DMARC provides the enforcement.
DKIM and Email Deliverability: What’s the Connection?
DKIM connects to deliverability by building trust in your domain over time. Authenticated mail is more likely to reach the inbox, and a consistent DKIM pass rate is a positive signal that feeds your sender reputation, the score mailbox providers use to decide where your mail lands.
The stakes are now formal. Since February 2024, Google and Yahoo require bulk senders (those sending 5,000 or more messages a day to personal accounts) to authenticate with both SPF and DKIM and to publish a DMARC policy of at least p=none.
Microsoft applied the same rules to outlook.com, hotmail.com, and live.com starting May 5, 2025. The same guidelines ask senders to keep spam complaints below 0.3%. Miss these requirements and your mail can be throttled or rejected before reputation even enters the picture.
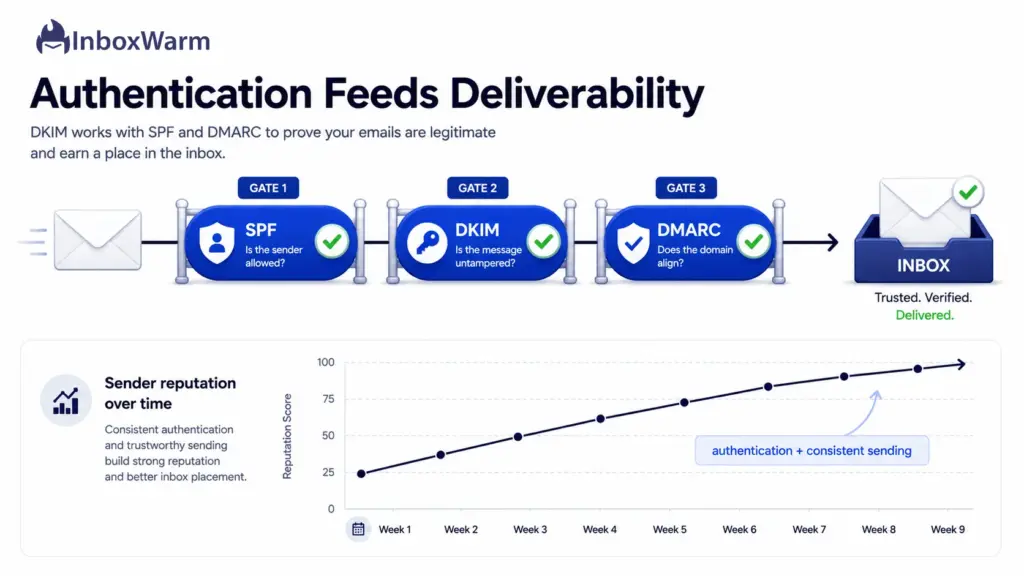
One honest caveat: DKIM is necessary, but it is not sufficient. Authentication proves who you are. It does not prove you are a sender people want to hear from. A brand-new domain with flawless DKIM can still land in spam simply because it has no sending history yet. That is the job of email warm-up, which gradually builds the reputation that authentication alone cannot.
DKIM vs. SPF vs. DMARC
SPF, DKIM, and DMARC are three layers of the same email authentication system. SPF verifies which servers may send for your domain, DKIM verifies the message was not altered and truly came from your domain, and DMARC ties the two to your visible From address and tells receivers how to handle failures.
| SPF | DKIM | DMARC | |
|---|---|---|---|
| What it checks | Is the sending IP authorized? | Was the message signed by the domain and unaltered? | Do SPF or DKIM align with the From domain, and what to do if not? |
| Method | DNS record listing allowed IPs | Digital signature plus public key in DNS | Policy, alignment, and reporting |
| Survives forwarding? | Often breaks | Usually survives | Depends on SPF or DKIM |
| Defined in | RFC 7208 | RFC 6376 | RFC 7489 |
You don’t choose between them. Modern deliverability needs all three.
SPF and DKIM do the verifying, while DMARC turns those results into enforcement and visibility. If you are building this stack from scratch, start by publishing an SPF record, add DKIM signing, then layer a DMARC record on top at p=none before tightening to quarantine or reject.
A Step-by-Step Guide to Setting Up DKIM for Your Domain
Setting up DKIM takes five steps: generate a key pair, choose a selector, publish the public key as a DNS record, enable signing in your mail platform, and verify the result. If you use a major provider, most of this is automated for you.
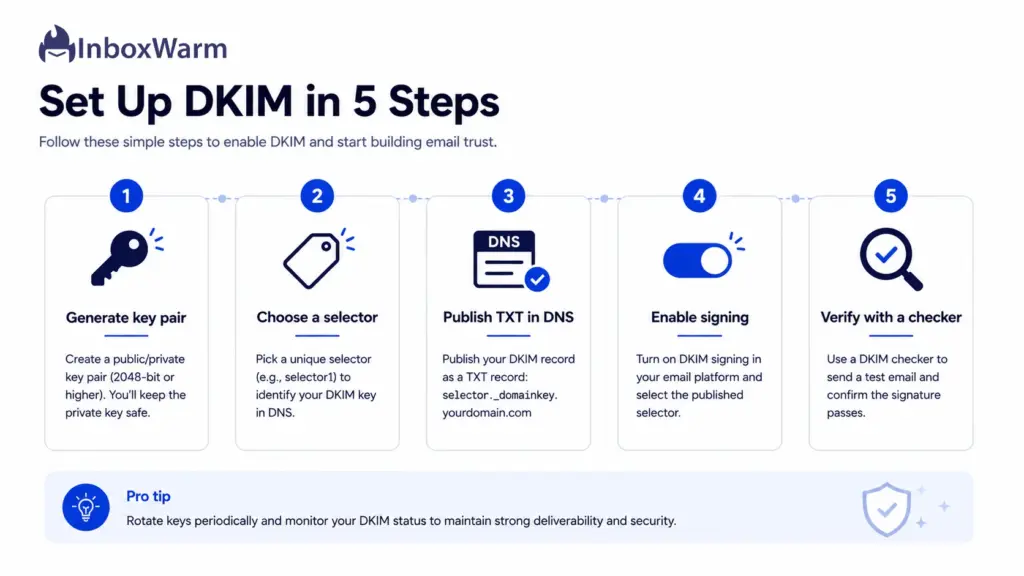
Step 1: Generate a 2048-bit Key Pair
Create the key pair on your sending platform. Google Workspace and Microsoft 365 generate the key for you inside the admin console, so you rarely touch the private key directly. If you run your own mail server, you can generate a 2048-bit RSA key pair with a tool like OpenSSL. The private key stays on the server; the public key goes into DNS in the next steps.
Step 2: Choose a Selector
Pick a selector name, which is just a label for this key, such as selector1, default, or a dated name like mail2026. Hosted providers assign one automatically. A clear selector makes it easy to add a second key later and rotate without breaking the signature.
Step 3: Publish the Public Key in DNS
Microsoft 365 custom domains typically use two DKIM CNAME records (selector1 and selector2) that point to Microsoft-managed DKIM infrastructure rather than publishing the public key directly in a TXT record.
Step 4: Enable DKIM Signing in Your Mail Platform
Turn on DKIM signing so outbound messages actually include a DKIM-Signature header. In Google Workspace, generate the record, publish it in DNS, then click Start Authentication.
In Microsoft 365, publish the required DKIM CNAME records and then enable DKIM for the domain in the Microsoft Defender portal. The exact interface may change over time, so always confirm the current menu path in your provider’s documentation.
Step 5: Verify the Signature
Send a test message to an inbox you control and confirm the signature validates. Run your domain and selector through a DKIM checker to confirm the record is published and well-formed. Allow up to 48 hours for DNS changes to propagate before you decide something is broken.
How to Check If Your DKIM Configuration Is Working Correctly
You can check DKIM in two ways: inspect the headers of a message you send to yourself, or run your domain and selector through a checker. Both confirm whether your signature is present, valid, and aligned with your From domain.
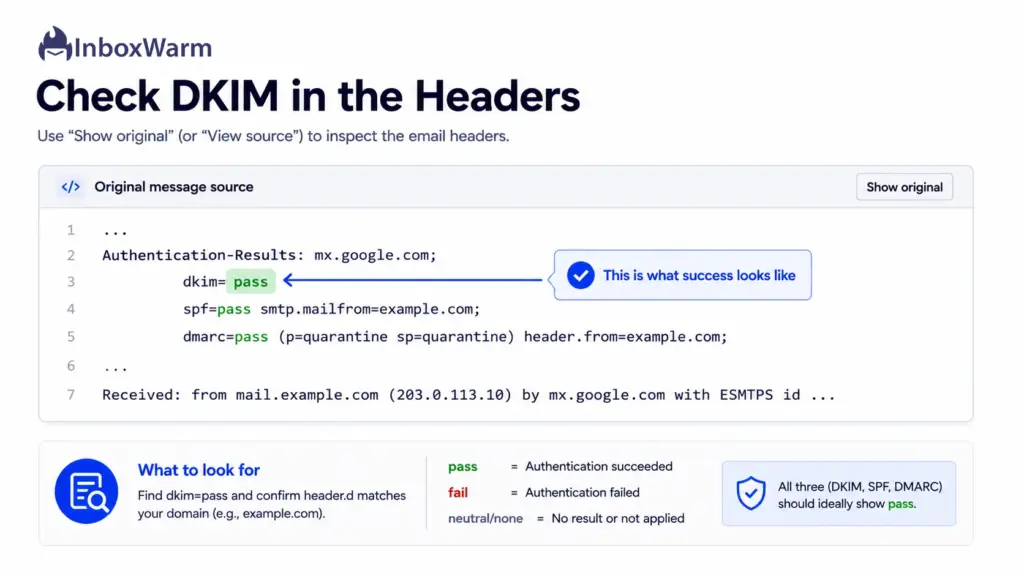
Check the Email Headers
Send a test email to a Gmail account, open it, and choose “Show original” from the message menu. Look for the Authentication-Results line near the top. A value of dkim=pass means your signature was verified successfully, and you’ll see the signing domain listed right beside it.
Use a DKIM Checker Tool
A checker queries your DNS for the selector’s public key and confirms the record is published and correctly formatted. You’ll need your domain and your selector, which you can find in the s= tag of the DKIM-Signature header. Confirm DKIM with a DKIM checker, and while you are at it, validate the rest of your stack with an SPF checker and a DMARC checker.
Know What a Pass Looks Like
A healthy result shows dkim=pass with a signing domain that matches your sending domain. If you see dkim=none, no signature was added, which usually means signing is off or the record has not propagated. If you see dkim=fail, the signature was present but did not validate, which points to one of the errors below.
Common DKIM Errors That Can Hurt Email Deliverability
Most DKIM failures come from a handful of fixable mistakes rather than anything exotic.
Here are the ones that trip people up most often, what causes them, and how to fix each.
| Error | Why it happens | How to fix it |
|---|---|---|
| Selector mismatch | The selector your server signs with does not match the one published in DNS. | Confirm the s= tag in the signature matches your DNS record name. |
| Key too short | A 512-bit or weak key is used, which some receivers reject outright. | Regenerate a 2048-bit key and republish the record. |
| Wrong record type | A CNAME is published where a TXT is expected, or vice versa. | Match the record type your provider requires (TXT for most, CNAME for Microsoft 365). |
| Broken or split key | Stray line breaks or a truncated public key corrupt the record. | Paste the full key, let DNS handle string splitting, and recheck. |
| No alignment | The signing domain does not align with the From domain, so DMARC still fails. | Sign with a domain that matches or aligns with your visible From address. |
| Not yet propagated | The record was added recently and has not spread across DNS. | Wait up to 48 hours, then recheck before troubleshooting further. |
If a checker reports a fail, work down this list from the top. A selector mismatch and a not-yet-propagated record account for the majority of new setups that look broken but are actually fine within a day.
DKIM Best Practices for Better Email Security and Deliverability
Good DKIM hygiene is mostly about strong keys, regular rotation, and pairing DKIM with the rest of your authentication stack. Follow these practices to keep signatures valid and your domain trusted.
- Use 2048-bit keys. They are the modern standard and harder to attack than older 1024-bit keys while still fitting comfortably in DNS.
- Rotate keys on a schedule: Replace keys periodically and run two selectors in parallel during the switch so signing never breaks. Dual-signing lets receivers validate either key while you transition.
- Align your signing domain with your From address: DKIM only helps DMARC when the signing domain matches or aligns with the visible From domain.
- Sign the headers that matter: Make sure From, Subject, and Date are in the signed headers list so the parts recipients see are protected.
- Pair DKIM with SPF and DMARC: Authentication works as a system. Layer a DMARC policy on top so failures are actually enforced, not just detected.
- Monitor with DMARC reports: Aggregate reports show you who is sending from your domain and whether DKIM is passing, which surfaces problems before they hurt deliverability.
Most of these take a few minutes once your record is live, and they pay off on every campaign. If you have not set the enforcement layer yet, generate a DMARC record and start p=none while you watch the reports.
How DKIM Supports Cold Email Outreach and Email Marketing Campaigns
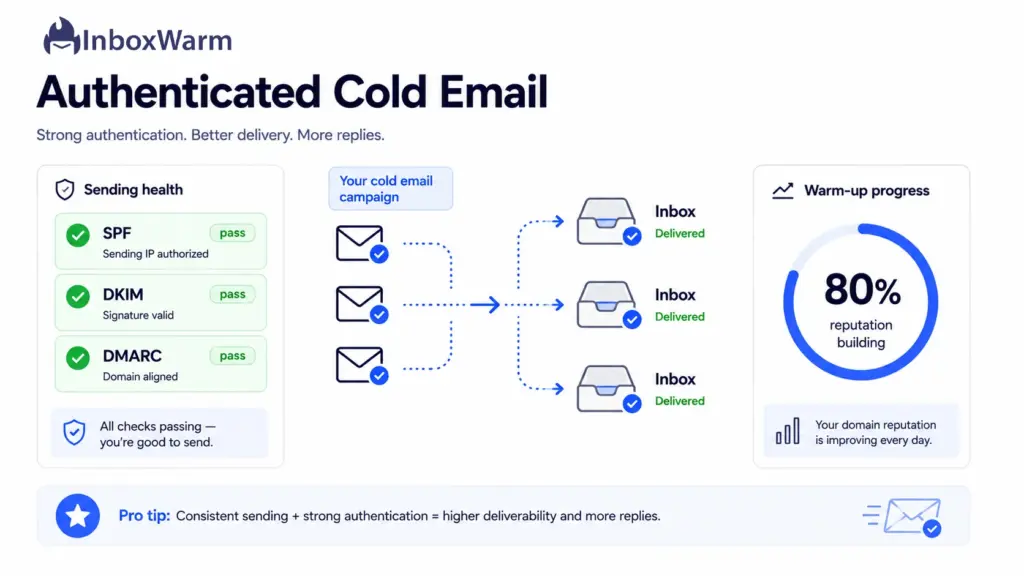
For cold email and marketing, DKIM is table stakes. High-volume sending is exactly what the bulk sender rules target, so without DKIM your campaigns get throttled or rejected by the same providers you are trying to reach. With it, every message carries proof of origin that helps your mail clear filters and land in front of real people.
If you run agency outreach or manage an SDR team, authentication is the foundation under everything else.
Here is what that looks like in practice:
- It clears the bulk sender bar. Google, Yahoo, and Microsoft require DKIM for senders pushing 5,000 or more messages a day, so a passing signature is the difference between delivery and rejection at scale.
- It protects your domain from impersonation. When you sign your mail, spoofed messages using your domain fail verification, which keeps fraud from eroding the reputation your campaigns depend on.
- It supports DMARC alignment. A signing domain that aligns with your From address lets DMARC pass; it’s the setup most cold email tools and inbox providers now expect.
- It does not replace warm-up. Authentication proves who you are. It does not prove you are a sender people want to hear from, so a new domain with perfect DKIM can still land in spam without sending history behind it.
New sending domains and fresh mailboxes need to ramp up gradually, which is why teams pair authentication with email warm-up before pushing volume. Whether you are warming up a new Gmail account, an Outlook mailbox, or sending through SMTP, DKIM should be passing before the first campaign goes out.
The order matters. Set up SPF, DKIM, and DMARC first so your identity is verified, then warm the domain so your reputation can carry that identity into the inbox. InboxWarm.ai is an AI-powered email warm-up tool that improves inbox placement and sender reputation, building the sending history that authenticated campaigns need to perform.
Conclusion
DKIM is one of the foundational pieces of modern email. It gives every message you send a verifiable, tamper-proof signature, so mailbox providers can trust that the mail really came from your domain and arrived unchanged. Set up alongside SPF and DMARC, it is no longer optional. It is the price of admission to the inbox for any serious sender.
The good news is that DKIM is mostly a one-time setup that pays off on every message afterward. Generate a 2048-bit key, publish the record at your selector, enable signing, and verify it with a checker. Once DomainKeys Identified Mail is passing, you have cleared the authentication bar that Google, Yahoo, and Microsoft now enforce for bulk senders.
From there, deliverability becomes a reputation game. Authentication gets you in the door, and consistent sending behavior keeps you in the inbox. Pair a clean authentication setup with a deliberate warm-up plan, and you give every campaign the best possible shot at landing where it belongs.
Frequently Asked Questions
What Is the Difference Between the DKIM Public Key and Private Key?
The private key is a secret that stays on your sending mail server and signs every outgoing message. The public key is published openly in your DNS so any receiving server can verify those signatures. Because the keys are mathematically paired, a signature created with your private key can only be validated by your matching public key. An attacker without your private key cannot forge a valid signature for your domain.
What Is a DKIM Selector?
A DKIM selector is a short label that points receivers to the correct public key in your DNS. It appears in the s= tag of the DKIM-Signature header and forms part of the record's location, as in selector1._domainkey.yourdomain.com. Selectors let a single domain publish multiple keys at once, which makes it possible to rotate keys or run several email services without conflict. Your provider usually assigns the selector for you.
Do I Need to Set Up DKIM if I Use Gmail or Microsoft 365?
Yes, if you send from your own domain. By default these providers may sign with their own domain, which does not help your reputation or DMARC alignment. Enable DKIM for your custom domain in the admin console, a one-time setup that covers all outbound mail.
How Long Does DKIM Take to Work After Setup?
After you publish the record and enable signing, DNS propagation can take anywhere from a few minutes to 48 hours. Wait a full day before troubleshooting, then confirm with a DKIM checker. If it still fails, check for a selector mismatch first.
Can DKIM Survive Email Forwarding?
DKIM usually survives forwarding better than SPF because the signature travels with the message, not the sending IP. As long as the signed headers and body are not changed, it stays valid. Mailing lists and gateways that rewrite the subject or body can break it, though relaxed canonicalization helps.
Does DKIM Encrypt My Emails?
No. DKIM does not encrypt your email's contents; it only proves the message came from your domain and was not altered after signing. For confidentiality, you would use TLS or end-to-end encryption instead.
What Happens if DKIM Fails?
A DKIM failure does not automatically send a message to spam, but it removes a trust signal and makes filtering more likely. If you have a DMARC policy of p=quarantine or p=reject and the message also fails SPF alignment, the receiver may divert it to spam or reject it outright. Common causes include a missing or malformed record, a selector mismatch, or content that was modified in transit. Running a checker usually pinpoints which of these is to blame.
Your emails are signed, aligned, and authenticated, and they are still landing in spam.
InboxWarm.ai warms up your sending with AI to build the engagement signals that move you from the spam folder to the inbox. Start free for 10 days, no credit card required.