TL;DR
- SPF tells receiving mail servers which servers are allowed to send email on your behalf.
- DKIM signs every email you send with a cryptographic key so receiving servers can confirm the message was not tampered with in transit.
- DMARC sits on top of both and tells receiving servers what to do when either check fails: do nothing, quarantine, or reject.
- All three are now mandatory for bulk senders under Google and Yahoo’s 2024 sender requirements. Skip them and your emails simply do not reach the inbox.
- Setup takes under 30 minutes per domain. This guide covers exactly how, plus how to test and fix the most common errors.
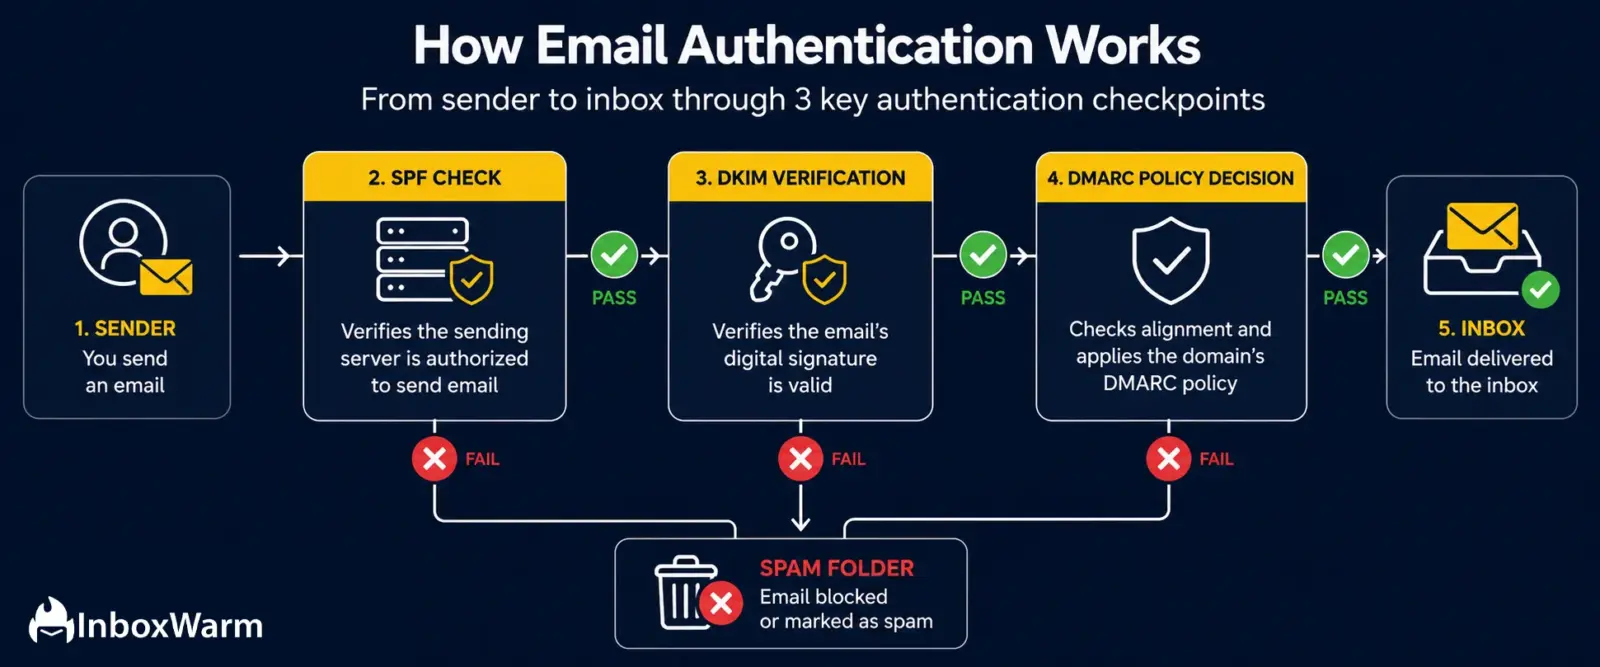
You spent an hour writing the perfect cold email. The subject line is tight, the personalisation is on point, the offer is clear. You hit send. And it lands in spam. Not because of the content. Not because of the subject line. Because your domain was never authenticated.
SPF, DKIM, and DMARC are the three DNS records that tell the internet your domain is legitimate. Without them, receiving servers have no way to verify you are who you say you are. Every major inbox provider- Google, Yahoo, Microsoft- uses authentication status as a primary deliverability signal. A domain with all three set up correctly gets the benefit of the doubt. A domain without them is treated as a potential threat, no matter how good the email copy is.
The good news is that fixing this is completely within your control. According to Google’s 2024 sender guidelines, bulk senders must now have SPF, DKIM, and DMARC configured or face hard delivery failures.
This guide walks you through each protocol clearly, step by step, with free tools to check your work as you go.
Table of Contents
What Is Email Authentication and Why Do You Need It?
Here is a problem most senders do not realise exists. Anyone can set up a mail server and send an email that claims to be from your domain. There is nothing in the basic email protocol that stops this. A scammer can send thousands of phishing emails that look exactly like they came from your company address, and without authentication records in your DNS, receiving servers cannot tell the difference.
Email authentication is the system that fixes this. It is a set of DNS records that let you declare, publicly and verifiably, which servers are authorised to send on your behalf and what to do when something claims to be you but fails the check. When a receiving server gets an email from your domain, it runs a quick DNS lookup to check your authentication records and uses that result as a core input into its spam classification decision.
From a deliverability standpoint, this matters enormously. Domains with clean SPF, DKIM, and DMARC records are treated as far more trustworthy than unauthenticated domains, regardless of content quality.
Your sender score, the reputation metric that inbox providers use to decide where your emails land, depends heavily on having a clean authentication foundation. Get this right first. Everything else builds on top of it.
What Is SPF and How Does It Work?
SPF stands for Sender Policy Framework. Think of it as a guest list for your domain. It is a DNS TXT record that lists every mail server authorised to send email on your behalf. When a receiving server gets an email from your domain, it does a quick DNS lookup and checks whether the sending server’s IP is on your list. If it is, SPF passes. If it is not, SPF fails.
The important thing to understand is that SPF only checks the technical return-path address used during the SMTP handshake, not the visible From: address in the email header. That means SPF alone does not prevent someone from spoofing your display name. It is a necessary piece of the puzzle, but it is not the whole picture. That is exactly why DKIM and DMARC are needed alongside it.
If you want to check whether your current SPF record is set up correctly, the InboxWarm SPF Checker will validate your syntax, count your DNS lookups, and flag any issues instantly. And if you need to build one from scratch, the SPF Generator will create a valid record for you in under two minutes.
How to Set Up Your SPF Record
Step 1: Make a list of every service that sends email from your domain. This includes your main email provider (Google Workspace, Microsoft 365), your outreach tools (Apollo, Instantly, Lemlist), your CRM or marketing platform (HubSpot, Mailchimp), and any transactional email service (SendGrid, Mailgun, Postmark). You need all of them.
Step 2: Log in to your DNS provider. Cloudflare, GoDaddy, Namecheap, Route 53. Wherever your domain is hosted.
Step 3: Create a new TXT record at the root of your domain (@) with this kind of structure:
v=spf1 tells the server this is an SPF record. Each include: authorises one sending service. The qualifier at the end tells the receiving server what to do when an IP is not on your list:
| Qualifier | What Happens |
|---|---|
| -all | Hard fail: unauthorised servers are rejected outright. Most secure, but risky if you miss a sending source. |
| ~all | Soft fail: unauthorised servers are flagged but delivered. Best starting point. |
| ?all | Neutral: no action taken. Not recommended. |
| +all | Pass all: every server can send as you. Never use this. |
Step 4: Save and wait for DNS to propagate, typically 15 to 60 minutes. Then verify your record is live using the SPF Checker before you send anything.
What Is the SPF 10-Lookup Limit?
SPF has a hard limit of 10 DNS lookups per evaluation. Each include: directive in your record counts as at least one lookup. If your record requires more than 10 lookups to fully evaluate, SPF returns a PermError, which many receiving servers treat the same as a hard fail. Companies using multiple sending platforms hit this constantly.
If you are over the limit, remove services you no longer use or replace include: directives with static IP4: ranges where possible.
What Is DKIM and What Does It Actually Protect?
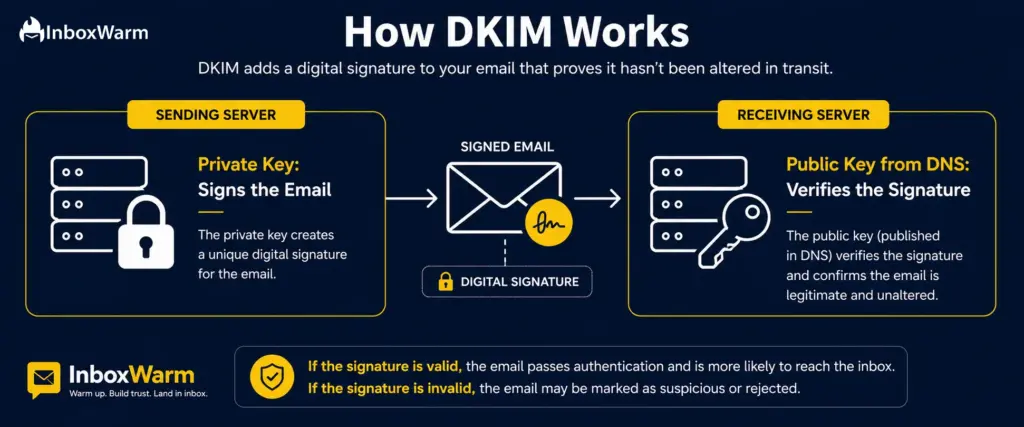
DKIM stands for DomainKeys Identified Mail. While SPF is about verifying who sent an email, DKIM is about verifying the email itself. Every message you send gets signed with a private cryptographic key held by your mail server.
The matching public key is published in your DNS. When a receiving server gets your email, it fetches your public key and uses it to verify the signature. If the signature checks out, the email is confirmed as unaltered. If something changed in transit, the signature fails.
Here is why this matters in practice. DKIM is the only authentication protocol that survives email forwarding. When an email gets forwarded, the sending IP address changes and SPF fails. But the DKIM signature is attached to the message body itself, so it travels with the email and still validates at the final destination. In environments where forwarding is common, DKIM is your primary protection.
Once you have published your DKIM record, verify it is resolving correctly with the InboxWarm DKIM Checker. Enter your domain and your DKIM selector, and it will confirm whether the public key is live and readable by receiving servers.
How to Set Up DKIM?
Step 1: Go into the email authentication settings of your sending platform. In Google Workspace: Apps > Google Workspace > Gmail > Authenticate Email. In Microsoft 365: Defender portal > Email Authentication Policies > DKIM. Other platforms have similar menus.
Step 2: Your platform will generate a DKIM key pair and give you a DNS record to publish. It will look something like this:
Type: TXT
Value: v=DKIM1; k=rsa; p=MIGfMA0GCSqGSIb3DQEBAQUAA4…
Step 3: Add this record exactly as provided. The part before ._domainkey is called the selector. It identifies which key pair to use. Get the name exactly right. DNS records are case-sensitive on some providers, and google._domainkey.yourdomain.com and Google._domainkey.yourdomain.com are two different records.
Step 4: Return to your platform and activate DKIM. If you use multiple sending platforms, repeat this for each one. Unlike SPF, there is no limit on how many DKIM records your domain can have.
Which DKIM Size Should You Use?
Use a 2048-bit key wherever your DNS provider allows it. A 1024-bit key is still technically valid but offers weaker cryptographic protection. Some older DNS providers cannot fit a 2048-bit key in a single TXT record. In that case, the key gets split across two quoted strings within the same record. This is fully valid and widely supported. Do not let it confuse you.
What Is DMARC and Why Is It the Missing Piece?
DMARC stands for Domain-based Message Authentication, Reporting, and Conformance. If SPF and DKIM are the checks, DMARC is the policy that says what to do when those checks fail. It is also what closes the spoofing loophole that SPF alone leaves open.
Here is the loophole. SPF checks the technical return-path address used during the SMTP handshake, not the visible From: address in the email header. So an attacker could set up their own domain, pass SPF using that domain, and still display your domain as the visible sender. Without DMARC, receiving servers have no way to catch this.
DMARC adds something called alignment: it requires that the domain in the visible From: header must match the domain that passed SPF or DKIM. If it does not match, DMARC fails and the policy kicks in.
DMARC also gives you reporting. When you configure a reporting address in your DMARC record, receiving servers start sending you daily aggregate reports showing every source that sent email claiming to be from your domain, and whether each source passed or failed authentication.
This visibility alone is worth the setup. You will often discover third-party services sending as your domain that you did not even know about. Build your record using the InboxWarm DMARC Generator and verify it is live with the DMARC Checker.
How to Set Up DMARC?
Step 1: Make sure SPF and DKIM are already working before you touch DMARC. DMARC evaluates both. Setting it up on a broken foundation means your reports will be useless and you risk blocking legitimate email.
Step 2: Create a TXT record at _dmarc.yourdomain.com. Use this as your starting configuration:
v=DMARC1 declares the record type. p=none is monitor mode: no action is taken on failing emails but reports are generated. rua is the address for aggregate reports. ruf is for forensic reports.
Step 3: Leave it on p=none for two to four weeks and review your reports. Once you are confident every legitimate sending source is passing, move to p=quarantine (failing emails go to spam) and eventually p=reject (failing emails are blocked).
What Are the Three DMARC Policy Levels?
The following table describe thee policy levels of the DMARC:
| Policy | What It Does | When to Use |
|---|---|---|
| p=none | Monitor only. Reports generated, no action on failures. | Start here. Run for 2 to 4 weeks while auditing your sending sources. |
| p=quarantine | Failing emails go to the spam or junk folder. | Once all legitimate senders are confirmed passing. |
| p=reject | Failing emails are blocked and never reach the inbox at all. | Full enforcement. Maximum protection and compliance. |
How Do SPF, DKIM, and DMARC Work Together?
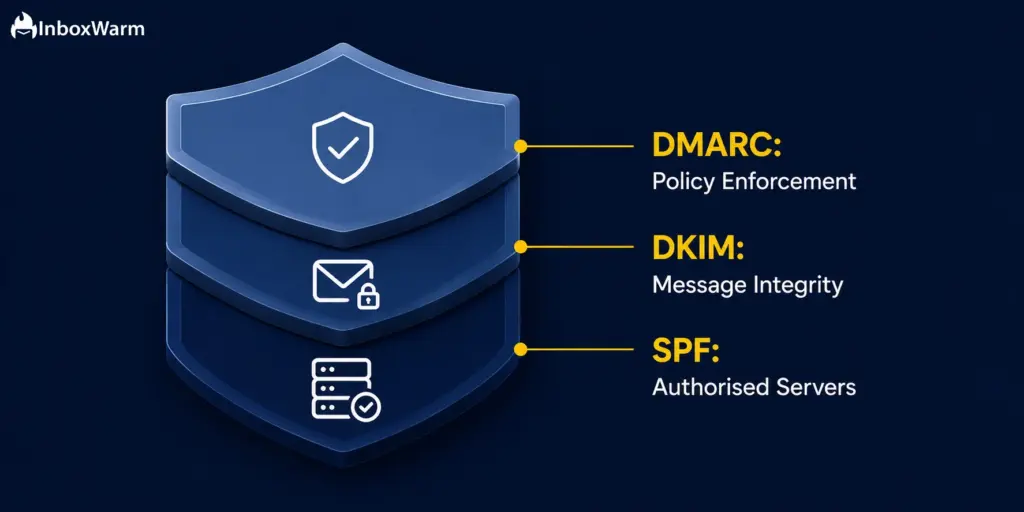
These three protocols are not doing the same thing. They cover different parts of the authentication problem and need each other to be complete.
SPF answers: is this server allowed to send for this domain? DKIM answers: Was this specific message signed and unmodified? DMARC answers: does the visible sender domain actually match, and what should happen if it does not? For DMARC to pass, at least one of SPF or DKIM must pass, and the authenticated domain must align with the visible From: domain. If only one aligns, that is still a DMARC pass.
In real-world scenarios: SPF fails on forwarded emails because the originating IP changes. DKIM survives forwarding because the signature travels with the message. DMARC without underlying SPF and DKIM records has nothing to evaluate.
All three working together create the only complete protection against spoofing, identity attacks, and the deliverability consequences that come from failing authentication checks.
What Do Google and Yahoo’s 2024 Sender Requirements Actually Mean?
In February 2024, Google and Yahoo started enforcing rules that changed the baseline for everyone doing email outreach. If you send more than 5,000 emails per day to Gmail accounts, you are now required to have SPF and DKIM configured, a DMARC policy of at least p=none, a working one-click List-Unsubscribe header, and a spam complaint rate below 0.10% measured in Google Postmaster Tools.
The 5,000-per-day threshold sounds high, but it catches most SaaS outbound teams and essentially all cold email agencies. And even if you send less than that, Gmail and Yahoo apply the same authentication checks to all incoming mail. The consequences are just softer for smaller senders: instead of hard rejection, you get lower inbox placement and higher spam rates.
The bottom line: if you are doing cold email in 2024 and beyond without SPF, DKIM, and DMARC configured, you are not losing some emails to spam. You are losing a lot of them, consistently, and the fix is a 30-minute DNS update.
How Do You Test Your SPF, DKIM, and DMARC Records After Setup?
Never assume a record is live just because you saved it. DNS propagation delays happen, copy-paste errors happen, and selector mismatches are incredibly common with DKIM. Always verify every record with a tool before you send any email from a newly configured domain.
InboxWarm has a free tool for each protocol:
- SPF Checker: Paste your domain. It validates syntax, counts lookups, and flags any errors.
- DKIM Checker: Enter your domain and selector to confirm the public key is live and readable.
- DMARC Checker: Checks your policy level, reporting addresses, and any syntax issues.
- Email Header Check: Send a test message to a Gmail account, open it, click the three dots > Show Original, and look for the Authentication-Results line. You will see live pass/fail results for all three protocols on a real message.
Which Email Platform Are You Sending From?
Authentication setup varies slightly by platform. InboxWarm has dedicated warm-up and setup guides for each:
What Are the Most Common SPF, DKIM, and DMARC Errors and How Do You Fix Them?
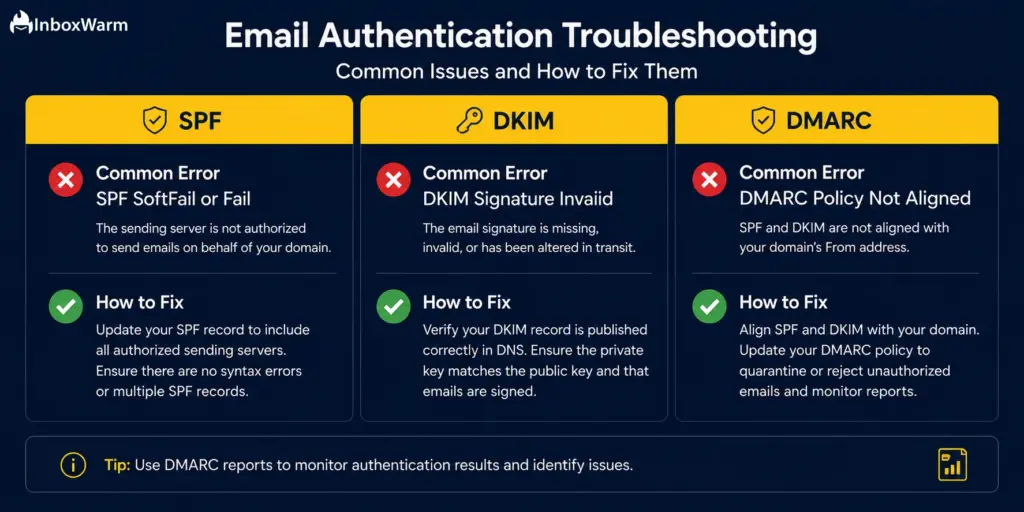
Most authentication failures come from the same handful of mistakes. Here is what to look for and how to fix each one.
SPF PermError: Too Many Lookups
You have exceeded the 10-lookup limit. Remove any sending services you no longer use. Replace include: directives with static ip4: ranges where possible. Run the updated record through the SPF Checker to confirm the lookup count is within the limit before publishing.
SPF Fails Because You Have Two SPF Records
Having two TXT records starting with v=spf1 on the same domain is invalid per RFC 7208. It causes a PermError and most receiving servers treat this as a hard fail. Fix: delete both records and create a single new one with all your include: directives combined.
DKIM Selector Not Found
The record name in your DNS does not match what your sending platform is looking for. Double-check the exact selector provided by your platform, including capitalisation, and match it precisely in your DNS record.
DMARC Fails Even Though SPF and DKIM Both Pass
This is an alignment issue, not an authentication failure. SPF is passing for a different domain than your visible From: address. This is very common when using third-party sending services that use their own domain in the return-path. Fix: check your email headers to see which domain SPF is authenticating against. Either configure the sending service to use your domain in the return-path, or ensure DKIM is aligning correctly instead. DMARC only needs one of the two to align.
DMARC Reports Are Not Arriving
If your rua reporting address is on a different domain than your sending domain, that receiving domain needs to publish a cross-domain authorisation record. The easiest fix is to use an rua address on your own domain. Verify your full record syntax is correct with the DMARC Checker.
Why Is Authentication Not Enough to Guarantee Inbox Placement?
Authentication tells mailbox providers who you are. It does not tell them whether to trust you. A brand-new domain with perfect SPF, DKIM, and DMARC will still land in spam on the first send. That is not a bug. That is how reputation-based filtering works: new domains have no sending history, so they get treated with default low trust.
What actually determines inbox placement is sender reputation, the cumulative score that inbox providers assign to your domain based on your sending behaviour over time. Low complaint rates, high open and reply rates, consistent send volumes, and a clean authentication record all feed into that score.
Building that reputation systematically before a campaign launches is what email warm-up does. It involves gradually increasing send volume from a new domain and generating positive engagement signals that train mailbox providers to trust you.
Authentication Is Set Up. Now Build Your Sender Reputation
InboxWarm.ai automates email warm-up and deliverability monitoring to help your emails reach the inbox, not the spam folder.
Frequently Asked Questions
What Happens to Your Emails If SPF Fails?
It depends on your DMARC policy. With p=none, the email usually gets delivered but flagged internally. With p=quarantine, it lands in spam. With p=reject, it is blocked entirely. Even without a DMARC record, persistent SPF failures will gradually damage your domain reputation and reduce your inbox placement rates over time.
Can You Have More Than One DKIM Record?
Yes, and you should if you send through multiple platforms. Each sending service uses a different selector, which means a different DKIM record at a different subdomain. There is no limit to how many DKIM records your domain can have. This is a key difference from SPF, which only allows one record per domain.
How Long Does It Take for DNS Changes to Propagate?
Most DNS changes propagate within 15 to 60 minutes. On some registrars with high TTL settings it can take up to 48 hours. Cloudflare and most modern providers are usually under 5 minutes. Always verify with a checker tool rather than assuming the change is live.
You Set Up DMARC but Still See Failures in Your Reports. What Is Going On?
The most common cause is alignment failure. A third-party sending service is passing SPF but using its own domain in the return-path, not yours. So even though SPF passes, DMARC fails because the authenticated domain does not match your visible From: address. Check your email headers to see which domain SPF is authenticating against and either fix the alignment or make sure DKIM is aligning instead.
Should You Jump Straight to p=reject or Start with p=none?
Always start with p=none. Jumping to p=reject before you have reviewed your reports and confirmed every legitimate sending source is passing authentication is how you accidentally block your own email. Run on p=none for at least two to four weeks, review your aggregate reports, fix any issues you find, then move to p=quarantine and eventually p=reject.
Does Having SPF, DKIM, and DMARC Mean Your Emails Will Reach the Inbox?
Not automatically. Authentication is the baseline. It tells mailbox providers you are who you say you are. Where your emails land still depends on your sender reputation, your complaint rate, your content, and your sending volume patterns. Authentication is the prerequisite for inbox placement, not a guarantee.
Final Thoughts
SPF, DKIM, and DMARC are not complicated. They are three DNS records that together tell the internet your domain is legitimate. Without them, every inbox provider you send to treats your emails with suspicion, and no amount of good copy, personalisation, or A/B testing will fix a deliverability problem rooted in missing authentication.
Set them up in order: SPF first, then DKIM, then DMARC starting on p=none. The whole setup takes under 30 minutes and it is permanent infrastructure that every other deliverability improvement builds on.
Once authentication is clean, the next step is building the sender reputation that actually determines where your authenticated emails land. That is where warm-up comes in. InboxWarm.ai handles it for you across all your sending domains at scale.