TL;DR
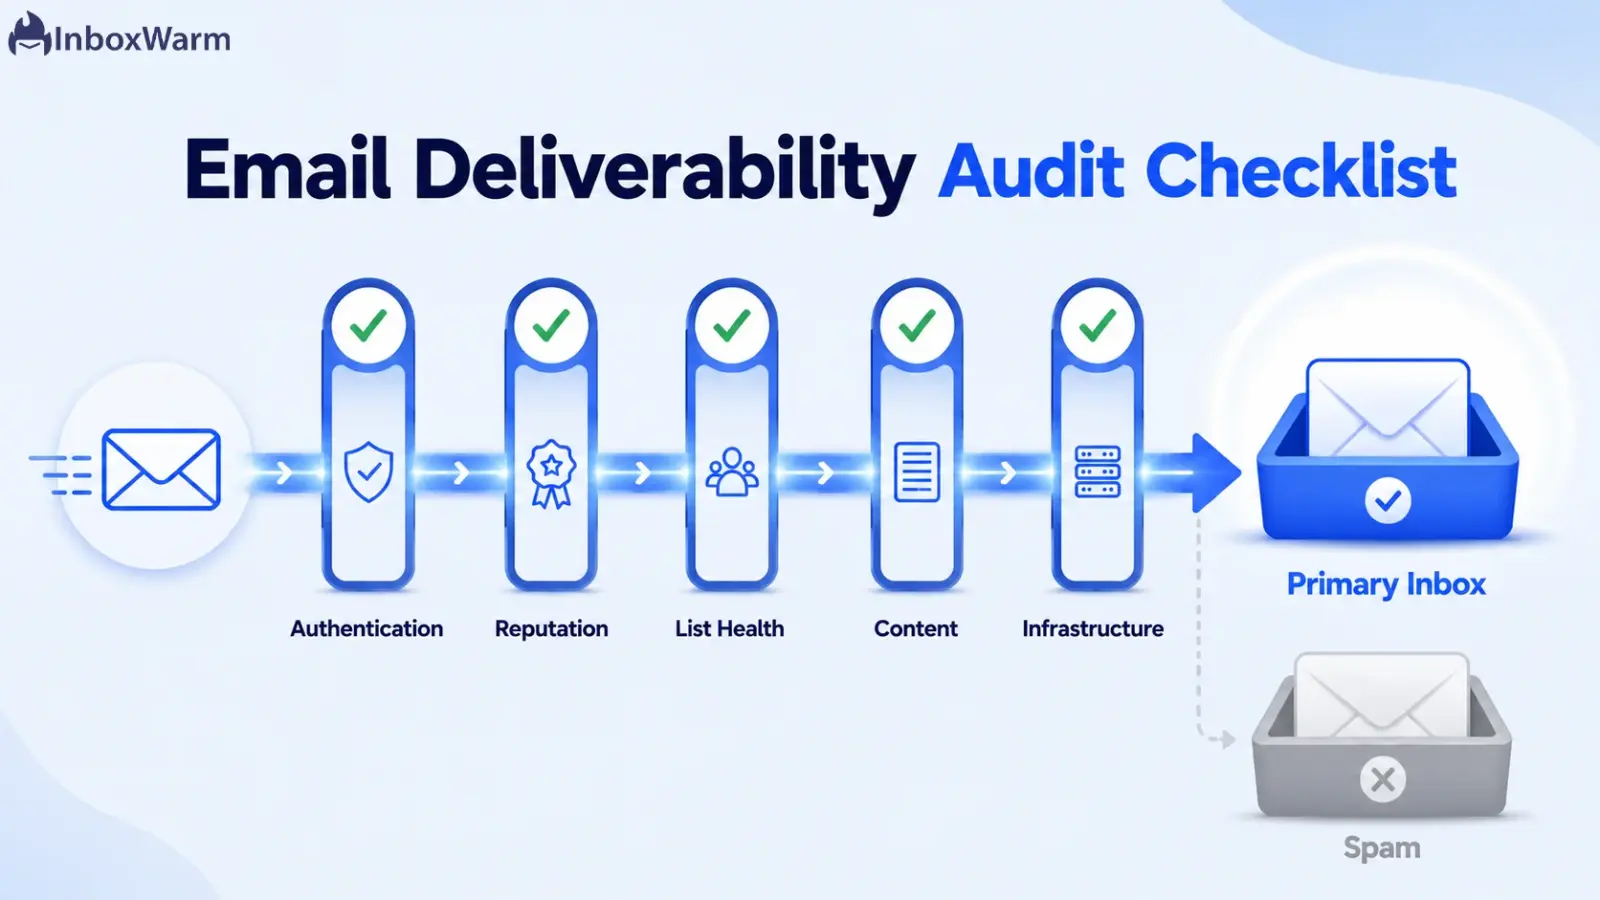
An email deliverability audit is a structured review of the technical, reputation, list, and content signals that decide whether your emails reach the inbox. Run it across five areas: authentication, sender reputation, list health, content engagement, and sending infrastructure. The 20-point checklist below shows you exactly what to test and the threshold each item needs to pass.
- Verify SPF, DKIM, and DMARC first. Most inbox placement failures start with broken authentication.
- Keep your spam complaint rate below 0.3% and your bounce rate under 2%. Google and Yahoo enforce these.
- Monitor reputation in Google Postmaster Tools and Microsoft SNDS, then confirm with a seed test before you scale.
- Audit on a schedule (monthly for active senders), not just when emails start going to spam.
Most senders have lived this moment: a campaign goes out, the open rate collapses, and nothing obvious explains it. The copy was solid. The list looked clean. Yet a big share of those emails never reached a real person. Some went to spam, some got throttled, and some were rejected outright. In almost every case, the writing isn’t the culprit. The real cause is one of the dozens of technical and reputation signals that mailbox providers weigh before deciding where a message lands.
Those signals add up quickly, and getting them wrong is costly. Google now blocks or quarantines mail from senders whose user-reported spam rate rises above 0.3%, and since November 2025 it has rejected non-compliant traffic outright instead of quietly routing it to spam. Recovering a damaged sender reputation takes weeks, and every campaign sent in the meantime lands in the wrong folder.
A deliverability audit replaces the guesswork with a clear answer. This guide breaks that audit into a 20-point checklist across five areas, explains what each check should look like when it passes, and names the free tools that surface the data behind it.
Run the checklist top to bottom, and the vague question of why emails keep hitting spam becomes a specific, fixable list, along with a repeatable way to lift inbox placement on the next send.
Table of Contents
What Is an Email Deliverability Audit?
An email deliverability audit is a structured, repeatable review of every signal that determines whether your messages reach the inbox instead of the spam folder. It checks four signal groups: email authentication (SPF, DKIM, and DMARC), sender and domain reputation, list health, and content engagement. The output is a pass or fail on each item plus a fix list.
Two terms matter before you start.
- Inbox placement is the percentage of your delivered email that lands in the primary inbox rather than spam or a secondary tab. It is not the same as your delivery rate, which only confirms the receiving server accepted the message. An email can be delivered and still sit in spam, so inbox placement is the number that actually reflects whether people see your email.
- Sender reputation is the trust score mailbox providers assign to your sending domain and IP based on your history. A strong reputation gets you to the inbox. A weak one gets you filtered.
A deliverability audit is different from a one-off email deliverability test. A test tells you where a single message landed today. An audit tells you why across your whole sending setup and gives you a checklist you can rerun every month as an email health check.
The 20 points below are grouped into the five areas you should work through in order.
Are Your Email Authentication Records Set Up Correctly?
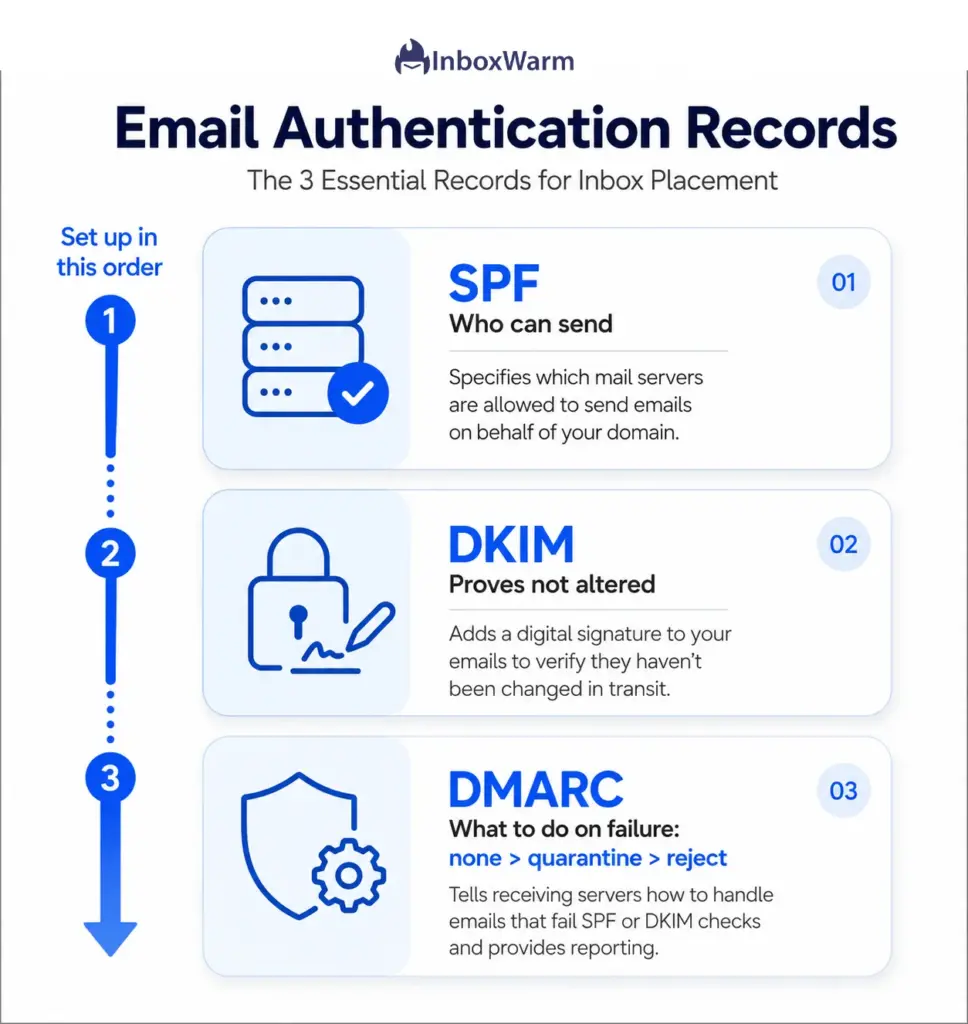
Email authentication proves you are allowed to send from your domain. If SPF, DKIM, or DMARC is missing or misconfigured, mailbox providers treat your mail as suspicious and route it to spam or reject it outright.
Since February 2024, Google and Yahoo have required SPF, DKIM, and DMARC for bulk senders, so these five checks are non-negotiable and come first in any audit.
1. Verify Your SPF Record
SPF (Sender Policy Framework) is a DNS record that lists which servers are allowed to send email for your domain. Confirm you have exactly one SPF record, that it includes every service you send through (your ESP, CRM, and transactional provider), and that it ends in ~all or -all. Watch for the 10 DNS lookup limit; exceeding it breaks SPF silently.
Run your domain through an SPF checker to confirm it passes, and if you need to rebuild it, an SPF generator will produce a clean record.
2. Confirm DKIM Signing Is Active
DKIM (DomainKeys Identified Mail) adds a cryptographic signature to every message so the receiving server can confirm the email was not altered in transit. Check that DKIM is enabled on every sending platform, that the public key is published in DNS, and that messages are signing with your own domain, not a shared provider domain. Send a test message and inspect the headers, or use a DKIM checker to confirm the signature validates.
3. Publish and Enforce a DMARC Policy
DMARC (Domain-based Message Authentication, Reporting, and Conformance) tells receiving servers what to do when a message fails SPF or DKIM, and it sends you reports on who is sending mail as your domain. Start at p=none to collect data without affecting delivery, then move to p=quarantine and eventually p=reject once your legitimate mail is aligned.
Do not jump straight to reject. Verify your policy with a DMARC checker, and build a correct record with a DMARC generator if you do not have one yet.
4. Check Forward and Reverse DNS (PTR) Records
Google requires that your sending domains and IPs have valid forward and reverse DNS records, also called PTR records. Reverse DNS maps your sending IP back to a hostname, and a missing or generic PTR record is a classic spam signal. If you send on a dedicated IP, confirm the PTR resolves to a hostname on your own domain. On a shared ESP, this is usually handled for you, but verify it rather than assume.
5. Confirm From-Domain Alignment
Alignment is the most common reason authentication ‘exists’ but DMARC still fails. SPF and DKIM can pass for a different domain than the one shown in your visible From address, which breaks DMARC alignment. Confirm that the domain in your From header matches the domain that SPF and DKIM authenticate. If you use a subdomain for sending, make sure your DMARC policy and DNS records account for it.
How Healthy Is Your Sender and Domain Reputation?
Sender reputation is the running trust score mailbox providers assign your domain and IP based on how recipients react to your mail. Strong authentication gets you in the door; reputation decides whether you stay there.
These five checks tell you how the major mailbox providers currently see you and whether you are on any blocklists.
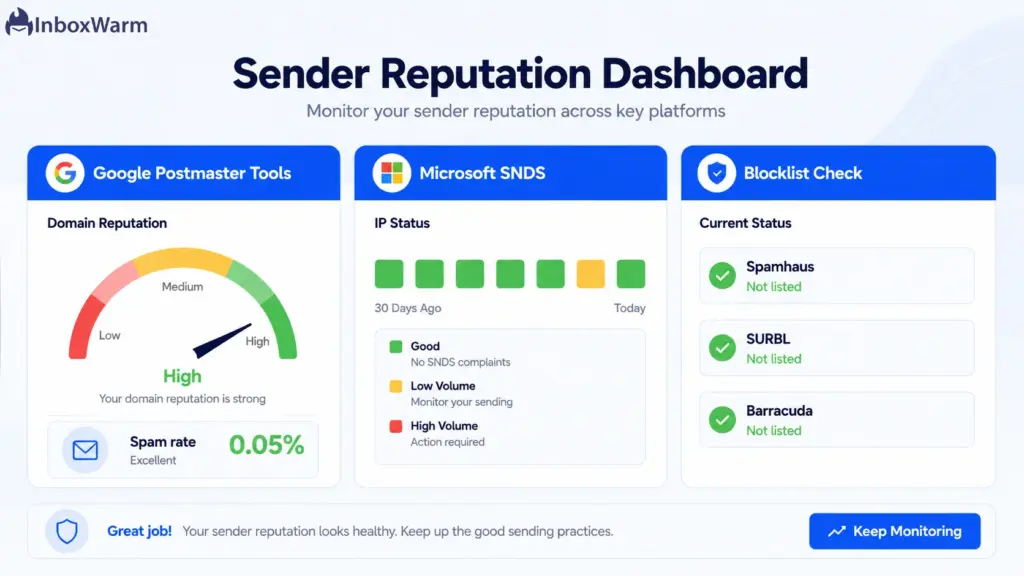
6. Check Your Domain Reputation
Domain reputation is the trust score tied to your sending domain, and it follows you even if you change IPs. To check domain reputation, open Google Postmaster Tools, where Gmail rates your domain as High, Medium, Low, or Bad. A Low or Bad rating means a meaningful share of your Gmail mail is already being filtered. Treat anything below High as a problem to investigate, not background noise.
7. Check Your IP Reputation
IP reputation is the trust score tied to the IP address you send from. On a dedicated IP, your own behavior drives it. On a shared IP, your neighbors affect it too. If you are on a shared pool and your reputation is poor despite clean sending, a noisy neighbor may be the cause, and a dedicated IP (properly warmed) may be the fix. Check IP reputation in Google Postmaster Tools and reputation lookup tools from your ESP.
8. Set Up Google Postmaster Tools
Google Postmaster Tools is the free dashboard that reports your Gmail spam rate, domain and IP reputation, authentication pass rates, and a compliance status against Google’s sender requirements. If it is not set up, set it up now; you are flying blind to the largest consumer mailbox provider without it.
Note that the spam rate dashboard only populates once you send to enough Gmail users for the data to be statistically significant, so low-volume senders may see gaps.
9. Monitor Microsoft SNDS
Microsoft SNDS (Smart Network Data Services) is the Outlook and Hotmail equivalent of Postmaster Tools. It is IP based, so you register the IPs you send from and it reports complaint rates, filter results, and trap hits, color coded so problems are easy to spot.
If you send any meaningful volume to Outlook, Hotmail, or Live addresses, monitor SNDS alongside Postmaster Tools so you are not optimizing for Gmail while quietly failing at Microsoft.
10. Scan Major Blacklists and Blocklists
A blacklist (also called a blocklist) is a published list of domains or IPs flagged for spammy behavior, and being listed can sink delivery across many providers at once. Check your sending domain and IP against the major lists, Spamhaus chief among them.
If you are listed, identify the cause (a spam trap hit, a sudden volume spike, or a compromised account) before you request delisting, because a delist without a fix only resets the clock.
Is Your List Clean Enough To Send?
Your list is the single biggest driver of bounce rate and spam complaints, and both feed straight into your reputation. Mailbox providers read a dirty list as a sign you do not have permission to mail your recipients.
These four checks confirm your list is safe to send to before you hit go.
11. Measure Your Bounce Rate
Bounce rate is the percentage of sent emails the receiving server rejects. The widely accepted benchmark is to keep total bounces under 2%, with under 1% considered excellent, and Google flags persistently high hard bounce rates as grounds for throttling or blocking.
Split hard bounces (permanent failures from invalid addresses) from soft bounces (temporary issues like a full mailbox). Remove every hard bounce immediately; they should never be emailed again.
| Bounce Rate | Status | Action |
|---|---|---|
| Under 1% | Excellent | Scale with normal hygiene |
| 1% to 2% | Acceptable | Monitor; tighten verification |
| 2% to 5% | Concerning | Pause and clean the list |
| Over 5% | Dangerous | Stop sending; full re-verification |
Bounce rate benchmarks compiled from industry deliverability reports, 2026. Treat 2% as a fire-drill threshold, not a steady state.
12. Run List Hygiene and Verification
List hygiene is the ongoing practice of removing invalid, risky, and unengaged addresses so you only send to real, reachable people. B2B contact data decays at roughly 22% to 25% a year as people change jobs, so a list that was clean 18 months ago is not clean now. Run your list through an email verification tool before any large send, add real-time verification at signup, and re-verify at least quarterly. Verifying before sending can cut bounce rates dramatically.
13. Track Your Spam Complaint Rate
The spam complaint rate is the percentage of delivered emails recipients mark as spam, and it is the metric Gmail watches most closely. Google requires bulk senders to keep their user-reported spam rate below 0.3% and recommends staying under 0.1%; cross the 0.3% line and you lose access to Gmail’s mitigation support until you stay below it for seven consecutive days. Watch this number in Postmaster Tools. A rising spam rate usually means a permission, relevance, or frequency problem, not a content one.
14. Audit Your Unsubscribe Process
A hard-to-find unsubscribe link pushes frustrated recipients to hit the spam button instead, which is far more damaging than an opt-out. Google and Yahoo require one-click unsubscribe in marketing messages, processed within two days. Confirm your unsubscribe link is visible, works in one click, and removes the recipient promptly. A healthy unsubscribe rate is a release valve that protects your spam complaint rate, so do not hide it.
Does Your Content Earn Engagement?
Once authentication and reputation are sound, engagement becomes the deciding factor. Mailbox providers reward mail that recipients open, read, and reply to, and they filter mail that gets ignored or deleted unread.
These three checks make sure your content helps rather than hurts inbox placement.
15. Review Your Engagement Rate
Engagement rate covers opens, clicks, and (for cold email) replies, and it is one of the strongest positive signals you can send. Providers like Gmail watch whether recipients interact with your mail and adjust placement accordingly. Segment out chronically unengaged contacts who have not opened in months; continuing to mail them drags down your engagement signals and your reputation. Sending less to people who care beats sending more to people who do not.
16. Check Content for Spam Triggers
Content rarely sends you to spam on its own, but it can tip a borderline reputation over the edge. Avoid the obvious triggers: all-caps subject lines, walls of spam-flagged phrases, misleading subjects, and link shorteners that hide your destination. Run a message through an email deliverability test or spam-score checker before a big send to catch problems early. Write like a person emailing a person, because that is what filters are trained to reward.
17. Balance Text, Images, and Links

Is Your Sending Infrastructure Ready?
The final group covers the foundation underneath every send: whether your domain is warmed, whether your volume is consistent, and whether you have verified where your mail actually lands. Skip these, and even a perfect list and clean content can still miss the inbox. This group matters most for cold email and any new domain.
18. Confirm Your Domain Is Warmed Up
Email warm-up is the process of gradually increasing sending volume from a new domain or IP while generating positive engagement, so mailbox providers learn to trust you before you send at full scale. A brand-new domain that blasts hundreds of cold emails on day one will land in spam, full stop.
Confirm your domain has been through email warm-up before any real campaign. InboxWarm.ai is an AI-powered email warm-up tool that improves inbox placement and sender reputation by building that trust automatically across providers like Gmail and Outlook.
19. Keep Sending Volume Consistent
Erratic sending looks suspicious. A domain that sends 50 emails one week and 5,000 the next reads as a spam pattern to filters. Ramp volume gradually, keep your daily and weekly sends in a predictable range, and avoid sudden spikes around launches. If you need to scale, increase volume in steady steps over days, not all at once. Consistency is itself a trust signal.
20. Run a Seed Test and Monitor Inbox Placement
Seed testing sends your campaign to a set of test inboxes (called seed accounts) spread across Gmail, Outlook, Yahoo, and others, then reports where each message landed: inbox, spam, or a secondary tab.
This is how you measure your real inbox rate and spam rate by provider before a campaign goes out, rather than guessing. Run a seed test ahead of major sends, and set up ongoing email deliverability monitoring so a placement drop triggers an alert instead of a surprise.
Unfamiliar with a term here? The glossary defines every metric in this checklist.
How Often Should You Run a Deliverability Audit?
Run a full email deliverability audit at least quarterly, and run it monthly if you send high volume or rely on cold email. Treat the authentication and reputation checks as a recurring email health check rather than a one-time setup, because DNS changes, list decay, and provider policy updates all move the goalposts over time.
Between full audits, set up continuous email deliverability monitoring on the signals that move fastest: spam complaint rate, bounce rate, domain reputation, and inbox placement from seed tests. The goal is to catch a problem while it is a yellow flag in a dashboard, not after a campaign has already cratered. The senders who keep their mail in the inbox are the ones who check before they are forced to.
Conclusion
Most deliverability problems are not mysteries. They are one of these 20 checks quietly failing. When you run a structured email deliverability audit, you stop guessing why your emails went to spam and start seeing exactly which signal broke: a misaligned DMARC record, a bounce rate creeping past 2%, a domain that was never warmed, or a spam rate drifting toward Google’s 0.3% ceiling.
Work the checklist in order. Fix authentication first, because nothing else matters if SPF, DKIM, and DMARC are broken. Then clean your reputation, tighten your list, sharpen your content, and confirm your infrastructure is ready. Each item you fix compounds, and together they are how you improve inbox placement instead of fighting the spam folder one campaign at a time.
The single highest-leverage item for new domains and cold email senders is warm-up. A trusted domain forgives small mistakes; an unwarmed one punishes everything. Get that foundation right, keep this audit on a monthly cadence, and inbox placement stops being luck and starts being a process you control.
Inbox placement shouldn’t be left to luck.
InboxWarm.ai automates email warm-up to strengthen your reputation across every major provider, turning deliverability into something you control
Frequently Asked Questions
Why are my emails going to spam?
The most common causes are broken or missing authentication, a poor sender reputation, a dirty list driving high bounces or spam complaints, or sending from a domain that was never warmed up. Run the audit to isolate which one applies to you. Cold email going to spam is most often an unwarmed domain combined with an unverified list.
How do I check my domain reputation?
Open Google Postmaster Tools after verifying your domain, where Gmail rates it as High, Medium, Low, or Bad based on your recent sending. For Outlook and Hotmail, register your IPs in Microsoft SNDS. Anything below a High rating in Postmaster Tools is worth investigating before your next campaign.
What is a good bounce rate for email?
Keep your total bounce rate under 2%, with under 1% considered excellent. Rates between 2% and 5% signal list quality problems, and anything above 5% can damage your reputation and trigger blocklisting. Remove hard bounces immediately and re-verify your list before large sends.
What spam complaint rate is too high?
Google requires bulk senders to keep their user reported spam rate below 0.3% and recommends staying under 0.1%. Crossing 0.3% makes you ineligible for Gmail's delivery mitigation until you stay below it for seven consecutive days. Monitor this number in Google Postmaster Tools.
How do I test email deliverability before a campaign?
Run a seed test, which sends your message to test inboxes across Gmail, Outlook, Yahoo, and others and reports where each one landed. Pair it with a spam-score check on your content. Together they show your inbox rate and flag content issues before the campaign reaches real recipients.
How is a deliverability audit different from a deliverability test?
A test tells you where one message landed right now. An audit is a structured review of every signal across your whole sending setup, with a pass or fail on each item and a fix list. Run a test often; run a full audit monthly or quarterly.
Does email warm-up actually improve inbox placement?
Yes, especially for new domains and cold email. Warm-up gradually builds positive sending history so mailbox providers trust your domain before you send at scale. Skipping it is the most common reason a technically perfect campaign still lands in spam.