TL;DR
To set up an SPF record in Google Workspace, add a single DNS TXT record at your domain host with the value v=spf1 include:_spf.google.com ~all. This authorizes Google’s mail servers to send email for your domain. Save the record, wait up to 48 hours for DNS propagation, then verify it with a lookup tool.
- Google’s official SPF value for Workspace-only sending is
v=spf1 include:_spf.google.com ~all. - One SPF record per domain. Multiple SPF records cause a PermError and break authentication.
- Stay under 10 DNS lookups. Google’s include alone uses 3 to 4 of them.
- SPF is added in DNS, not the Admin console, and works best paired with DKIM and DMARC.
A single line of missing DNS text is enough to send your Google Workspace email straight to spam. The message can be perfect, the offer relevant, and the timing right, and it still gets filtered because receiving servers never confirmed you were allowed to send it.
That confirmation is what an SPF record provides, and most domains that struggle with deliverability are missing it or have it set up wrong.
SPF is the first of the three authentication checks every modern inbox runs, and getting it wrong is one of the most common reasons legitimate Google Workspace mail underperforms. Since February 2024, Google has required every sender to set up SPF or DKIM and bulk senders to run all three protocols, with enforcement tightening into permanent rejections in late 2025.
Skipping it is no longer a small oversight; it is a deliverability tax you pay on every campaign.
The good news is that SPF for Google Workspace is one line of text. This guide walks you through what the record is, the exact value Google publishes, and how to add and verify it at any DNS host. To skip ahead and build one now, the SPF generator creates a valid record in seconds.
Table of Contents
Why Is SPF Important for Google Workspace?
SPF matters for Google Workspace because it is how receiving servers confirm that mail claiming to come from your domain actually originated from Google’s infrastructure. Sender Policy Framework (SPF) is a DNS TXT record that lists the servers authorized to send email for your domain. When a message arrives, the receiving server reads that list and decides whether to trust the source. No record, or a broken one, and your legitimate mail looks no different from a spoof.
The following are the reasons why setting an SPF record is essential in your google workspace:
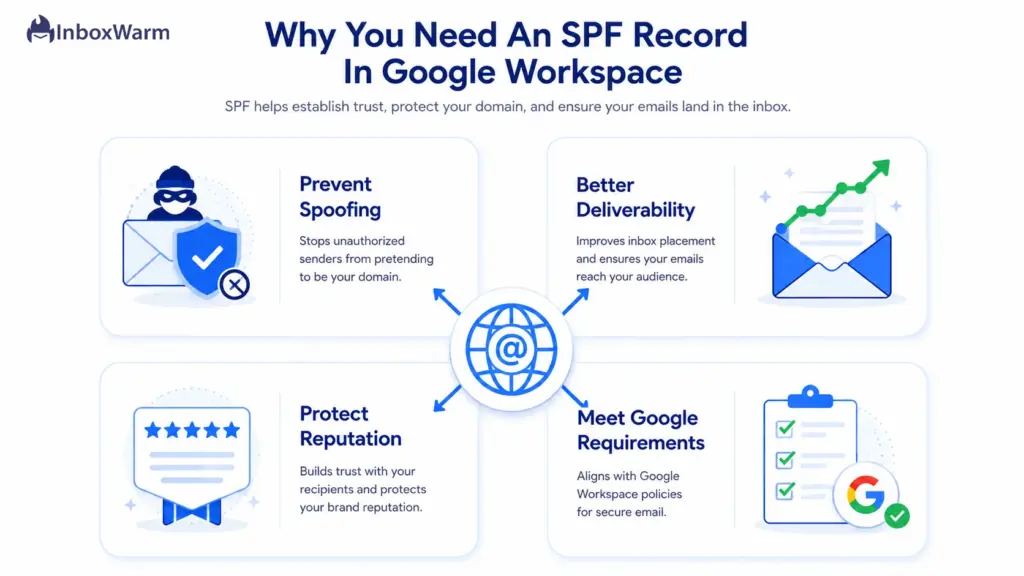
Prevent Email Spoofing
Spoofing is when an attacker forges your domain in the From address to send phishing or scam emails that appear to come from you. SPF makes this harder. By publishing the exact list of servers allowed to send on your behalf, you give receiving servers a way to reject mail from any source you have not approved.
SPF does not stop every attack on its own, but it removes the easiest path an impersonator has to abuse your domain.
Improve Email Deliverability
Authenticated mail lands in the inbox more often than unauthenticated mail. When your SPF record passes, you signal to Gmail and other providers that you are a known, accountable sender, which feeds directly into how they score and route your messages.
Domains that fail SPF see more soft-failed and quarantined mail, especially on cold or new domains that have no sending history to fall back on.
Protect Your Domain Reputation
Your domain reputation is the trust score inboxes assign to your sending domain over time, and authentication failures drag it down. Every spoofed message that slips through using your domain, and every legitimate message that fails a check, teaches filters to trust you less. A clean SPF record protects that reputation by keeping unauthorized senders off your domain and keeping your real mail authenticated.
If you are starting from a cold domain, pairing authentication with a structured Gmail warm-up builds that trust faster.
Meet Google’s Email Authentication Requirements
Authentication is no longer optional. Per Google’s email sender guidelines, every sender to Gmail accounts must set up SPF or DKIM, and senders of more than 5,000 messages per day to personal Gmail accounts must set up SPF, DKIM, and DMARC together.
Google began enforcing these rules on February 1, 2024, and in November 2025 escalated enforcement so that non-compliant mail faces temporary and permanent rejections. SPF is the foundation that the requirement is built on.
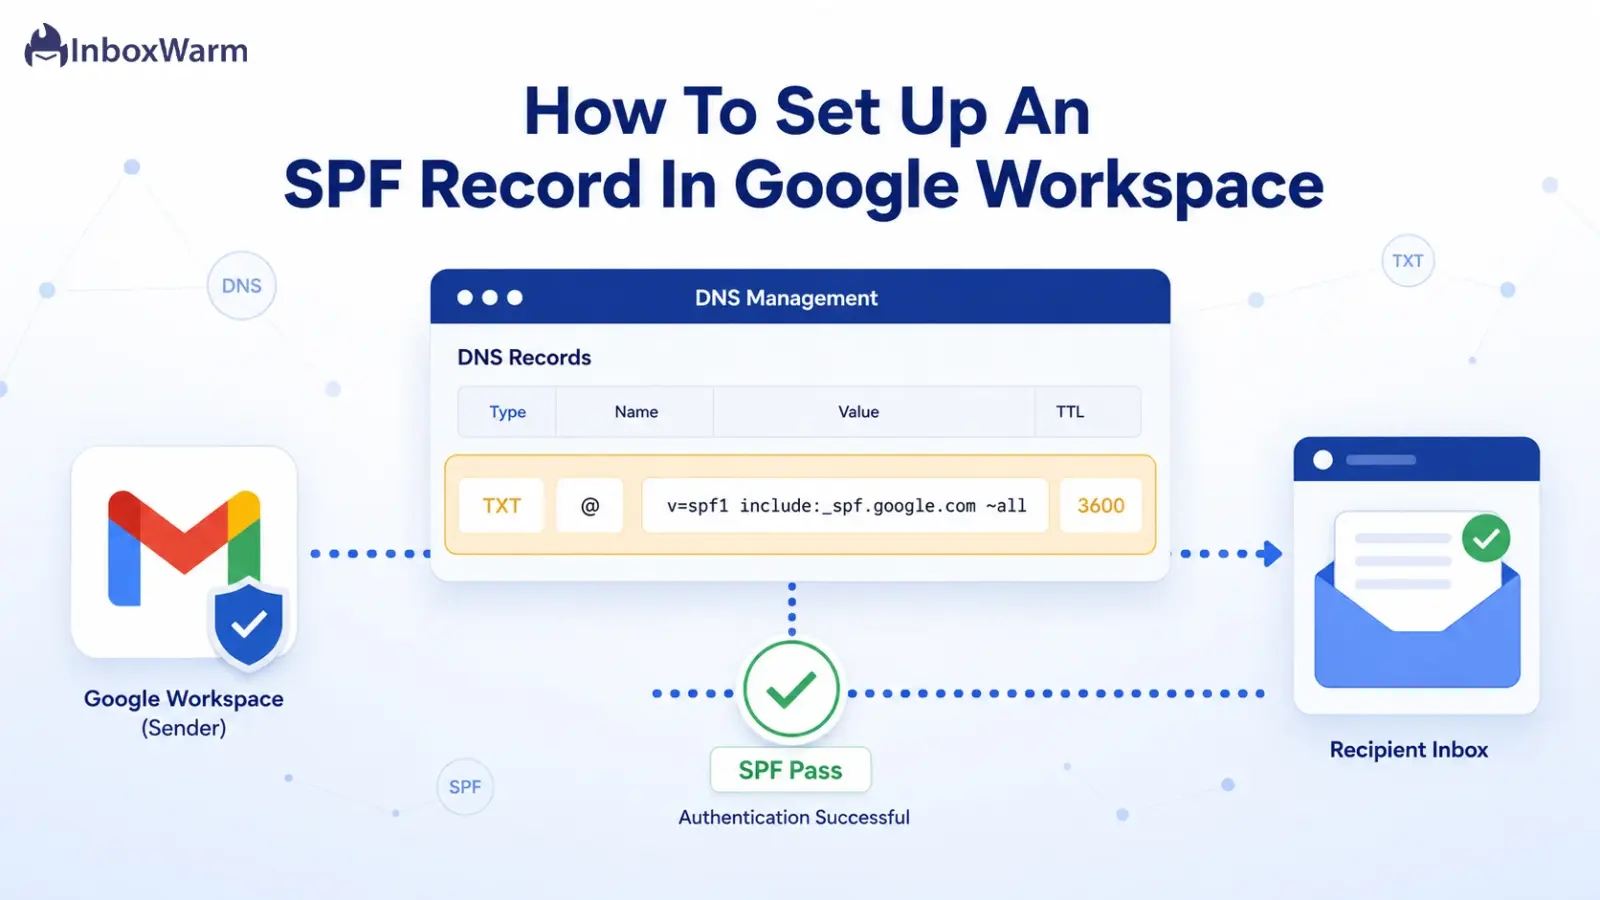
Google Workspace SPF Record: The Official SPF Value
Google publishes one recommended SPF value for domains that send only through Google Workspace. According to Google’s official Set up SPF documentation, that value is shown below. It is the exact string to publish as a TXT record, with no quotes, brackets, or extra spacing added.
Recommended SPF Record For Google Workspace
If Google Workspace is the only service sending email from your domain, use this record:
v=spf1 include:_spf.google.com ~all
That single include:_spf.google.com statement authorizes all of Google’s mail servers at once. Google maintains its sending IPs behind that one include and updates them automatically, which is why you should never hardcode Google’s IP addresses or try to flatten this record yourself.
If you send through additional tools such as Mailchimp, SendGrid, or a CRM, you do not create a second record. You merge every sender into the same line, for example:
v=spf1 include:_spf.google.com include:sendgrid.net include:servers.mcsv.net ~all
Understanding The SPF Syntax
Each part of an SPF record does a specific job. Reading the value left to right, here is what every mechanism means:
| SPF Element | What It Means |
|---|---|
| v=spf1 | The version tag. Every SPF record must start with this. It tells receivers the record uses SPF version 1. |
| include:_spf.google.com | Authorizes Google Workspace mail servers to send for your domain. The include pulls in Google's own SPF record, which lists its sending IP ranges. |
| ~all | The softfail qualifier. Mail from any server not listed is accepted but marked suspicious (usually routed to spam) rather than rejected outright. |
| -all | The hardfail qualifier. Mail from unlisted servers is rejected. Stronger, but risky if you forget to include a legitimate sender. |
| +all | Never use this. It tells receivers to accept mail from any server, which defeats the entire purpose of SPF. |
Google’s recommended record uses ~all (softfail), not -all (hardfail). Softfail is the safer starting point: it gives you authentication without risking the loss of mail from a sending service you forgot to list. Once DMARC reporting confirms every legitimate sender is included, you can graduate to all for stricter protection.
What Do You Need Before Setting Up an SPF Record?
Three quick checks save you from the most common setup failures. SPF lives in your DNS, not in the Google Admin console, so before you touch anything you need access to your DNS host, a clear view of any record that already exists, and a backup of your current settings.
Spend five minutes here, and the actual setup takes one.
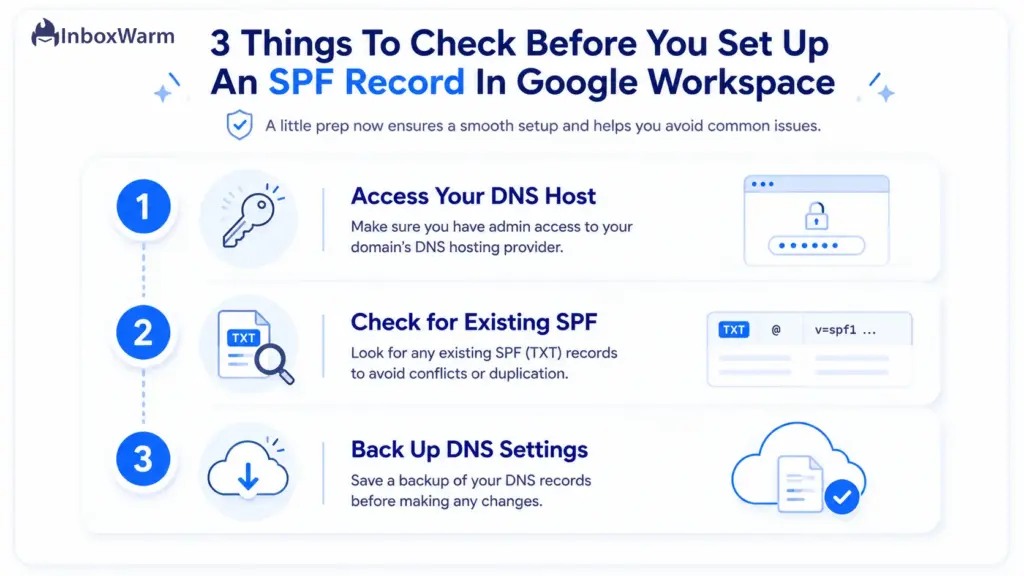
Access Your DNS Provider
SPF is published by whoever manages your domain’s DNS, which is usually your domain registrar or a service like GoDaddy, Cloudflare, Namecheap, or Squarespace. Confirm you have admin login to that account, not just to Google Workspace. If your DNS is managed by an agency or IT contractor, line up the access now so you are not blocked mid-setup.
Check For Existing SPF Records
A domain can have only one SPF record, so before adding anything, check whether one already exists. Look in your DNS for any TXT record that begins with v=spf1. You can confirm in seconds with the SPF checker. If a record exists, you will edit it to add Google rather than create a new one. Two SPF records on the same domain cause a PermError, and authentication fails for all of your mail.
Back Up Current DNS Settings
Before you change any record, copy your existing DNS entries somewhere safe, including the current SPF value if there is one. A screenshot or a quick text export is enough. DNS edits are easy to reverse only if you know exactly what was there before, and this small step turns a stressful mistake into a one-click rollback.
How To Set Up An SPF Record In Google Workspace
Setting up SPF takes seven steps, and only one of them involves typing the record itself. The process is the same across DNS hosts even though the menus are named differently.
Follow these in order, then move straight to verification so you are not waiting on guesswork.
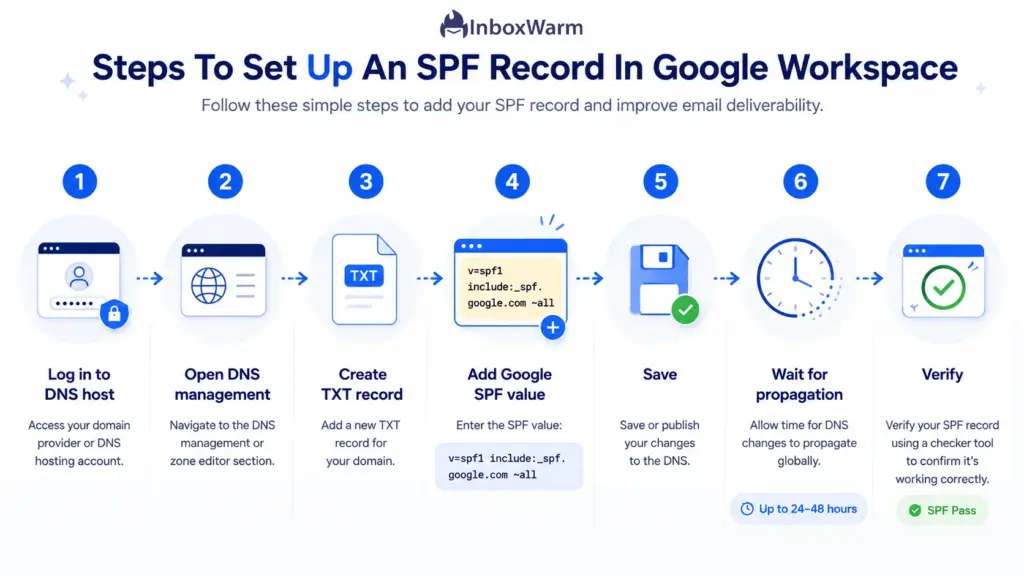
Step 1: Log In To Your DNS Host
Sign in to the account that manages your domain’s DNS. This is your registrar or DNS provider, not the Google Admin console. If you are unsure who hosts your DNS, an SPF or MX lookup on your domain will usually reveal the provider, or check where your domain was registered.
Step 2: Open DNS Management
Find the DNS settings area. Depending on the provider, it may be labeled DNS Management, DNS Zone Editor, Advanced DNS, or Manage DNS. This is the screen that lists all your existing records: A, MX, CNAME, and TXT. You will be working in the TXT section.
Step 3: Create A TXT Record
Add a new record and set its type to TXT. For the host or name field, enter @ to apply the record to your root domain (some providers want the domain itself or a blank field instead). If you send mail from a subdomain, you must add a separate SPF record for that subdomain.
Step 4: Add Google’s SPF Record
In the value or content field, paste Google’s recommended record exactly:
v=spf1 include:_spf.google.com ~all
If you send through other services too, merge them into this one line instead of pasting a second record. Do not add surrounding quotation marks unless your provider explicitly requires them, and watch for autocorrect turning straight quotes or hyphens into stylized characters, which breaks the syntax.
Step 5: Save Changes
Save or apply the record. Most providers confirm with a success message and show the new TXT entry in your records list. Double-check the saved value character for character against the line above, since a single missing space or stray character will cause SPF to fail.
Step 6: Wait For DNS Propagation
DNS changes are not instant. Google notes that SPF authentication can take up to 48 hours to start working, although many providers propagate within a few hours. Avoid making further edits during this window unless you spot an obvious error, since repeated changes only reset the clock.
Step 7: Verify The SPF Record
Once propagation is complete, confirm the record is live and valid. Run your domain through the SPF checker or send a test email to a Gmail address and inspect the headers for spf=pass.
The next section covers verification tools in detail.
How To Verify Your Google Workspace SPF Record
Verifying your SPF record confirms three things: that it is published, that the syntax is valid, and that it stays within the 10-lookup limit. You have three reliable ways to check, from a no-install web tool to a terminal command.
Use at least one before you trust your setup.
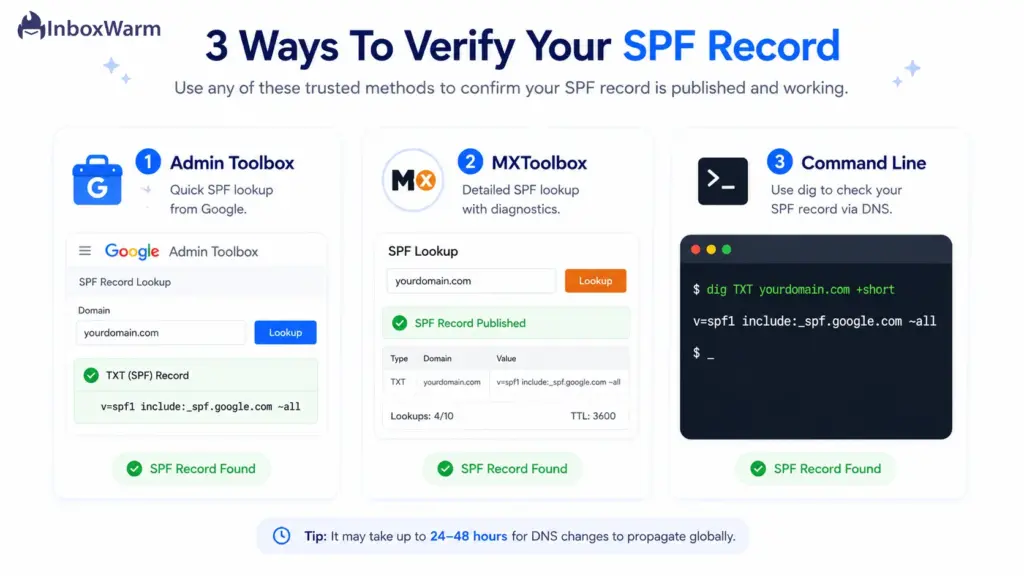
Google Admin Toolbox
Google’s own Admin Toolbox Dig tool lets you query your domain’s DNS records directly from the source. Enter your domain, select the TXT record type, and read the returned SPF string. Because it comes from Google, it is a dependable check that Workspace can see your record as published.
MXToolbox
MXToolbox SPF Lookup is the most widely used verification tool. It does more than display the record: it validates the syntax, counts your DNS lookups against the limit of 10, and flags issues like multiple SPF records or deprecated mechanisms. The pass or fail summary at the top tells you instantly whether the record is healthy.
Command Line Methods
If you prefer the terminal, you can query SPF directly. On macOS or Linux, use dig; on Windows, use nslookup:
# macOS / Linux
dig TXT yourdomain.com +short
# Windows
nslookup -type=TXT yourdomain.com
Both commands return your domain’s TXT records. Look for the line starting with v=spf1 and confirm it matches what you published. The command line shows the raw record with no interpretation, which makes it the fastest way to spot a typo.
Common SPF Setup Mistakes You Should Avoid
Most SPF problems trace back to four mistakes, and all four are avoidable. SPF is strict about format and structure, so a record that looks fine at a glance can still fail silently.
Watch for these before and after you publish.
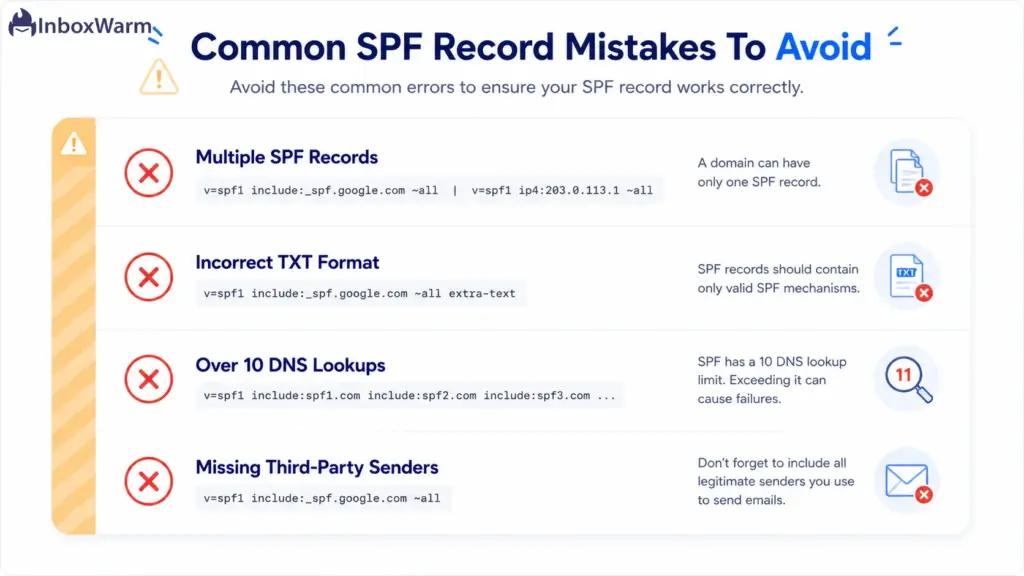
Multiple SPF Records
A domain can have only one SPF record. Publishing two TXT records that both start with v=spf1 causes a PermError, and receivers may stop evaluating SPF entirely. This usually happens when someone adds a new sender as a separate record instead of merging it. The fix is always to consolidate every sender into one line.
Incorrect TXT Record Format
SPF syntax is unforgiving. Extra spaces (v = spf1 instead of v=spf1), a missing colon (include _spf.google.com), or smart quotes pasted from a document will all break the record. Type or paste the value as plain text and verify it after saving.
SPF Lookup Limit Errors
SPF allows a maximum of 10 DNS lookups per evaluation, a hard limit defined in RFC 7208. Each inclusion counts toward it, and Google’s include alone uses roughly 3 to 4 lookups because it nests its own records. Stack a few more services, and you exceed 10, which triggers a PermError and fails SPF. If you are close to the limit, audit your includes and remove any sender you no longer use.
Missing Third-Party Sending Services
If a tool sends email for your domain and is not in your SPF record, its mail can fail authentication and land in spam. Marketing platforms, help desks, CRMs, and invoicing tools all send on your behalf. Every time you add a new sending service, add its include to your existing SPF record, then re-verify.
Troubleshooting SPF Issues In Google Workspace
When SPF is not working, the symptom usually points to the cause. Here are the four issues you are most likely to hit and how to resolve each one.
SPF Validation Failed
If a checker reports SPF as failed, start with the basics: confirm the record exists, begins with v=spf1, and contains include:_spf.google.com. A missing Google include is the most common cause, because without it Workspace servers are not authorized. Also confirm only one SPF record exists and that propagation has finished.
Emails Going To Spam
If SPF passes but mail still lands in spam, SPF is rarely the whole story. Check that DKIM is configured and signing your outbound mail, since DKIM survives forwarding where SPF does not, and confirm your DMARC alignment. Persistent spam placement on a healthy record usually points to sender reputation or content, not authentication.
SPF SoftFail Errors
A softfail (~all) result means a message came from a server not listed in your record. This is expected behavior for the ~all qualifier, but if your own legitimate mail is softfailing, a sending service is missing from your record. Identify the sender from your DMARC reports and add its include.
SPF PermError Issues
A PermError is a permanent error, and it means your record is structurally broken. The two usual causes are multiple SPF records on the domain and exceeding the 10-lookup limit. Both stop SPF evaluation completely. Consolidate to a single record and trim your includes until you are back under 10 lookups.
Do You Need DKIM and DMARC With SPF for Google Workspace?
SPF, DKIM, and DMARC are three layers of the same defense, and Google’s bulk sender rules expect all three. SPF verifies the sending server, DKIM verifies the message content with a cryptographic signature, and DMARC ties the two together and tells receivers what to do when a check fails. You need all three for full protection.
Here is how they compare:
| Protocol | What It Checks | How It Works | Survives Forwarding? |
|---|---|---|---|
| SPF | Which servers may send for your domain | DNS TXT record listing authorized sending sources | No |
| DKIM | That the message was not altered in transit | Cryptographic signature verified against a public key in DNS | Yes |
| DMARC | Alignment of SPF/DKIM with the From domain | Policy that instructs receivers to none, quarantine, or reject | Policy layer |
Set them up in order: SPF first, then DKIM, then DMARC once both are passing. You can build the policy records with the DKIM checker and the DMARC generator and confirm enforcement with the DMARC checker. For a deeper breakdown of each protocol, the email authentication guide defines the terms in one place.
What Are the Best Practices for SPF in Google Workspace?
A correct SPF record is not a set-and-forget task. It needs light maintenance as your sending setup changes. These four practices keep it healthy over time.
Maintain A Single SPF Record
Always keep one SPF record per domain. When you add a sender, merge its include into the existing line rather than publishing a new record. This is the single most important rule, because duplicate records are the fastest way to break authentication for your entire domain.
Keep Third-Party Senders Updated
Audit your includes whenever you add or remove an email tool. A new marketing platform needs to be added; a tool you stopped using should be removed to free up DNS lookups. An out-of-date record either fails new senders or wastes part of your 10-lookup budget on services you no longer touch.
Monitor Authentication Results
Publish a DMARC record, even at p=none, so you receive aggregate reports showing exactly which sources are sending mail as your domain and whether they pass SPF. This is how you catch a missing sender or an unauthorized one before it costs you deliverability. Monitoring turns SPF from a guess into a measured system.
Review DNS Records Regularly
Schedule a quarterly review of your SPF, DKIM, and DMARC records. Sending infrastructure drifts: vendors change their includes, teams adopt new tools, and old records linger. A short recurring check keeps your authentication aligned with how you actually send mail today.
Frequently Asked Questions
Where do I add the SPF record, in Google Admin or in DNS?
You add SPF in your domain's DNS, not in the Google Admin console. Log in to your DNS host or registrar, open DNS management, and create a TXT record with the SPF value. Google Workspace reads the published record from DNS; it does not store it for you.
How long does it take for a Google Workspace SPF record to work?
DNS changes can take up to 48 hours to fully propagate, though many providers update within a few hours. Google specifically notes that SPF authentication may take up to 48 hours to start working. Wait for propagation before testing, and avoid making repeated edits during that window.
Can I have more than one SPF record on my domain?
No. A domain can have only one SPF record. Publishing two records that both start with v=spf1 causes a PermError and breaks SPF evaluation. When you add a new sending service, merge its include into your existing SPF record on the same line.
How do I verify my Google Workspace SPF record is working?
Use a lookup tool or the command line. Run your domain through the SPF checker or MXToolbox to validate syntax and lookup count, query it with dig or nslookup, or send a test email to Gmail and check the headers for spf=pass. Any one of these confirms the record is live and valid.
What does ~all mean at the end of the SPF record?
The ~all is a softfail qualifier. It tells receiving servers to accept mail from servers not listed in your record but treat it as suspicious, usually routing it to spam. It is Google's recommended default because it authenticates your mail without risking rejection of a sender you may have forgotten to include. A stricter -all rejects unlisted mail outright.
Why is my SPF record failing even though it looks correct?
The two most common hidden causes are exceeding the 10 DNS lookup limit and having a second SPF record on the domain. Both produce a PermError that stops evaluation. Other culprits include a missing include:_spf.google.com, smart quotes from a copy-paste, or stray spaces. Verify with a tool that counts lookups, not just one that displays the record.
Do I still need DKIM and DMARC if I have SPF?
Yes. SPF only verifies the sending server and it breaks when mail is forwarded. DKIM adds a signature that survives forwarding, and DMARC ties both to your From domain and sets enforcement. Google requires bulk senders to run all three. Set up SPF first, then DKIM and DMARC.
Final Thoughts
Setting up an SPF record in Google Workspace comes down to one line of text in the right place. Publish v=spf1 include:_spf.google.com ~all as a single DNS TXT record, keep it to one record per domain, stay under 10 lookups, and verify it after propagation. That is the whole job, and it is the foundation every other deliverability gain is built on.
SPF is necessary, but it is not sufficient on its own. It verifies the server, not the message, and it does not survive forwarding. Pair it with DKIM and DMARC to meet Google’s requirements in full and to give your domain real protection against spoofing. Treat the three as one system, set them up in order, and monitor the results so a missing sender never quietly costs you the inbox.
Authentication gets your mail eligible for the inbox. What earns it a consistent place there is reputation, built through steady, engaged sending over time. Get your Google Workspace SPF record right today, then keep the trust signals strong, and your campaigns stop fighting the spam filter and start landing where they belong.
A clean SPF record authenticates you, but a cold domain still has no reputation.
InboxWarm.ai builds that track record automatically, ramping up your sending the way inboxes expect from a trusted sender. Start free for 10 days, no card required.